Table of Contents
Advertisement
Quick Links
Advertisement
Table of Contents

Summary of Contents for LABS AMPLIFI
- Page 1 USER GUIDE HOME WI-FI PERFECTED ™ AmpliFi Home Wi-Fi System ™...
-
Page 3: Table Of Contents
AmpliFi User Guide Table of Contents Table of Contents Chapter 1: Getting Started . . . . . . . . . . . . . . . . . . . . . . . . . . . . . . . . . . . . . . . . . . . . - Page 4 Table of Contents AmpliFi User Guide ULabs...
-
Page 5: Chapter 1: Getting Started
Download and install the AmpliFi app from the App Store or Google Play Store . ™ If you are not using the app to install the AmpliFi Router, please skip step 1 and proceed to step 2 . Launch the AmpliFi app . Connect the Power Adapter to the power port on the AmpliFi Router . - Page 6 AmpliFi Router . Non-App Users Perform the following steps: • Tap the touchscreen on the AmpliFi Router . Power on your broadband modem . • Use a computer or tablet to connect to the unique wireless network (SSID) displayed on the screen of your AmpliFi Router .
- Page 7 The app accesses one AmpliFi network at a time . If you want to access a different AmpliFi network, perform these steps: 1 . Tap Logout . 2 . The AmpliFi app will search for AmpliFi devices . 3 . Tap the appropriate Router . ULabs...
-
Page 8: Touchscreen Of The Router
• “IP Addresses” on page 4 WAN IP 10.0.2.192 • “Speed” on page 4 ROUTER IP 192.168.124.1 For configuration, refer to the AmpliFi app . Time and Date AMPLIFI WAN IP • Displays the public or Internet IP address of the 1137 Router . -
Page 9: Router Settings
The Settings screen for the Router offers a variety of The Devices screen displays the system dashboard . It configuration options . provides an overview of the AmpliFi Wi-Fi system including network status, number of connected clients, and active download/upload speeds . - Page 10 Chapter 2: Devices AmpliFi User Guide General Sound Effects The General screen for the Router allows you to access device settings . Tap to save your changes . System Sound • Enabled by default . The Router emits notification sounds when an action is complete (for example, when a setting is saved) .
- Page 11 AmpliFi User Guide Chapter 2: Devices Internet IP Address • Enter the Internet IP address of the Router . Network Mask • Enter the network or subnet mask of the The Internet screen for the Router allows you to access Router .
- Page 12 Chapter 2: Devices AmpliFi User Guide Guest SSID Name • The name of the guest wireless network is displayed . Tap to change it . • Password The password to the guest wireless network is displayed . Tap to change it .
- Page 13 AmpliFi User Guide Chapter 2: Devices DHCP Server • Advanced Select this option to customize the wireless settings for the 2 .4 GHz and 5 GHz radio bands . The DHCP Server screen allows you to access the DHCP settings, which determine how IP addresses are assigned in your network .
-
Page 14: Static Leases
Chapter 2: Devices AmpliFi User Guide To create a port forwarding rule, tap + . Static Leases Name Enter a descriptive name for this rule . IP Address Enter the LAN IP address that will receive the forwarded port traffic . -
Page 15: Firmware Update
. Note: Your Wi-Fi will be temporarily down while you update the AmpliFi devices . If you have significant network activity, such as a download or upload in progress, you can postpone the update until an appropriate time . -
Page 16: Mesh Point Settings
Chapter 2: Devices AmpliFi User Guide Mesh Point Settings Software Version • Displays the version number of the Mesh Point The General screen for the Mesh Point allows you to access software . device settings . Tap to save your changes . -
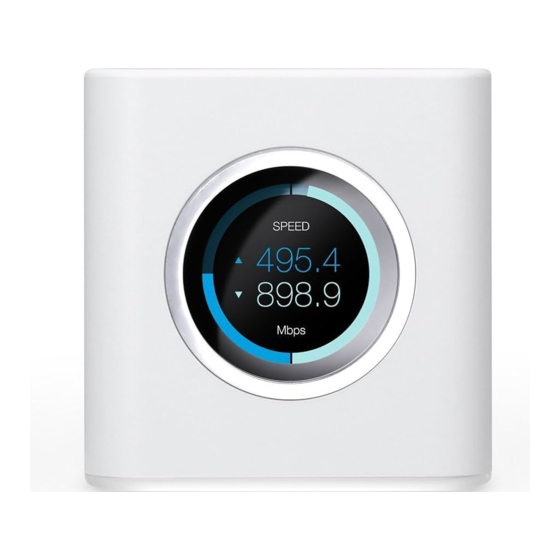
Page 17: Throughput
AmpliFi User Guide Chapter 3: Performance Chapter 3: Performance ISP Test You can run a speed test that will provide your download The Performance screen allows you to access the throughput speed, upload speed, and connection ping time . A history of statistics and run a speed test . - Page 18 Chapter 3: Performance AmpliFi User Guide ULabs...
-
Page 19: Quick Setup
AmpliFi User Guide Chapter 4: Guest Chapter 4: Guest Status and Settings The Guest screen allows you to quickly enable a guest wireless network for guest access . active/inactive Displays the status of the guest network . (number of) guests connected Displays how many guests are currently connected to the guest network . - Page 20 Chapter 4: Guest AmpliFi User Guide Stop Tap to disable the guest network . Settings Tap to access the wireless settings for more configuration options, including wireless security options . Go to “Wireless” on page 8 for details . ULabs...
-
Page 21: Client Details
AmpliFi User Guide Chapter 5: Clients Chapter 5: Clients Client Details The Client Details screen displays device and status The Clients screen displays the list of clients connected to information about the client device . the Router and Mesh Points . - Page 22 Chapter 5: Clients AmpliFi User Guide • Create static lease To map a static IP address to the client device, tap this option . Name The hostname of the client device is automatically displayed . If you want to change it, tap to edit the name .
-
Page 23: Chapter 6: Diagnose
AmpliFi User Guide Chapter 6: Diagnose Chapter 6: Diagnose The Diagnose screen will check your WAN link, IP settings, Internet connection, and Mesh Point status . indicates success . WAN Link The connection between the Router and modem is checked . If there is an issue, please refer to “My Internet is down;... - Page 24 Chapter 6: Diagnose AmpliFi User Guide ULabs...
-
Page 25: Getting Started
5 . Tap Start . Your guest network is now active . maximum setting or at the brightness level you choose in the AmpliFi app . The Mesh Points will be lit based on the How do I configure my Mesh Points? signal strength that they are receiving from the Router . -
Page 26: Troubleshooting
Google Fiber or Fios? do I do? Yes, you can use AmpliFi with a fiber service if you set up The Router features a smart LCD touchscreen display . the Router to use bridge mode . See the FAQ: “Will AmpliFi If the display becomes unresponsive or freezes in any way, support bridge mode?”... -
Page 27: Advanced Features
Wi-Fi signal operates . You can also view this data using the AmpliFi app on your smartphone or tablet . Perform these steps: Band and channel selection are important when you want to have the most efficient network possible . - Page 28 Tap the control to display or hide the To manage the DHCP server settings, perform these steps: SSID (name of the guest network) . 1 . Open the AmpliFi app . 6 . Tap to save your settings . 2 . Tap the picture of the Router .
-
Page 29: Appendix B: Contact Information
AmpliFi User Guide Appendix B: Contact Information Appendix B: Contact Corporate Headquarters Information U Labs 2580 Orchard Parkway San Jose, CA 95131 24/7 Live Chat Support www.amplifi.com Live chat support is available within the app, 24 hours a day, 7 days a week . Tap the icon in the upper left of the app and then tap Live Support . - Page 30 ©2016 Ubiquiti Networks, Inc . All rights reserved . Ubiquiti, Ubiquiti Networks, the Ubiquiti U logo, ULabs, the ULabs logo, AmpliFi, and Home Wi-Fi Perfected are trademarks or registered trademarks of Ubiquiti Networks, Inc . in the United States and in other countries . Apple, the Apple logo, and iPhone are trademarks of Apple Inc ., registered in the U .S .
Need help?
Do you have a question about the AMPLIFI and is the answer not in the manual?
Questions and answers