Table of Contents
Advertisement
Quick Links
Advertisement
Table of Contents

Summary of Contents for SpeedLeader DVX402
-
Page 1: User Manual
SHENZHEN SPEEDLEADER TECHNOLOGY User Manual DVX402 Seamless Switch... -
Page 2: Safety Instructions
About the Manual Without the written permission of the company, it is forbidden for any company or individual to imitate, copy, or transcribe part or all of the contents of the manual. It is not allowed to have the commodity publicity or achieve any commercial or profit-seeking purpose in any form (electronic form, mechanical form, photocopying form, recording form, or other possible ways). - Page 3 This symbol warns the user that there is the hazardous voltage exposed inside the equipment and there is an electric shock hazard. This equipment must be connected with ground wire. This equipment needs a rated power voltage. Ensure that the input voltage error should be between - 10% and +10%.
-
Page 4: Table Of Contents
Contents Overview ........................5 Application ........................6 Installation ........................7 Install DVX402 ..................... 7 Rear Panel......................8 Operation Interface ...................... 11 Menu System ........................ 15 Menu System Overview ..................15 Main Menu System ..................... 17 Automatic Menu ....................18 Input Menu ......................19 Output Menu ....................... - Page 5 Contrast………………………………………………………………………………..44 Save and Recall of the Preset ................45 Transfer of the Preset………………………………………………………..….…46 Logo capture and Transfer………………………………………………………..47 Logo or Black Field Transfer…………………………………………………..….50 Specifications…………………………………………………………………………..52 Page 4 of 55...
-
Page 6: Overview
3G-SDI (optional), and each channel can receive SD or HD video signals. DVX402 has 2-channel output, the main channel of which is the live program output, and the vice channel of which is preview output. Program and preview output interface has two DVI and one VGA, with the highest resolution up to 1920 x 1200 @ 60Hz or 2048 x 1152 @ 60Hz. -
Page 7: Application
Application Figure 1-1 shows a typical application of DVX402. DVX402 receives a variety of signal and resolution input, supporting the video input from the low resolution to high resolution as follows: VGA (XGA, WUXGA) DVI (Compatible HDMI 1.3) ... -
Page 8: Installation
Installation Install DVX402 The user can choose whether to install DVX402 to rack or flight case. DVX402 is a standard 2U chassis, with the size of 8.8cm (Height) x 44cm (Width) x 33.5CM (Depth). While installing, please avoid scratching the case and use cushion for fixing suspension loop. -
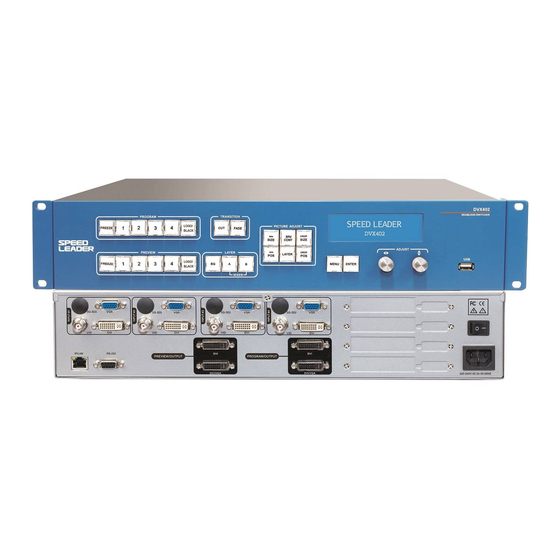
Page 9: Rear Panel
① # 1 ~ # 4 Channel Video Input It can receive a 4-channel video at the same time, and each channel can receive VGA, DVI, HDMI (DVI terminal), VID (CVBS) and SDI (optional). DVX402 offers a number Page 8 of 55... - Page 10 ② TCP / IP interface, using RJ-45 terminal, is reserved for the communication interface. ③ RS-232 interface, using DB9 terminal if it is connected by computer’s RS-232 or console, resolution adjustment, channel selection and seamless switch to DVX402 can be operated by it.
- Page 11 Figure 2-4 DVX402 Preview Output Interface ⑤ Program Video Output Interface The program output channel has two video output interface, using two DVI-I terminals, of which DVI / VGA interface can output DVI and VGA signal.
-
Page 12: Operation Interface
DVX402 provides a standard IEC power terminal with the input power of 100 ~ 240VAC, 50Hz or 60Hz, at the same time, the ground wire of the power supply must be grounded to avoid equipment damage or the electric shock to human body. - Page 13 These two groups of INPUT # 1~ # 4 are to choose input source and then output to the program or preview display. When the input channel is selected, the key will show yellow light. DVX402 will record every input video data, such as, layer position, size, brightness, crop mode.
- Page 14 Figure 3-2 DVX402 Front Panel: Layer Key Area There are three keys in LAYER key area, respectively BG key, A key and B key, with the corresponding switch BG layer, A layer and B layer. After selecting layer, signal switch, position adjustment, screen size adjustment and crop adjustment can be operated.
-
Page 15: Menu Operation
⑧ State Display DVX402 has a 240 x 64 LCD window indicating the current state of the switch, menu selection, data state and other system parameters, which will be described in detail next. ⑨ Menu Operation MENU-menu key: press the Menu key to enter the main menu system or return to the previous menu, whose function will be introduced in detail in the following parts. -
Page 16: Menu System
Menu System Menu System Overview DVX402 has a convenient menu system; Figure 4-1 shows the default display menu of DVX402 after electrifying. The user can observe the corresponding source and other important information of the current preview and program layers. - Page 17 Electrify Preview BG:#1 <DVI 1920x1080/60> A :#2 <VGA 1024x768/60> Speed Leader B:#3 <DVI 1280x720/60> DVX402 Program BG:#4 <DVI 1920x1080/60> A:#3 <DVI 1280x720/60> B:off Default Resolution 1920x1080/60 MENU Mix layer split Preview switch swap Fade time 1.5 s System Main Menu...
-
Page 18: Main Menu System
30 seconds. Main Menu System Press the MENU key in the default cycle, DVX402 will enter to the main menu system. Figure 4-2 is the first layer menu displayed on the LCD by main menu system. -
Page 19: Automatic Menu
AUTO The function of DVX402 Automatic Menu is to classify and replace the user’s data and resume one or more users’ parameters to the factory default state. Figure 4-3 expands the sub-menu and parameters that can be set in AUTO Menu. The AUTO Menu restores all the user data related to the window size, window position, and crop size and interception position. -
Page 20: Input Menu
Auto: after selecting reset parameters, choose the automation, and press ENTER to confirm the reset. Example: When the user selects preview, A & B, crop & window for resetting the parameter, DVX402 will reset crop and window data in the layer A and layer B automatically to the default state. INPUT DVX402 input menu mainly sets source, brightness, contrast, color and other parameters for each channel. - Page 21 ENTER key for reset d0d000255255 Figure 4-4 Input Menu Flowchart Input: DVX402 has four-channel input, and each channel owns“1、2、3、4” in the INPUT key area on the corresponding panel keystroke. Every channel has four-video input: DVI, VGA, VID, SDI. Source: it matches along with input channel. After selecting input channel (for example, # 3-channel is selected), the user should change input source and connect the channel with source.
-
Page 22: Output Menu
Output menu is to change the preview output and program output resolution. The user can browse in the menu and select the appropriate resolution as the output. Preview output and program output share the same resolution. The following is DVX402 output resolution list. -
Page 23: Special Effects Menu
Tip:: after revising the output resolution, window size, window position, crop size , crop position in DVX402 will reset to the default state. If the output resolution previously saved by the user in the pre-setting stage is different from the current output resolution, this presetting will be not sued. - Page 24 Preview switch: this submenu is to revise the display way of preview display when the preview image switches into the program output. When the preview switching mode is swap, if the user switches the preview screen to the program, the program on the screen will be showed on the preview display screen, as shown in Figure 4-6.
-
Page 25: Layer Menu
Figure 4-7 Preview Switching Mode: stay Fade time: it refers to the time length of resolute effect for switching preview picture into program. The user can press FADE key, and DVX402 will decide the transition time length of picture switching by fade time. - Page 26 LAYER Preview Border Mix Layer Split Modify On Program Separation Knob adjustment Knob adjustment Knob adjustment Turn on, turn off Turn on, turn off Turn on, turn off Figure 4-8 Layer Menu Flowchart Mix Layer Split: layer A and layer B is called superimposed layer, whose separation means whether layer A and layer B can be allowed to appear in the same screen (preview or program).
- Page 27 Tip: Close Mix Layer Split will avoid adding the same layer in the current program of the preview display, and totally avoid the impact that the background operation makes on program. Preview Program Figure 4-9 open Mix Layer Split, Three Layers in Program and Preview Page 26 of 55...
- Page 28 Preview display video wall Figure 4-10 Close Mix Layer Split, Less than 2 Layers in Program and Preview Modify On Program: refers to output window size and position, crop size and position and the input source of the program, which can change at your wishes. Open Modify On Program: when it is open, all the keys in PROGRAM information source key area can be used.
- Page 29 Preview Display Video Wall Figure 4-11 Open Modify On Program Preview Border, it is the rectangular frame of the layer edge, when the user selects and edits layers in the preview display, which can prompt the user the location and size of the current layer.
-
Page 30: Logo Menu
Using this menu, the user can select the saved logo、 capture and save the logo、 capture, and erase the logo. There are two LOGO / BLACK keys in the front panel key areas of DVX402, which are located in the PROGRAM and PREVIEW key area. LOGO... -
Page 31: Preview Menu
The preset of DVX402 can save and recall preview or program, including selection, layer size and position. No matter whether the saved preset is preview or program data, it can be transferred on the preview or program. -
Page 32: System Menu
Save: the user can save the current layer, the source, the image color and other parameters as the preset. ★ means there is the preset. ☆ indicates that there is no preset. Before saving, the user should select the target channel, the program or preset, and then choose one from group 1 to group 10, finally press ENTER to save it. -
Page 33: System Version
SYSTEM Knob adjustment, Chinese, English Language System version knob adjustment,Software x.x.x Hardware x.x.x VGA setup ENTER key for access Input knob adjustment,#1~4 Auto Adjust ENTER key for correction H position Knob adjustment V position Knob adjustment H clock Knob adjustment Knob adjustment Clock phase ENTER key for access... -
Page 34: Operation
Factory Reset-all the parameters can be resumed to the factory default. Operation For commonly used functions, such as DVX402 factory resetting, output resolution setting, input source selection, switching, layer operation, brightness and contrast adjustment and saving and recalling of the preset, logo capture and transferring will be introduced in detail in the following parts. -
Page 35: Output Resolution Setting
Steps: in the default cycle menu, first enter the factory reset menu in the system menu (shown in Figure 5-1), and then press ENTER to reset. Output Resolution Setting The program output and preview output of DVX402 share the same resolution, and see the following flowchart. ……... - Page 36 As shown in Figure 5-3, the input of the main menu, the user should select the input channels # 1 to # 4 which needs to be configured; and then to select the DVI, VGA, VID, SDI in the information source. System main Input Input...
-
Page 37: Switch
Seamless Switch The switch mode for DVX402 has tow kinds, one is CUT, and the other is FADE, the corresponding keys are FADE key and CUT key in TRANSITION key area. After editing the picture in the preview display, the user can switch the picture on the preview display to the program output by pressing CUT key or FADE key. -
Page 38: Layer Operation
There are tow ways for controlling switching mode: fade time and preview switching mode. Preview switching mode has two kinds: swap and stay. Fade time can be set from 0 to 5 seconds, as shown in the following chart. Preview switch System EFFECT Default cycle... -
Page 39: Deletelayer
The operation of adding layer is similar to the source selection, but different in the purpose. The user can add layer A or layer B, the BG layer is the default. ② ① Figure 5-7 Configure Input Source Operation Flowchart Steps: (1) Add the layer press key A or key B in LAYER key area, then there will be the border on the preview display. - Page 40 ① ② ③ Preview Mix Layer CL&PRI clean :N/A A&B priority:A Figure 5-8 Delete Layer and Modify Layer Priority Operation Flowchart Steps: ① Figure 5-8 shows the shortcut menu of entering the layer, first press any key (BG key, A key, B key) in the LAYER key area ②...
-
Page 41: Window Size And Position
Window Size and Position 1. Adjust Window Size ① ② ③ Preview Layer BG window H size: 1920 Vsize t: 1080 Figure 5-9 Adjust Window Size Operation Flowchart ① the mode of shortcut menu to the window size is first to press BG key, A key or B key in the LAYER key area, and the pressed key will show yellow light. - Page 42 program are opened, if the user presses the WIN SIZE key again, the user will switch preview channel or program channel. 2. Adjust Window Position ① ② ③ Preview Layer BG window H pos: V pos: Figure 5-10 Adjust Window Position Operation Flowchart Page 41 of 55...
-
Page 43: Crop Size And Position Of Picture
Steps: ① the mode of shortcut menu to the window size is first to press BG key, A key or B key in the LAYER key area, and the pressed key will show yellow light. ② Press WIN SIZE key in the PICTURE POS key area to enter into the window position for adjusting shortcut menu. - Page 44 Preview Layer BG Crop ③ H size: 1920<100%> V size: 1080<100%> Figure 5-11 Adjust Picture Crop Size Operation Flowchart Steps: ① the mode of shortcut menu to the window size is first to press BG key, A key or B key in the LAYER key area, and the pressed key will show yellow light.
-
Page 45: Contrast
Layer Brightness and Contrast ① ② ③ Preview Layer BG BRI/CONT brightness: contrast: Figure 5-13 Adjust Brightness and Contrast Operation Flowchart Steps: ① the mode of shortcut menu to the Brightness/Contrast is first to press BG key, A key or B key in the LAYER key area, and the pressed key will show yellow light. -
Page 46: Save And Recall Of The Preset
user presses the BRI/CONT key again, the user can switch preview channel and program channel. Save and Recall of the Preset 1. Save of the Preset System main Default cycle Preset Save menu ENTER MENU ENTER ☆1~9 Choose preview or program choose ☆1~10 Press ENTER key for saving Figure 5-14 Preset Saving Operation Flowchart... -
Page 47: Transfer Of The Preset
choose from 1 to 10, and save it by pressing ENTER key. After saving, the ☆ which the preset number corresponds will change into ★. Recall of the Preset There are two ways for recalling the preset, one is menu recall, and the other is shortcut key. -
Page 48: Logo Capture And Transfer
Tip: If the current output resolution is different from the preset resolution. LCD display of DVX402 will prompt the user that “Above setting changed”.And you cannot recall the preset. - Page 49 Logo capture is intercepted and saved from dynamic input video. DVX402 can store 3 groups of logo. Before saving the logo, the user can adjust the size and position of the logo interception and then save it in the logo menu.
- Page 50 (3) Adjust the crop size and position (CROP / SIZE key, CROP / POS key, knob, knob), for the detailed instructions, please refer to the crop size and position operation instruction. 2、Save the Logo System Default cycle main Logo OUTPUT menu MENU ENTER...
-
Page 51: Logo Or Black Field Transfer
Steps: Entering the capture menu, use the knob to select layer (including preview / BG, preview / A, preview / B, program / BG, program / A, and program / B), and then use knob to select any of a set of numbers from ☆ 1 to 3 in, finally press ENTER to save. Logo or Black Field Transfer Before transferring the logo or black field, the user should select the logo in the transfer menu, and then use LOGO / BLACK key for direct transfer. -
Page 52: Specifications
① Enter into the transfer menu of the logo menu, and use knob to select black field or ★ 1 to 3 logo. When selecting black field, LOGO / BLACK key corresponds to the black field, and when selecting ★ 1 to 3, the transferred is picture screen. ②... - Page 53 DVI input Number Connector DVI-I Standard DVI1.0,HDMI1.3 downward compatibility Resolution VESA Standard,PC to 1920x1200,HD to 1080p VGA video input Number Connector DB15 R、 G、 B、 Hsync、 Vsync:0 to1Vpp± 3dB (0.7V Video+0.3v Sync ) Standard 75 ohm black level:300mV Sync-tip:0V Resolution VESA Standard,PC to 1920x1200 VID video input Number...
- Page 54 3G-SDI optional Number Connector Standard SD-SDI,HD-SDI,3G-SDI 1080p 60/50/30/25/24/25(PsF)/24(PsF) 720p 60/50/25/24 Resolution 1080i 1035i 625/525 line PREVIEW Output Number 1 channel VGA,2 channel DVI Connector DVI-I(DVI/VGA interface can output DVI or VGA) VGA Standard:R、G、B、Hsync、Vsync:0 to1Vpp± 3dB (0.7V Video+0.3v Sync ) Standard 75 ohm black level:300mV Sync-tip:0V DVI Standard:DVI1.0 800×...
- Page 55 1366× 768@60Hz 2048× 1152@60Hz 1440× 900@60Hz 2560× 960@60Hz 1600× 1200@60Hz 1920× 1080@50Hz 1280× 720@50Hz PROGRAM output Number 1 channel VGA,2 channel DVI Connector DVI-I(DVI/VGA interface can output DVI or VGA) VGA Standard:R、G、B、Hsync、Vsync:0 to1Vpp± 3dB (0.7V Video+0.3v Sync ) Standard 75 ohm black level:300mV Sync-tip:0V DVI Standard:DVI1.0 800×...
- Page 56 GENERN Weight 4.0kg Dimensions 8.8cm(height)x44cm(width)x33.5cm(depth) 100VAC – 240VAC 50/60Hz Power supply Power 100W consumption Working -10° C~45° C Temperature Storage humidity 10%~90% Specification Subject to change without prior notice! Page 55 of 55...
Need help?
Do you have a question about the DVX402 and is the answer not in the manual?
Questions and answers