Samsung Galaxy Note Edge User Manual
Hide thumbs
Also See for Galaxy Note Edge:
- User manual (236 pages) ,
- Service manual (137 pages) ,
- Important information manual (62 pages)
Table of Contents
Advertisement
Quick Links
Download this manual
See also:
User Manual
Advertisement
Table of Contents

Related Manuals for Samsung Galaxy Note Edge


Summary of Contents for Samsung Galaxy Note Edge
-
Page 1: User Guide
User Guide (UG template version 15a) SPT_SM-N915P_UG_Eng_102315_FINAL... -
Page 2: Table Of Contents
Table of Contents Get Started ..............................Your Phone at a Glance ........................Set Up Your Phone ..........................Activate Your Phone ..........................Complete the Setup ..........................Set Up Voicemail ........................... Sprint Account Information and Help ....................Sprint Account Passwords ......................Manage Your Account ........................ - Page 3 Screen View Options ........................... Motions and Gestures ......................... Multi Window ..........................Enter Text ............................Text Input Methods ........................Google Voice Typing ........................Samsung Keyboard ........................Swype ............................Tips for Editing Text ........................Phone Calls ..............................Wi-Fi Calling ............................Make Phone Calls ..........................
- Page 4 Import and Export Contacts ........................ Accounts and Messaging ..........................Google Account ........................... Create a Google Account ......................Sign In to Your Google Account ....................Access Gmail ..........................Send a Gmail Message ....................... Read and Reply to Gmail Messages ..................Samsung Account ..........................iii...
- Page 5 Email ..............................Add an Email Account ......................... Add a Microsoft Exchange ActiveSync Account ................. Compose and Send Email ......................Reply To or Forward Email ......................Manage Your Email Inbox ......................Access Email Settings ........................ Delete an Email Account ......................Text and Multimedia Messaging ......................
- Page 6 Google Play Newsstand ........................Music Apps ............................Google Play Music ........................Music ............................NextRadio ........................... Samsung Milk Music ........................Spotify ............................Sprint Music Plus ........................Sprint Zone ............................Sprint TV & Movies ..........................1Weather ............................. eBay ..............................NASCAR Mobile ..........................
- Page 7 Open the Camera ........................Take a Picture ..........................Record Videos ..........................Review Pictures and Videos from the Camera ................Configure the Camera ....................... 100 Gallery ............................... 103 View Photos and Videos ......................104 Work with Photos ........................106 Share Photos and Videos ......................
- Page 8 My Files ............................. 121 Navigation ............................122 Google Maps ..........................122 Scout ............................122 Peel Smart Remote ........................... 122 S Health ............................123 S Note ............................... 125 S Voice .............................. 127 Scrapbook ............................128 Using the Smart Select and Image Clip Tools ................
- Page 9 International Roaming Status Messages ..................140 Contact Sprint for Assistance with International Service ..............142 Settings ..............................144 Using Settings ........................... 144 Access Settings ........................144 Search Settings ......................... 144 Settings Options ........................144 Wi-Fi Calling Settings ........................145 Wi-Fi Settings ............................
- Page 10 Sound Mode ..........................159 Vibration Intensity ........................159 Vibrate When Ringing ....................... 159 Ringtones ..........................160 Vibrations ..........................160 Notification Ringtone ......................... 160 Other Sounds ..........................160 Do Not Disturb .......................... 161 Notifications on Locked Screen ....................161 Application Notifications ......................
- Page 11 ..........................182 Language and Input Settings ......................183 Choose a Default Language ..................... 183 Set a Default Input Method ....................... 183 Samsung Keyboard Settings ....................183 Swype Settings ......................... 185 Google Voice Typing Settings ....................186 Handwriting Recognition ......................187 Speech Settings ........................
- Page 12 KNOX Security .......................... 194 Advanced Settings ........................194 Help ..............................195 Activate This Device .......................... 195 System Update Settings ........................195 About Device Settings ........................195 Application Manager Settings ......................196 Default Applications Settings ......................197 Calendar Settings ..........................197 Call Settings ............................
- Page 13 Samsung KNOX ........................213 Samsung Electronics America (SEA), Inc................213 Do you have questions about your Samsung Mobile Device? ..........213 Legal Information ........................214 Index ................................215 xii...
-
Page 14: Get Started
Get Started The following topics give you all the information you need to set up your phone and Sprint service the first time. Your Phone at a Glance The following illustration outlines your phone’s primary features. Set Up Your Phone Before using your new phone, you must install and charge the battery, as well as installing an optional memory card (not included). -
Page 15: Remove The Back Cover
Remove the Back Cover Remove the cover for access to the SIM card, optional memory card (not included), and the battery. 1. Remove the back cover using the slot on the top of your phone. 2. Carefully lift the cover. Warning: Do not bend or twist the back cover excessively. - Page 16 Install the Battery ■ Insert the battery, aligning the gold contacts on the battery with the gold contacts on the phone, and gently press the battery into place. Replace the Back Cover ■ Replace the battery compartment cover, making sure all the tabs are secure and there are no gaps around the cover.
-
Page 17: Activate Your Phone
2. Plug the other end of the USB cable into the Adaptive Fast Charging charger, and then plug the Charging Head into an electrical outlet to charge your battery. Caution: Use only Samsung-approved charging devices. Samsung accessories are designed to maximize battery life. Using other accessories may invalidate your warranty and may cause damage. -
Page 18: Complete The Setup
Samsung Account: Your Samsung Account is used for access to Samsung apps and services, such as Samsung Hub, Samsung Apps, Samsung Link, and much more. Complete the steps to sign in to your current Samsung Account, or sign up for a new Samsung Account. -
Page 19: Set Up Voicemail
Set Up Voicemail Your phone automatically transfers all unanswered calls to voicemail, even if your phone is in use or turned off. You should set up your Sprint Voicemail and personal greeting as soon as your phone is activated. Always use a password to protect against unauthorized access. Note: Voicemail Password –... -
Page 20: Manage Your Account
Voicemail Password You will create your voicemail password when you set up your voicemail. See Set Up Voicemail for more information on your voicemail password. Data Services Password With your Sprint phone, you may elect to set up an optional data services password to control access and authorize purchases. -
Page 21: Sprint Support Services
Sprint Support Services Sprint 411 and Sprint Operator Services let you easily access information and calling assistance from your Sprint phone. Sprint 411 Sprint 411 gives you access to a variety of services and information, including residential, business, and government listings; movie listings or show times; driving directions, restaurant reservations, and major local event information. -
Page 22: Phone Basics
Phone Basics Your phone is packed with features that simplify your life and expand your ability to stay connected to the people and information that are important to you. The following topics will introduce the basic functions and features of your phone. Your Phone’s Layout This illustration outlines your phone’s basic layout. - Page 23 ● Back key: Returns to the previous screen, or close a dialog box, options menu, the notification panel, or keyboard. ● Home key/finger scanner: Returns to the home screen. The Home key can also act as a fingerprint scanner for security (unlock) and other applications. ● Recent Apps key: Displays a list of apps you’ve used recently.
-
Page 24: Turn Your Phone On And Off
Turn Your Phone On and Off Use the Power/Lock key to turn the phone on or off. Turn the Phone On ■ Press and hold the Power/Lock key. Turn the Phone Off 1. Press and hold the Power/Lock key to display the Device options menu. 2. Tap Power off >... -
Page 25: Touchscreen Navigation
Touchscreen Navigation Your phone’s touchscreen lets you control actions through a variety of touch gestures. When you want to select items such as applications and settings icons, or type using the keys of the onscreen keyboard, simply tap them with your finger. Touch and Hold To open the available options for an item (for example, a contact or link in a Web page), touch and hold the item. -
Page 26: Swipe Or Slide
Swipe or Slide To swipe or slide means to quickly drag your finger vertically or horizontally across the screen. Drag To drag an item, touch and hold your finger with some pressure before you start to move your finger. While dragging, do not release your finger until you have reached the target position. Phone Basics... - Page 27 Flick Flicking the screen is similar to swiping, except that you need to swipe your finger in light, quick strokes. This finger gesture is always in a vertical direction, such as when flicking the contacts or message list. Rotate For most screens, you can automatically change the screen orientation from portrait to landscape by turning the phone sideways.
-
Page 28: Pinch And Spread
Pinch and Spread Pinch the screen using your thumb and forefinger to zoom out or spread the screen to zoom in when viewing a picture or a Web page. (Move fingers inward to zoom out and outward to zoom in.) Tip: Pinching any home screen will show you options to customize home screens, or tap a thumbnail to go straight to another screen. -
Page 29: Your Home Screen
Your Home Screen The home screen is the starting point for your phone’s applications, functions, and menus. You can customize your home screen by adding application icons, shortcuts, folders, widgets, and more. The home screen extends beyond the initial screen. Swipe the screen left or right to display additional screens. - Page 30 Remove a Shortcut Remove a shortcut from the home screen. 1. From home, touch and hold a shortcut to undock it. 2. Drag the icon to Remove and then release it. Note: Removing a shortcut does not delete the app, it just removes the shortcut from the home screen. Add a Widget Widgets are self-contained apps that display on a home screen.
-
Page 31: Extended Home Screens
Configure Home Screen Settings Choose options for the home screen. 1. From home, pinch the screen. – or – Touch and hold an empty space on the screen. 2. Tap Home screen settings, and then enable or disable these options: ... -
Page 32: Status Bar And Notification Panel
Delete a Home Screen You can delete home screens, except for the default screens. 1. From home, pinch the screen. – or – Touch and hold an empty space on the screen. 2. Scroll to the screen you want to delete. Touch and hold the screen, and then drag it to Remove. - Page 33 Icon Description Roaming signal strength is displayed. More bars indicate a stronger signal. Airplane Mode is active. Battery is charging. Battery is fully charged. Notification Icons Icon Description You have a missed call. A new email has arrived. A new Gmail has arrived. A new message has arrived.
-
Page 34: Notification Panel
Icon Description A system error has occurred. More notifications are available. Location services are active. Note: Additional notification icons may appear. All notifications may be accessed through the notification panel. Notification Panel The notification panel displays details about your phone’s status, and it provides easy access to common settings and features. -
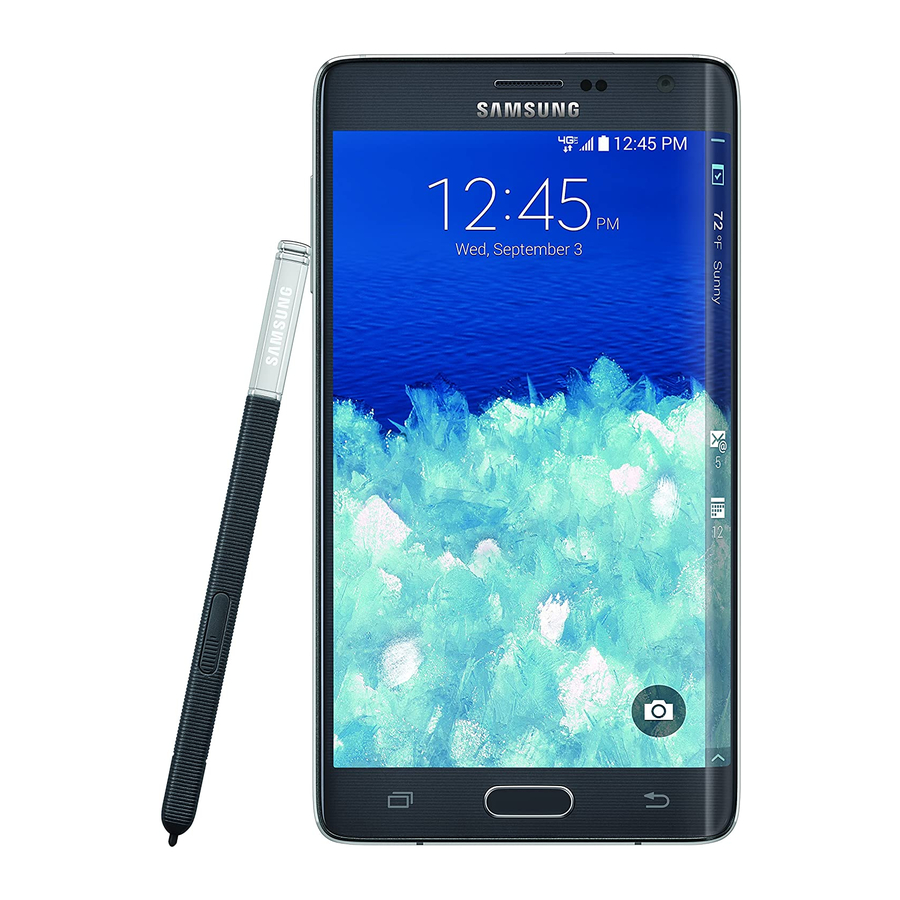
Page 35: Edge Screen Features
Edge Screen Features The beautiful curved Edge screen delivers always-on access to incoming calls, email, Internet, apps, notifications, news and more without interrupting the content on the main screen. Watch a movie, browse the Internet or take a picture using controls on the curved Edge display. At bedtime, turn your Edge display into a clock that stays on all night without draining your battery. -
Page 36: Customize App Shortcuts
Basic Gestures The Edge screen responds to basic gestures as follows: Swipe right or left to switch between panels. Swipe down to view the Quick Tools. Swipe up to access settings (only when the screen is unlocked). Customize App Shortcuts You can choose the apps you want to display in the Edge screen. -
Page 37: Edge Screen Options
Edge Screen Options Configure the Edge screen panels to provide convenient functions that are the most useful to you. ■ From home, tap Apps > Settings > Edge screen. – or – Swipe upward from the bottom of the Edge screen, and then tap Settings. -
Page 38: Air Command
Air Command Air command allows you to quickly activate frequently used applications or perform actions. ■ To launch the Air command menu, remove the S Pen from the S Pen slot, hold the S Pen near the screen so that the pointer appears, and press the S Pen button once. ... -
Page 39: Smart Select
Smart Select Smart select provides a capture tool to select content on a screen and add it to your Scrapbook app or share it with your contacts. To use the Smart select tool: 1. Remove the S Pen from the S Pen slot, hold the S Pen near the screen so that the pointer appears, and press the S Pen button once. -
Page 40: Image Clip
Image Clip Outline and crop images from the screen, in any shape, to share or paste. You can edit the cropped content, or personalize it with your handwriting. To use Image Clip: 1. Remove the S Pen from the S Pen slot, hold the S Pen near the screen so that the pointer appears, and press the S Pen button once. -
Page 41: Air View
S Pen Settings. Screen View Options Your Galaxy Note Edge lets you use additional motions and gestures, along with features such as Multi Window, to maximize your productivity and enjoyment. Motions and Gestures Control your phone by making specific gestures with your hand above the phone’s screen. -
Page 42: Multi Window
Enable Motions and Gestures 1. From home, tap Apps > Settings > Motions and gestures. 2. Tap an option to view its description, and then tap the ON/OFF button to enable the feature. Multi Window Use two apps on the same screen, in separate, resizable windows. Turn Multi Window On or Off Turn Multi window on or off in Settings. - Page 43 1. Touch and hold Back to display the panel, and then drag apps to the windows. 2. You can also use these Multi window options: Adjust the size of apps in Multi window: Drag the border between the windows to a new position.
- Page 44 Split Screen View You can also launch recently used apps directly into split screen view: 1. Tap the Recent Apps key. 2. Recently used apps that support split screen view have a Multi window icon in the title bar. Tap Open in split screen view icon in the title bar to launch the application in Multi window view.
-
Page 45: Enter Text
Text Input Methods Your phone offers several text input methods. ● Samsung keyboard allows you to enter text by tapping keys on a virtual QWERTY keyboard. Samsung keyboard includes optional predictive text, which matches your key touches to common words so you can select a word to insert it into your text. -
Page 46: Google Voice Typing
1. From a screen where you can enter text, drag down from the top of the screen to open the notification panel, and then tap Select keyboard > Google voice typing. – or – on the Samsung keyboard or on the Swype keyboard. 2. Speak into the microphone and watch your text being entered onscreen. -
Page 47: Samsung Keyboard
Google Voice typing to enter text by speaking. Touch and hold display additional options. If you have more than one language selected in Samsung keyboard settings, you can swipe your finger over to switch between languages. -
Page 48: Tips For Editing Text
3. While entering text, use these options: If you make a mistake, tap to delete a single character. Touch and hold to delete an entire word or field. By default, Swype starts with a capital at the beginning of text. Tap to start with a capital letter, or tap twice to enter all capitals. -
Page 49: Phone Calls
Phone Calls With the Sprint National Network and your phone, you can enjoy clear calling across the country. Wi-Fi Calling Wi-Fi Calling uses Wi-Fi networks to help improve voice and data coverage. It sends and receives calls and text messages over a Wi-Fi network and may offer better coverage in buildings and areas of poor cellular reception. -
Page 50: Call From Logs
1. On the Edge screen, tap Phone. If the keypad is not shown, tap the Keypad tab at the top of the screen. – or – From home, tap Phone. If the keypad is not shown, tap the Keypad tab at the top of the screen. -
Page 51: Call From Contacts
Call from Contacts You can place calls directly from Contacts. Note: You can access Contacts directly from the Phone app. Tap the Contacts tab at the top of the screen. 1. From home, tap Apps > Contacts. 2. Tap a contact, and then tap –... -
Page 52: Make An Emergency Call
Make an Emergency Call You can place calls to 9-1-1 even if the phone’s screen is locked or your account is restricted. Note: To call the 9-1-1 emergency number when the phone’s screen is locked, press the Power/Lock key to turn the screen on, drag up, and then tap Emergency call to display the emergency dialer. - Page 53 To answer a call from the Edge screen: ■ When your phone notifies you of an incoming call, drag down to answer the call. To answer a call from the main screen: ■ When your phone notifies you of an incoming call, drag to the right to answer the call.
-
Page 54: Mute The Ringing Sound
Mute the Ringing Sound You can mute the ringtone without rejecting the call by doing one of the following. ● Press the Volume key down. ● Place the phone screen-down on a level surface. See Motions and Gestures Settings for options, including the Mute/pause motion to mute incoming calls by turning over the phone. -
Page 55: Multitasking While On A Call
Multitasking While on a Call If you want to continue with your current call and do something else, such as access the contacts list, you can place the call on the Edge screen. To move the call screen to the Edge screen: ■... -
Page 56: Phone Call Options
Phone Call Options The Phone app provides many useful features and options to help you make the most of your calling experience. Dialing Options 1. On the Edge screen, tap Phone. If the keypad is not shown, tap the Keypad tab at the top of the screen. -
Page 57: Caller Id
Caller ID Caller ID identifies a caller while the phone is ringing, by displaying the number of the incoming call. Block Caller ID You can block your Caller ID (visible to other when you make a call), before making a call. The blocking only lasts for that call, and then returns to regular Caller ID. -
Page 58: Three-Way Calling
Three-Way Calling With Three-Way Calling, you can talk to two people at the same time. When using this feature, the normal airtime rates will be charged for each of the two calls. 1. On the Edge screen, tap Phone. If the keypad is not shown, tap the Keypad tab at the top of the screen. -
Page 59: In-Call Options
Deactivate Call Forwarding 1. On the Edge screen, tap Phone. If the keypad is not shown, tap the Keypad tab at the top of the screen. – or – From home, tap Phone. If the keypad is not shown, tap the Keypad tab at the top of the screen. -
Page 60: Voicemail
● More options for the following options: Contacts: Launch Contacts. Action memo: Create an Action memo during a call. Messages: Launches Messages to create a new message. Settings: Launches Call Settings. For more information, see Call Settings. -
Page 61: Voicemail Notification
Use Visual Voicemail to Access Your Messages 1. From home, tap Apps > Voicemail. 2. Tap an entry to listen to the message. Note: You are charged for airtime minutes when you access voicemail from your wireless phone. Use Another Phone to Access Messages 1. -
Page 62: Set Up Visual Voicemail
Set Up Visual Voicemail Setting up Visual Voicemail follows many of the same procedures as setting up traditional voicemail. You should set up your voicemail and personal greeting as soon as your phone is activated. Your phone automatically transfers all unanswered calls to your voicemail, even if your phone is in use or turned off. Note: To set up your traditional voicemail, see Set Up Voicemail. -
Page 63: Visual Voicemail Options
Use Visual Voicemail to Delete Your Messages 1. From home, tap Apps > Voicemail. 2. Open a message and tap Delete. Tip: You can restore messages you have sent to the trash folder. Tap Inbox > Trash, touch and hold the message you want to restore to the inbox, and then tap Restore to Inbox. -
Page 64: Configure Visual Voicemail Settings
Mark as Read: Mark this voicemail as being read. Mark as Unread: Mark this voicemail as not being read. Note: Not all options are available for all messages. Configure Visual Voicemail Settings The Visual Voicemail settings menu lets you access settings for notifications, pictures, greetings, and more. -
Page 65: Logs
Logs The Logs tab of the Phone app lists all missed, dialed, received, and rejected calls. View Logs From Logs, you manage the list of recent calls. 1. On the Edge screen, tap Phone. Tap the Logs tab at the top of the screen. –... - Page 66 Save a Number to Contacts from Logs You can save a number from a recent call record to create a new contact, or update an existing contact. 1. On the Edge screen, tap Phone. Tap the Logs tab at the top of the screen. –...
-
Page 67: Access Call Settings
Delete Logs Follow these steps to clear the Logs list. 1. On the Edge screen, tap Phone. Tap the Logs tab at the top of the screen. – or – From home, tap Phone. Tap the Logs tab at the top of the screen. 2. -
Page 68: Contacts
Outlook account set up on your phone. ● Samsung account contacts are synchronized between your phone and your Samsung account, if you have a Samsung account set up on your phone. ● Device contacts are stored locally on the phone. -
Page 69: Contacts Settings Options
Contacts Settings Options Choose options for contacts, including choosing how contacts display, importing and exporting contacts, and more. You can access Contacts settings in two ways: ● From the Contacts app: From home, tap Contacts > More options > Settings > Contacts. -
Page 70: Save A Phone Number
Save a Phone Number You can save a phone number to Contacts directly from the phone keypad. 1. On the Edge screen, tap Phone. If the keypad is not shown, tap the Keypad tab at the top of the screen. –... -
Page 71: Assign A Picture To A Contact
Assign a Picture to a Contact Adding a picture to a contact entry creates a more personal and easily recognized entry. For example, when receiving a call from one of your contacts, the associated picture will display. You can assign a picture from Gallery, or take a new picture with Camera. -
Page 72: Delete Contacts
Delete Contacts You can delete a single contact, or choose multiple contacts to delete. Delete a Contact 1. From home, tap Apps > Contacts. 2. Tap a contact to display it, and then tap More options > Delete > Delete. Delete Multiple Contacts 1. -
Page 73: Favorites
Make a Call with a Speed Dial 1. On the Edge screen, tap Phone. If the keypad is not shown, tap the Keypad tab at the top of the screen. – or – From home, tap Phone. If the keypad is not shown, tap the Keypad tab at the top of the screen. -
Page 74: Groups
Create a Shortcut to a Favorite You can create a shortcut to a favorite, to access their information directly from the home screen. 1. From home, tap Apps > Contacts. 2. Tap Favorites, and then touch and hold on a contact to select it. 3. Tap More options >... -
Page 75: Send A Message To A Group
Add Contacts to a Group 1. From home, tap Apps > Contacts. 2. Tap Groups, and then tap a group. 3. Tap Add, and then tap the contact(s) you want to add. 4. Tap Done. Send a Message to a Group You can send a message to members of a group, if the members have a telephone number stored in their contact record. -
Page 76: Share Contacts
Share Contacts You can quickly share contacts via Bluetooth, Email, Gmail, Messages, or Wi-Fi Direct, or send them to print. Send Contact Information You can copy a contact’s information into a text message and send it. 1. From home, tap Apps >... -
Page 77: Import And Export Contacts
Import and Export Contacts You can import or export contacts from the phone’s memory (USB storage), or from an optional, installed memory card (SD card, not included). You might have contacts stored in phone memory or on a memory card if you are moving from an old device, or if you received them via Bluetooth from another device. Contacts you export are saved as name cards (.vcf), which can be imported into other apps or devices that support the name card format. -
Page 78: Accounts And Messaging
Accounts and Messaging With Sprint service and your phone’s messaging capabilities, you have the opportunity to share information through many different channels and accounts. Google Account Many of your phone’s applications, such as Gmail, Google Maps, Google Hangouts, and the Google Play store, require a free Google Account. -
Page 79: Access Gmail
Access Gmail After you set up your Google Account on your phone, you can access Gmail from your phone. 1. From home, tap Apps > Gmail. 2. Do any of the following: Swipe your finger up the screen to view more messages and conversations. ... -
Page 80: Samsung Account
Samsung Account Create a Samsung account for access to Galaxy Apps and much more. When you sign in to your Samsung account on your phone, you can access Samsung-specific content and features. 1. From home, tap Apps > Settings. 2. Tap Accounts >... -
Page 81: Add A Microsoft Exchange Activesync Account
Add Additional Email Accounts If you already have an email account set up on your phone, you can still add a new account from Email. 1. From home, tap Apps > Email. 2. Tap More options > Settings > Manage accounts. 3. Tap Add account, and then follow the prompts to enter your log in credentials and configure options for the account. -
Page 82: Compose And Send Email
Compose and Send Email Compose and send email using any account you have set up on your phone. Increase your productivity by attaching files such as pictures, videos, or documents to your email messages. 1. From home, tap Apps > Email. -
Page 83: Manage Your Email Inbox
Manage Your Email Inbox The following procedures allow you to view, sync, sort, and delete your email messages. View Your Email Inbox 1. From home, tap Apps > Email. 2. If you have multiple accounts set up on your phone, tap Menu at the top of the screen, and then choose one from the menu. -
Page 84: Access Email Settings
Delete Multiple Email Messages 1. From home, tap Apps > Email. 2. Tap More options > Select, and tap the checkboxes beside messages you want to delete. – or – Touch and hold on a message you want to delete, and then tap checkboxes for additional messages to delete. -
Page 85: Text And Multimedia Messaging
Text and Multimedia Messaging With Text Messaging (SMS), you can send and receive text messages between your phone and another device that supports messaging. Multimedia messages, (MMS), can contain text and pictures, recorded voice, audio or video files, picture slideshows, contact name cards (vCard), or calendar events (vCalendar). See your service plan for applicable charges for messaging. -
Page 86: Save And Resume A Draft Message
Save and Resume a Draft Message If you tap Back while composing a text or multimedia message, or leave the Messages screen, the message is automatically saved as a draft. To resume composing a Draft message: 1. From the Edge screen, tap Messages. -
Page 87: Reply To A Message
View Multimedia Message (MMS) 1. From the Edge screen, tap Messages. 2. From the message list, tap a message to display it. 3. While the message is open, tap the play icon (on a video or audio file) to play back the file or tap an image to view a picture. -
Page 88: Access Messages Settings
Note: Locked messages will not be deleted, unless you select the Include protected messages checkbox before confirming the deletion. Delete a Message 1. From the Edge screen, tap Messages. 2. While viewing a conversation, touch and hold the message that you want to delete. 3. Tap Delete >... -
Page 89: Messenger
Messenger Send instant messages with all your friends using Facebook’s Messenger app. 1. From home, tap Apps > Messenger. 2. Follow the prompts to enter your Facebook account details and complete the sign in. Social Networking Accounts Stay in touch on the go with all your social networking accounts. Post updates on FamilyWall for Sprint, Facebook, and see what everyone is talking about on YouTube, and more. -
Page 90: Instagram
Instagram Capture and share photos and videos with your friends. Customize what you capture, then share it on your feed or post it directly to your friends. 1. From home, tap Apps > Instagram. 2. Follow the prompts to register or log in to Instagram. Pages Manager The Pages Manager app lets you manage up to 50 Pages from your smartphone or tablet. - Page 91 Note: It is not necessary to sign in to YouTube to view content. However, if you wish to sign in to access additional options, tap More options > Sign in. Select an account (if available) or create a new account. (Even if you sign in to YouTube via the Web, you must separately sign in via your phone.) Accounts and Messaging...
-
Page 92: Apps And Entertainment
Apps and Entertainment All your phone’s features are accessible through the Applications list. Note: Available apps and services are subject to change at any time. Google Play Store The Google Play store app is the place to go to find new Android apps, games, movies, music, and books for your phone. -
Page 93: Open An Installed App
Open an Installed App After you install an app, it is available in the Apps tray. ■ From home, tap Apps, and then tap the app icon. Uninstall an App You can uninstall any app that you have downloaded and installed from Google Play. 1. -
Page 94: Google Play Newsstand
Google Play Newsstand With Google Play Newsstand, discover more of the news and magazines you care about all in one app on your phone. Enjoy breaking news and in-depth articles featuring audio and video. From sports, business, cooking, entertainment, fashion and more it is all in one place. ■... -
Page 95: Play Music
Play Music 1. From home, tap Apps > Music. 2. Tap the category tabs at the top of the screen. The default tabs are Playlists, Tracks, Albums, Artists, Folders, and Devices. You may have to swipe your finger right or left along the tabs to see all of them. - Page 96 Set a Song as a Ringtone or Alarm Tone You can set a song as a ringtone for all incoming calls, or for a contact. You can also set a song as an alarm tone. 1. From home, tap Apps > Music.
-
Page 97: Nextradio
Samsung Milk Music Exclusive to Galaxy owners, Samsung Milk Music is a radio service that gives you more of the music you love, curated by top DJs and industry pros and all for free. Samsung Milk Music lets you adjust what songs play, based on factors like release date and popularity. -
Page 98: Spotify
Spotify Spotify gives you millions of songs at your fingertips. The artists you love, the latest hits, and new discoveries just for you. Hit play to stream anything you like. 1. From home, tap Apps > Spotify. 2. Follow the prompts to update the app and then log in to your Spotify account or sign up for a new account from your phone. -
Page 99: Sprint Zone
Sprint Zone Access your Sprint account, get phone information and help, find recommended apps, and more. 1. From home, tap Apps > Sprint Zone. 2. Tap My Account to sign in to and manage your Sprint account, Support to get help with your device or service, Sprint News to learn the latest Sprint information, or Network to see or test your current data connectivity. -
Page 100: 1Weather
1Weather Receive real-time local weather information at any location in the world. Access seven-day and hourly weather forecasts for your area. 1. From home, tap Apps > 1Weather. 2. Follow the prompts to update the app in Play Store, and then explore the app to customize your views, add locations, and more. -
Page 101: Pen.up
PEN.UP PEN.UP is an online community app that brings together anyone that uses the S Pen to draw, sketch, scribble or paint. Share photos, comment on other creations, or just browse through the pages for something to add to your personal collection. 1. -
Page 102: Web And Data
Web and Data The following topics address your phone’s data connections and the built-in Web browser. Additional data-related features can be found in Accounts and Messaging, Apps and Entertainment, and Tools and Calendar. Your phone’s data capabilities let you wirelessly access the Internet or your corporate network through a variety of connections, including: Wi-Fi Wi-Fi provides wireless Internet access over distances of up to 300 feet. - Page 103 Scan and Connect to a Wi-Fi Network 1. From home, tap Apps > Settings > Wi-Fi. 2. The network names and security settings (Open network or Secured) of detected Wi-Fi networks are displayed. When you select an open network, you will be automatically connected to the network. ...
-
Page 104: Internet
Internet Your phone’s Internet browser gives you full access to both mobile and traditional websites on the go, using your phone’s 3G or 4G mobile data or Wi-Fi connections. ■ From home, tap Apps > Internet. Note: The first time you launch Internet, you may be prompted to enter your 10-digit wireless phone number to access the Sprint home page. -
Page 105: Your User Name
Note: The Sprint network is self-discoverable, which means no additional steps are required for your phone to connect to it. Your User Name When you buy your phone and sign up for service, you are automatically assigned a user name, which is typically based on your name and a number, followed by “@sprintpcs.com”. -
Page 106: Hotspot
Hotspot Use the Hotspot feature to share your phone’s data connection with other devices via Wi-Fi. Important: Use of the Hotspot feature requires an additional subscription. Sign on to your account at sprint.com/mysprint or access your account via Sprint Zone (tap Apps >... -
Page 107: Tethering
Tethering Share your phone’s Internet connection with a computer that connects to your phone using a USB cable or via Bluetooth. 1. From home, tap Apps > Settings. 2. Tap Hotspot and Tethering and then choose a tethering method: USB tethering: Connect the computer to the phone using the USB cable, and then tap USB tethering to turn tethering on. -
Page 108: Add A Vpn
Add a VPN Configure a connection to a VPN. You must have a PIN or Password screen lock set before adding a VPN. Tip: You may need to contact your network administrator for some of the information needed to set up a VPN connection. -
Page 109: Disconnect From A Vpn
Disconnect from a VPN The following describes how to disconnect from a VPN connection. 1. Swipe down from the top of the screen to open the notification panel. 2. Tap the VPN connection to return to the VPN settings screen, and then tap the VPN connection to disconnect from it. -
Page 110: Pictures And Video
Pictures and Video Camera You can use the camera or camcorder to take and share pictures and videos. Make your selfies better than ever with a class-leading 3.7MP front-facing camera featuring Wide Angle Selfie Mode that gets more friends and fun in frame. Capture special moments on a crisp, clear 16MP camera and a full suite of advanced editing functions. -
Page 111: Take A Picture
● Capture: Tap to take a picture. ● Mode: Tap to choose a shooting mode. The current mode displays on the camera screen. Shooting modes allow you to choose modes for automatically adjusting settings to suit conditions, or to access special features like panorama or other specialty shots. ● Gallery: View your pictures or video, and access picture sharing and editing options. -
Page 112: Review Pictures And Videos From The Camera
Resume to continue a paused recording. Stop to stop recording. Tip: If Voice Control is active, you can begin recording by saying “Record Video.” See Configure the Camera. Review Pictures and Videos from the Camera After you take a picture or record a video, you can review and edit it right from the camera, using special Studio options. -
Page 113: Configure The Camera
Review and Edit a Video from the Camera 1. From home, tap Apps > Camera. 2. Record video, and then tap the Gallery thumbnail at the bottom right corner of the screen. 3. While reviewing a video, you can use these options: ... - Page 114 Rear-cam selfie: Take a self-portrait using the rear camera. Selective focus: Make objects stand out from the background by blurring items in the distance. Panorama: Take multiple pictures to merge into one expansive picture. You can create a horizontal or vertical panorama picture.
- Page 115 HDR (Rich tone) : Save the picture in HDR (rich tone) only (Back camera only). Help : View help on using the camera. Interval shot : Take a series of pictures at a set interval (Front camera only). ...
-
Page 116: Gallery
White balance : Select an appropriate white balance, so images have a true-to-life color range. The settings are designed for specific lighting situations. These settings are similar to the heat range for white-balance exposure in professional cameras (Back camera only). -
Page 117: View Photos And Videos
• Content to display: Choose whether to display all content, or only pictures stored on your phone, or from Facebook or Picasa (if you have those accounts set up on your phone). • Remove from Scenery/Documents: Remove a photo from the Scenery category or Document category (Scenery or Document view only). -
Page 118: View Videos
More info: View information about the picture. Write on image: Use the S Pen to write or draw on the picture. Rotate left: Rotate the picture to the left. Rotate right: Rotate the picture to the right. ... -
Page 119: Work With Photos
Work with Photos While viewing a photo, you can choose to delete the photo, rotate or crop it, and more. Rotate and Save a Photo To rotate or save your photo, follow the below procedures. 1. From home, tap Apps > Gallery. -
Page 120: Send A Photo Or Video By Multimedia Message
4. Tap the screen and then tap Share via > Gmail or Email. 5. Address and compose your message and then tap Send or Send. Note: If you have multiple email or Gmail accounts, the default account will be used. Send a Photo or Video by Multimedia Message Although you can send several photos or videos in a multimedia message, it may be better to send one at a time, especially if the files are large in size. -
Page 121: Video
5. Enter the prompted information, such as description and tags, and select a privacy option. 6. Tap Upload. Video Play videos stored on your phone, or from your other devices (you must sign in to your Samsung account to play videos synced from your other devices). 1. From home, tap Apps >... -
Page 122: Tools And Calendar
Tools and Calendar Learn how to use many of your phone’s productivity-enhancing apps and features. Bluetooth Bluetooth is a short-range communications technology that allows you to connect wirelessly to a number of Bluetooth phones, such as headsets and hands-free car kits, and Bluetooth-enabled handhelds, computers, printers, and wireless phones. -
Page 123: Reconnect A Headset Or Car Kit
The pairing and connection status is displayed below the hands-free headset or car kit name in the Bluetooth devices section. When the Bluetooth headset or car kit is connected to your phone, (Bluetooth connected) displays in the status bar. Depending on the type of headset or car kit you have connected, you can then start using the headset or car kit to listen to music or make and receive phone calls. -
Page 124: Send Information Using Bluetooth
Send Information Using Bluetooth You can use Bluetooth to transfer information between your phone and another Bluetooth-enabled device, such as notebook computer. The first time you transfer information between your phone and another device, you need to enter or confirm a security passcode. After that, your phone and the other device are paired, and you will not need to exchange passcodes to transfer information in the future. -
Page 125: Receive Information Using Bluetooth
Receive Information Using Bluetooth Your phone is capable of receiving a wide variety of file types with Bluetooth, including photos, music tracks, and documents such as PDFs. 1. From home, tap Apps > Settings > Bluetooth. 2. If Bluetooth is not on, tap the ON/OFF switch to turn it on. 3. Tap the checkbox beside your phone’s Bluetooth name to make it discoverable. -
Page 126: Calendar
My calendar: Calendar entries that are stored locally on the phone and not part of an account. Samsung Calendar: Calendar entries that are synchronized between your phone and your Samsung account. Google/Gmail: Calendar entries that are synchronized between your phone and your Google Account. -
Page 127: Event Alerts
5. Tap Save, or tap View more options to enter more information about the event. Available options depend on the type of event and the account it is synced with. Enter participants in the Participants field. Tap Show me as (or Status) to choose how the event shows on your calendar to other event organizers. -
Page 128: View Events
View Events The following procedure helps you view your calendar events. 1. From home, tap Apps > Calendar. 2. To view a Calendar event farther out, tap Menu, and then tap a time period (Year, Month, Month and agenda, Week, Day, or Agenda). 3. -
Page 129: Delete Events
Week, Month, and Year Views Week view displays a chart of the events of one week. In Year or Month views, you will see markers on days that have events. When in Week view: ● You can touch and hold on a time slot to create a new event at that time. ● Tap an event to view its details. -
Page 130: Clock
Clock The Clock app offers features for keeping track of time and setting alarms. From home, tap Apps > Clock. Tap a tab to use a feature: Alarm: This feature allows you to set an alarm to ring at a specific time. ... -
Page 131: Dropbox
Turn an Alarm On or Off Once you set and save an alarm, you can turn it on or off from the Clock menu without deleting the settings. 1. From home, tap Apps > Clock > Alarm tab. 2. Tap the alarm clock icon next to a saved alarm. The icon is green when the alarm is turned on (set), and gray when it is turned off. -
Page 132: Flipboard Briefing
Tap either Sign Up or Sign In. To sign up or sign in with a Google or Samsung Account, tap either Sign up with Google or Sign up with Samsung Account. To use a different email address, enter your email address under the section or via email. -
Page 133: Galaxy Apps
Galaxy Apps Discover apps designed exclusively for your Galaxy device. ■ From home, tap Apps > Galaxy Apps. Google Now Google Now gets you just the right information at just the right time. It tells you today’s weather before you start your day, how much traffic to expect before you leave for work, when the next train will arrive as you are standing on the platform, or your favorite team’s score while they’re playing. -
Page 134: My Files
My Files My Files allows you to manage your sounds, images, videos, Bluetooth files, Android files, and other data in one convenient location. This application allows you to launch a file if the associated application is already on your phone. 1. From home, tap Apps >... -
Page 135: Navigation
Navigation Your phone offers a number of location-based navigation programs to help you figure out where you are and get you where you are going. Google Maps Use the Google Maps application to determine your current location with or without GPS, get driving and transit directions, and find phone numbers and addresses for local businesses. -
Page 136: S Health
Read and agree to the terms and conditions, and then tap Next. Sign in to your Samsung account if you have not already done so. For more information, refer Samsung Account. You must sign in to a Samsung account to set and save goals, and use other advanced S Health features. - Page 137 Weight: Track your weight and BMI (body mass index). Sleep: Samsung wearable devices (not included) can record your sleep data and sync it with Sleep in S Health. Heart rate: Measure your heart rate, using the heart rate sensor on the back of your phone (next to the Camera flash).
-
Page 138: S Note
The S Note app helps you create, edit, and manage all the notes on your phone. Sign in to your Samsung account to access your notes in S Note from any device. With S Note, create content by typing, writing, drawing, and even recording voice, video, or taking pictures. -
Page 139: Share A Note
3. When finished, tap Save. 4. Enter a name for the note and tap Save. Edit a Note When in the S Note app, you can edit notes as follows: 1. From home, tap Apps > S Note. 2. Tap a note to view it. 3. -
Page 140: S Voice
● Text mode: Type text using the keyboard. Tap once to select Text mode. Tap again to change the Text settings. ● Photo note: Add a note page by taking a picture. The camera is activated. After you take a picture, crop the image as desired. -
Page 141: Scrapbook
Scrapbook The Scrapbook app provides a place for you to manage the multimedia content you capture with the S Pen. Scrapbook provides storage and organization tools for content you capture while using your mobile phone. Using the S Pen, you can capture articles, images, and even videos and music. You can then add a title, text, a handwritten memo, or content tags. -
Page 142: Sprint Id
4. Tap More options > Edit category. 5. You can edit the Category name and the Layout. When finished, tap Done. Sprint ID An ID is a pack of applications and content that you can download to your phone. IDs add another set of home screens to your phone. - Page 143 Share a Voice Recording 1. From home, tap Apps > Voice Recorder. 2. Tap List, and then touch and hold on a recording to display options. 3. Tap Share via, and then follow the prompts to choose a method and share the file. Modify a Voice Recording 1. From home, tap Apps >...
-
Page 144: Voice Search
3. Tap More options for options: Select: Choose voice recording(s). After selection, you can Share or Delete the selected recordings, or use other options. Sort by: Choose an order to display the list. Filter by category: Choose a category, to display only voice recordings assigned to that category. -
Page 145: Microsd Card
Make phone calls Get directions Send messages Set reminders Ask questions Schedule meetings Play music and movies Set alarms Try more voice actions microSD Card A microSD memory card is an optional accessory (not included) that allows you to store images, videos, music, documents, and other data on your phone. -
Page 146: Remove A Microsd Card
Important: Ensure that the back cover and the USB charger/accessory port cover are closed tightly to prevent water and dust entering the phone. Open or loose covers may allow water and dust to enter the phone and cause damage. Remove a microSD Card Use the following procedure to remove an optional microSD card from your phone. -
Page 147: Transfer Files Between Your Phone And A Computer
Transfer Files Between Your Phone and a Computer You can use the supplied USB cable to connect your phone directly to your computer and transfer music, pictures, and other content files. For example, if you have a music album stored on your computer that you want to listen to on your phone with the music player, Google Play Music, or Sprint Music Plus, just attach your phone to the computer and copy the files to the Music folder. -
Page 148: Update Your Phone
(for example, if your device is lost or stolen). You should remove your Google Account before shipping your device to Samsung or any other service provider for service and before resetting the device to factory settings. -
Page 149: Sprint Worldwide Wireless Service
Sprint Worldwide Wireless Service With your phone and global roaming service from Sprint Worldwide Wireless Service, you can make phone calls and use wireless data services around the globe on compatible CDMA and GSM/UMTS networks. For a country-specific travel guide, select your phone and destination from sprint.com/traveltips. Get Information for Sprint Worldwide Service View contact information for Sprint Worldwide. -
Page 150: Set Network Mode Options
Set Network Mode Options In order to roam internationally on different types of network technology (CDMA/LTE and GSM/UMTS), you may need to set your phone’s network mode to allow use of a specific technology. Once set, your phone is designed to enter global roaming mode automatically when you activate your Sprint Worldwide service, meaning that it should automatically connect to an appropriate CDMA/LTE or GSM/UMTS network when you travel. -
Page 151: Sprint International Voicemail Service
3. Tap to insert the US country code, and then enter the area code and number. 4. Tap to place the call. Sprint International Voicemail Service Your Sprint voicemail will follow you as you travel. All of your unanswered calls will be forwarded to your Sprint voicemail. -
Page 152: Access Your Voicemail Internationally
Access Your Voicemail Internationally You will need to call your voicemail number to access your voicemail while roaming internationally. New Message Indicators Your voicemail message indicators may be displayed differently when roaming internationally. ● A “Message Waiting” indicator icon or a text message is displayed when a voicemail message is received. -
Page 153: Access Email And Data Services Internationally On Gsm/Umts Networks
Access Email and Data Services Internationally on GSM/UMTS Networks To access your email and browse the Web when travelling, you may need to manually select the carrier that provides Sprint service in your location. You can find a list of carriers for each country where GSM data service is offered at sprint.com/sww. - Page 154 Status Messages Message Description This feature is not available on the current network. Service Not Available Either the service is not activated properly or the current network is available for emergency calling only. Adjust your network settings to check for other available networks. If Emergency Calls Only service is still not available after adjusting the settings, contact Sprint Customer Service to report the issue for resolution.
-
Page 155: Contact Sprint For Assistance With International Service
Contact Sprint for Assistance with International Service If you experience any issues with voice or data services while outside of the United States, Sprint offers customer support 24 hours a day. In the event that you do experience an issue, try the following actions: ● First try powering your phone off and then back on;... - Page 156 Country From Landline Phone Canada 1-866-805-9890 Caribbean (Anguilla, Barbados, 1-866-313-6672 Cayman Islands, and Dominica) France 0800-903200 Germany 0800-180-0951 Italy 800-787-986 Mexico 001-877-294-9003 Trinidad and Tobago 1-800-201-7545 United Kingdom 0808-234-6616 Note: This toll free service is available on ordinary landline phones and some public pay phones. This service does not cover any hotel access charges.
-
Page 157: Settings
Settings Configure your phone to your preferences. Using Settings Use Settings to configure your phone to your preferences. Access Settings You can access Settings in a variety of ways. ■ From home, tap Apps > Settings. – or – From home, touch and hold on the status bar, and then drag down to display the notification panel. -
Page 158: Wi-Fi Calling Settings
Wi-Fi Calling Settings Wi-Fi Calling uses Wi-Fi networks to help improve voice and data coverage. It sends and receives calls and text messages over a Wi-Fi network and may offer better coverage in buildings and areas of poor cellular reception. Enable Wi-Fi Calling 1. From home, tap Apps >... -
Page 159: Advanced Wi-Fi Settings
• Wi-Fi Direct: Connect to other Wi-Fi Direct devices. For more information, see Wi-Fi Direct Settings. • Advanced: Configure more settings. For more information, see Advanced Wi-Fi Settings. • WPS push button: Set up a connection to a WPS (Wi-Fi Protected Setup) router or other equipment. -
Page 160: Wi-Fi Direct Settings
Wi-Fi Direct Settings Wi-Fi Direct allows devices to connect to each other directly via Wi-Fi, without a Wi-Fi network or hotspot, and without having to set up the connection. For example, your phone can use Wi-Fi Direct to share photos, contacts and other content with other Wi-Fi Direct devices. 1. From home, tap Apps >... -
Page 161: Hotspot And Tethering Settings
4. Tap More options for more settings: Visibility timeout: Set the length of time your phone is visible to other devices when you turn on visibility. Received files: View files transferred to your phone via Bluetooth. Rename device: Change the name your phone uses to identify itself when you make your phone visible to other Bluetooth devices. -
Page 162: Allowed Devices
• Security: Choose the security level for your Mobile Hotspot. • Password: If you choose a security level that uses a password, set a password. By default, the password is your mobile telephone number. • Show password: When enabled, the contents of the Password field are visible. •... -
Page 163: Tethering Settings
Add, and then enter the other device’s Device name and MAC address. Consult the 3. Tap other device’s settings to find these details. 4. Tap OK to add the device to the Allowed devices list. Tethering Settings Use Tethering to share your phone’s Internet connection with a computer that connects to your phone via USB cable, or by Bluetooth. -
Page 164: Data Usage Settings
Data Usage Settings Monitor data usage, and control your phone’s connection to mobile data service. Note: Data is measured by your phone. Your service provider may account for data usage differently. 1. From home, tap Apps > Settings. 2. Tap Data usage to configure options: Mobile data: Enable or disable your phone’s access to mobile data service. -
Page 165: Location Settings
Location Settings Control apps’ access to your location, and configure location sources. Some apps may require one or more location services be turned on for full app functionality. When Location is turned on, you are allowing Google’s location service to collect anonymous location data. Some data may be stored on your phone, and collection may occur even when no apps are running. -
Page 166: Nfc And Sharing Settings
NFC and Sharing Settings Share information between your other devices using NFC (Near Field Communication), Nearby devices (file sharing), Printing, Screen Mirroring, and MirrorLink. Turn NFC On or Off Use NFC (Near Field Communication) to share information between your phone and another NFC- capable device or NFC tag, by touching the devices together, typically back-to-back. -
Page 167: Tap And Pay
Tap and Pay With your phone and a payment app, you can use your phone to pay for items by tapping it to an item at the point-of-purchase. Google Wallet is an example of a payment app. You must have the payment app set up on your phone to use it with Tap and Pay. -
Page 168: Printing Settings
• Receive files from other devices: Choose how to handle incoming files from other devices. More options > Rename device to rename your phone for the Nearby devices feature. Printing Settings You can print from your phone, via Wi-Fi, to an optional compatible printer (not included). Your phone and the optional printer must be connected to the same Wi-Fi network. -
Page 169: Screen Mirroring Settings
3. Choose a print service from the list, and then tap the ON/OFF switch to turn the service on. The service must be on to add a printer. 4. Tap More options > Settings to configure options. Available options may vary depending on the type of printer, and not all printers support all options. -
Page 170: Mobile Networks Settings
Note: If you choose a default messaging app other than Messages (for example, Google Hangouts or Messaging+), you will not be able to use the standard Messages app unless you restore it as the default messaging app. Mobile Networks Settings Set options for network selection and data service. -
Page 171: Roaming Settings
Name: Enter the name of the VPN. Type: Choose the type of VPN. Server address: Enter the VPN server address. PPP Encryption (MPPE): Tap to enable, if applicable for the VPN. Show advanced options: Tap to set other options, depending on the type of VPN. 4. Tap Save to save the VPN. -
Page 172: Sound Mode
Notifications System Sound Mode You can switch between sound modes, while preserving the individual sound settings you’ve made. Note: Sound modes are also available from the Device options menu. Press and hold the Power/Lock key, and then choose Mute, Vibrate, or Sound from the Device options. 1. -
Page 173: Ringtones
Ringtones Choose a default ringtone for incoming calls. 1. From home, tap Apps > Settings. 2. Tap Sounds and notifications > Ringtones to choose a ringtone: Tap a ringtone to select it. As you tap a ringtone, a sample plays. ... -
Page 174: Do Not Disturb
Sound when tapped: Play a tone when tapping the Samsung keyboard. Vibrate when tapped: Set the phone to vibrate when tapping the Samsung keyboard. Do Not Disturb Mute all calls and alerts, except for those that you choose to allow. -
Page 175: Notification Access
Notification Access Applications cannot read notifications unless you give them access. 1. From home, tap Apps > Settings. 2. Tap Sounds and notifications > Notification access. 3. Tap an application to give it access to notifications. Display and Wallpaper Settings Configure settings for your phone’s display and wallpaper. -
Page 176: Font
One-handed input: Adjust the size and position of the dialing keypad, in-call buttons, Samsung keyboard, Calculator, and unlock pattern. Side key panel: Display the hard keys and other selected functions as buttons at the side of the screen. -
Page 177: Screen Timeout
Screen Timeout Screen timeout lets you choose how long the display screen remains lit after you tap the screen or press any key. 1. From home, tap Apps > Settings. 2. Tap Screen timeout, and then choose a time period. Screen Mode Choose a screen mode to match your type of viewing. -
Page 178: Led Indicator Settings
Photo Frame: Display pictures in a photo frame. After enabling the option, tap to choose pictures to display. Photo Table: Display of pictures in a photo table. After enabling the option, tap to choose pictures to display. More options >... -
Page 179: Lock Screen Settings
Lock Screen Settings Configure settings for locking the screen, to improve security. Screen Lock Choose a screen lock, to secure the screen. Depending on the Screen lock you choose, you can also choose screen lock options to work along with the screen lock. 1. -
Page 180: Set A Pattern Screen Lock
Set a Pattern Screen Lock When a Pattern screen lock is set, you draw a pattern, which you create, on the screen to unlock the phone. You will also set a PIN to use as a backup, in case you forget the pattern. 1. -
Page 181: Set A Pin Screen Lock
Set a PIN Screen Lock With a PIN screen lock, you enter a Personal Identification Number, which you create, on the screen to unlock the phone. 1. From home, tap Apps > Settings. 2. Tap Lock screen > Screen lock > PIN, and then follow the prompts to create or change your screen unlock PIN. -
Page 182: Set A Password Screen Lock
Set a Password Screen Lock With a Password screen lock, you enter an alphanumeric password, which you create, on the screen to unlock the phone. 1. From home, tap Apps > Settings. 2. Tap Lock screen > Screen lock > Password, and then follow the prompts to create or change your screen unlock password. -
Page 183: Set A Fingerprint Screen Lock
Set a Fingerprint Screen Lock With a Fingerprint screen lock, swipe your finger over the Home key. Note: Before using the Fingerprint screen lock option, you will need to register your fingerprint on your phone. See Finger Scanner. 1. From home, tap Apps >... -
Page 184: Multi Window Settings
Multi Window Settings Multi window allows you to use two apps on the same screen, in separate, resizable windows. For more information, see Multi Window. After you turn on Multi window in Settings, you can control whether the Multi window tab displays on the screen by touching and holding Back. -
Page 185: S Pen Settings
Note: You can only move buttons from Active to Available or vice-versa if there is space in the destination area. For example, if there are already ten Active buttons, you will need to move one to Available before dragging a different Available button up to the Active area. S Pen Settings Configure options and settings for the S Pen. -
Page 186: Motions And Gestures Settings
Motions and Gestures Settings The Motion settings allow you to set up various Motion activation services. 1. From home, tap Apps > Settings. 2. Tap Motions and gestures to configure features. Tap the ON/OFF switch to turn a feature on. -
Page 187: Night Clock
To download additional panels, tap Download. To reorder the panels, tap More options > Reorder. Add Wallpaper to Your Edge Screen 1. Swipe upward on the Edge screen and then tap Settings. 2. Tap Express me > Create new. ... - Page 188 Edge Screen Text Edge screen text allows you to write a personal message that appears on the Edge screen. 1. Swipe upward on the Edge screen and then tap Settings. 2. Tap Edge screen text. 3. Type a personal message to display on the Edge screen. Edge Screen Timeout Edge screen timeout is applied only when the Edge screen is on, unless the Night clock is currently active.
-
Page 189: Accounts Settings
Accounts Settings When you set up accounts on your phone, such as your Google or Samsung accounts, and your email or social networking accounts, you can synchronize account information between your phone and the account. Types of information you can synchronize include contacts, pictures, videos, and other types of files. -
Page 190: Backup And Reset Settings
Backup and Reset Settings Set options for backing up your data to the Google servers. Backup and Restore Settings You can back up your data to a Google Account, and use the backed-up date to restore information when you re-install an app, or when you get a new phone. 1. -
Page 191: Easy Mode Settings
Easy Mode Settings Easy mode provides a simpler experience using your phone, with a simpler home screen layout and simpler app interactions. If you are a first-time smartphone user, or just to want to simplify the operation of your phone, you can turn on Easy mode at any time. 1. -
Page 192: Hearing Accessibility Settings
Hearing aids: Automatically adjusts to attempt to improve the sound quality for use with hearing aids. Samsung subtitles (CC): Displays Samsung subtitles where available. Tap the ON/OFF switch to turn the option on or off, and then tap Samsung subtitles to configure options. Settings... -
Page 193: Dexterity And Interaction Settings
Google subtitles (CC): Displays Google subtitles where available. Tap the ON/OFF switch to turn the option on or off, and then tap Google subtitles to configure options like Language, Text size, and Caption style. Sound balance: Adjust the sound sent to the left and right when using earphones. ... -
Page 194: Configure Other Accessibility Settings
Press and hold delay: Choose how long your phone waits during a tap and hold gesture on the screen, before continuing with the tap and hold action. Interaction control: Control how your phone interprets motions and screen touches. To turn Interaction control on or off at any time, press and hold the Home key and the down Volume key at the same time. -
Page 195: Private Mode Settings
Use fingerprint recognition as an alternative to entering passwords in certain apps. You can also use your fingerprint to verify your identity when logging in to your Samsung account. Note: Fingerprint recognition uses the unique characteristics of each fingerprint to enhance the security of your device. -
Page 196: Language And Input Settings
Language and input, and then tap Default to select the default input method. Samsung Keyboard Settings The Samsung keyboard is an onscreen QWERTY keyboard, so you can enter text by “typing” on the keyboard. Samsung keyboard is enabled by default, and you can choose options for using it. - Page 197 • Personalized data: When enabled, predictive text uses personal language data you have entered to make better predictions. Samsung keyboard can collect all the text you enter, including personal data and credit card numbers, in order to give better prediction results.
-
Page 198: Swype Settings
• Vibration: When enabled, a vibration plays for your key touches. • Character preview: When enabled, the character appears in a bubble as you tap keys. More settings: • Pen detection: Show the handwriting pad when the S Pen is detected. •... -
Page 199: Google Voice Typing Settings
• Bold font on keys: Enable or disable bold font for the letters and symbols on the keys of the Swype keyboard. My Words: Choose options for customizing Swype based on your text entries. • Backup & Sync: Use Swype Connect to back up your words. •... -
Page 200: Handwriting Recognition
Offline speech recognition: Download and install speech recognition engines, to allow you to use voice input while not connected to the network, such as during Airplane mode. Block offensive words: Tap the checkbox to control whether Google displays words generally recognized as offensive. -
Page 201: Mouse/Trackpad Settings
1. From home, tap Apps > Settings. 2. Tap Language and input, and then tap Text-to-speech options: Preferred TTS engine: Select Samsung text-to-speech engine, or Google Text-to-speech Engine. Tap to configure options. General: • Speech rate: Choose a rate for text readouts. -
Page 202: Date And Time Settings
Date and Time Settings By default, your phone receives date and time information from the wireless network. When you are outside network coverage, you may want to set date and time information manually using the Date and Time settings. 1. From home, tap Apps >... -
Page 203: Accessories Settings
contact: You should still make an emergency call to the appropriate authorities if needed. Tap the ON/OFF switch to turn the option on. The following additional options are available: • Send pictures: Send pictures from the front and rear cameras to your emergency contact when you press the Power/Lock Key 3 times in a row. -
Page 204: Storage Settings
Ultra power saving mode: Tap the ON/OFF switch to turn the mode on. When on, your phone will conserve power by changing to grayscale screen mode, limiting the number of usable apps, turning off mobile data when the screen is off, and turning off connectivity features such as Wi-Fi and Bluetooth. -
Page 205: Security Settings
Security Settings Configure options for securing information on your phone. Device Administration Some applications, such as Corporate email, may require you allow access to your phone by device administrators in certain circumstances, such as if your phone is lost or stolen. Some features a device administrator might control include: ● Setting the number of failed password attempts before the phone is restored to factory settings. -
Page 206: Reactivation Lock
Settings. 2. Tap Security, and then tap the checkbox beside Reactivation lock to enable or disable the setting. Tip: You must establish and sign in to a Samsung account to use the Reactivation Lock feature. See Samsung Account. Passwords Use the Make passwords visible setting to briefly display password characters as you enter them into password fields. -
Page 207: Credential Storage
Credential Storage You can install credentials from an optional installed memory card (not included), and use the Credential storage settings to allow applications to access the security certificates and other credentials. 1. From home, tap Apps > Settings. 2. Tap Security, and then tap an option: ... -
Page 208: Help
Help Learn about using your phone. 1. From home, tap Apps > Settings. 2. Tap Help, and then tap topics to display information Activate This Device Connect to the network and activate your phone. If your phone is already activated, use this option to view information about your plan and usage. -
Page 209: Application Manager Settings
KNOX version: View your phone’s KNOX version. Application Manager Settings You can download and install applications from the Google Play store or Samsung Apps, or create applications using the Android SDK and install them on your phone. Use Application manager to manage applications on your phone. -
Page 210: Default Applications Settings
Default Applications Settings If you have installed multiple apps that perform the same kind of task, for example more than one messaging app, you can choose the app you want to use as the default. 1. From home, tap Apps >... -
Page 211: Call Settings
Notification sound: Choose a sound for calendar event notifications. Vibration: Enable vibration for calendar event notifications. Quick responses: Manage text phrases, which you can use to send to event attendees. Call Settings Configure options for calling with your phone. Tip: You can also access Call settings from the Phone app. -
Page 212: Answering And Ending Calls
Answering and Ending Calls Manage settings for answering and ending calls. 1. From home, tap Apps > Settings. 2. Tap Application Settings > Call > Answering and ending calls to configure these options: Answer calls by: • Pressing the Home key: Answer incoming calls by pressing the Home key. -
Page 213: Call Alerts
Call Alerts Set options for sounds and vibrations to occur during calls. 1. From home, tap Apps > Settings. 2. Tap Application Settings > Call > Call alerts to configure settings: Vibrate when answered: When enabled, your phone will vibrate when a call is answered. ... -
Page 214: More Settings
More Settings Settings for TTY and Hearing Aids are located in this option. TTY Mode A TTY (teletypewriter, also known as a TDD or Text Telephone) is a telecommunications device that allows people who are deaf, hard of hearing, or who have speech or language disabilities, to communicate by telephone. -
Page 215: Personalize Call Sound
Personalize Call Sound Choose options for call audio, in cases where you might need the sound softer or clearer, or optimized for your right or left ear. Note: This option is can only be configured during a call. For more details, see In-Call Options. -
Page 216: Dtmf Tones
DTMF Tones Set the length of Dual-tone Multi-frequency (DTMF) tones, which play when you use the keypad during a call, such as when navigating menus. 1. From home, tap Apps > Settings. 2. Tap Application Settings > Call > DTMF tones to choose a tone length. Voicemail Settings Set options for Visual Voicemail. -
Page 217: Email Settings
Swipe to call or message: Swipe your finger across a contact record to call or send a message to the contact’s default number. Swipe right to call, or left to create a message addressed to the contact. Only contacts with phones: Only contacts with at least one phone number display in Contacts. - Page 218 • Message preview line: Choose whether up to 3 lines display with the email subject in the Inbox. • Title line in list: Choose what displays as the title in the list of emails, the sender, or the subject of the email. •...
- Page 219 Manage Email Account Settings You can edit settings for your individual email accounts, such as email address and password, name display and signature, frequency of retrieval, and more. Note: Available settings depend on the type of email account. See your email service provider for details. 1.
- Page 220 • Always Cc/Bcc myself: Choose options for sending a copy of emails you send to yourself, as a copy (Cc) or blind copy (Bcc). • Show images: Choose whether to automatically display embedded images in the body of an email. •...
-
Page 221: Gallery Settings
2. Tap Application Settings > Internet to configure options: Manage accounts: Tap to sign in to your Samsung account. Signing in to your Samsung account allows you to sync bookmarks and open pages with your other devices. ... -
Page 222: Messages Settings
Messages Settings The messages settings menu lets you control options for your text and MMS messages including message limits, size settings, and notifications. Tip: You can also access Message settings from the Messages app. From home, tap Messages > More options > Settings. 1. - Page 223 Delete old messages: When turned on, your phone will automatically delete the oldest messages when the maximum number of messages is reached. Tap the ON/OFF switch to turn the setting on, and then set the maximum number of messages with the Text message limit and Multimedia message limit settings below.
-
Page 224: S Voice Settings
Spam filter: When turned on, your phone block messages that may be spam, by filtering based on criteria you set. Tap the ON/OFF switch to turn the setting on, and then configure filters: • Add to spam numbers: Enter telephone numbers, to automatically flag messages from the numbers as spam, when Spam settings are enabled. -
Page 225: Copyright Information
For more information, please call 1-800-SAMSUNG (726-7864). Intellectual Property All Intellectual Property, as defined below, owned by or which is otherwise the property of Samsung or its respective suppliers relating to the SAMSUNG mobile device, including but not limited to, accessories, parts, or software relating thereto (the “mobile device”), is proprietary to Samsung and protected under... -
Page 226: Modification Of Software
1-800-SAMSUNG (726-7864) Internet Address: samsung.com ©2015 Samsung. Samsung, Samsung Galaxy, Air View, S Pen, S Voice, Multi Window, Samsung Milk Music, and KNOX are trademarks of Samsung Electronics Co., Ltd. Note: Screen images are simulated. Appearance of device may vary. -
Page 227: Legal Information
Full written terms and detailed information about the warranty and obtaining service are available on the device at: Settings > About device > Legal Information > Samsung legal or you may access the online version of the Health/Safety and Warranty guide for your device at: English samsung.com/us/Legal/Phone-HSGuide... -
Page 228: Index
Accounts, 65 Call Waiting, 44 Email, 67 Caller ID, 44 Gmail, 66 Block your number, 44 Calling Google, 65 Samsung, 67 International, 137 Social Network, 76 International Dialing, 202 Accounts Settings, 176 US Dialing, 202 Action Memo, 25 Camera, 10, 97... - Page 229 Emergency Tone Setting, 161 Credential Storage, 194 Encryption, 192 Data, 89, 91 Data Connection Enhanced 9-1-1 (E9-1-1), 39 Status and indicators, 92 Enter Text, 32 Data Services, 91 Tips, 35 Entertainment, 79 Password, 7 Evernote, 118 Data Usage, 151 Date and Time Settings, 189 Extended Home Screen, 18 Daydream, 164 Face Tag, 208...
- Page 230 Google Play Music, 81 Instagram, 77 International Data Roaming, 139 Music (App), 81 International Dialing, 202 NextRadio, 84 Internet, 91 Samsung Milk Music, 84 Settings, 208 Spotify, 85 Sprint Music Plus, 85 Interruptions Setting, 161 Keyboard Music (App), 81 Google Voice Typing, 186...
- Page 231 Make calls, 36 Samsung Account, 67 Mute ringtone, 41 Samsung Keyboard, 34 Receive, 39 Settings, 183 Reject, 41 Samsung Milk Music, 84 Reject with text message, 41 Scout, 122 Speed dials, 59 Scrapbook, 128 Three-way calling, 45 Screen Capture, 28...
- Page 232 Swype, 34 Remove, 133 Unmount, 133 Swype Keyboard, 185 Security Settings System Update Settings, 195 Credential Storage, 194 Tap and Pay, 154 Device Administration, 192 Tap Gesture, 12 Text Editing, 35 Encryption, 192 Text Entry, 32 Passwords, 193 Security Update Service, 193 Input methods, 32 Security Settings, 192 Text Messaging, 72...
- Page 233 Password, 7 Web, 89 Retreiving messages, 47 While Locked Sound Setting, 161 Review messages, 49 Wi-Fi, 89 Setting up, 47, 49 Connect, 89 Settings, 51, 203 Hotspot, 93 Setup, 6 Settings, 145 Visual voicemail, 48 Turn on and off, 89 Volume, 158 Wi-Fi Calling, 36 Settings, 145...
Need help?
Do you have a question about the Galaxy Note Edge and is the answer not in the manual?
Questions and answers