Table of Contents
Advertisement
Quick Links
Advertisement
Table of Contents

Related Manuals for Topfield TF 5300k


Summary of Contents for Topfield TF 5300k
- Page 1 TF 5300k User Guide Digital Terrestrial Receiver Personal Video Recorder CONAX...
-
Page 3: Table Of Contents
Contents iii Contents 1 Introduction Features ....... Controlling the digital receiver . - Page 4 iv Contents 3 Preference Settings Language settings ......16 Video and audio settings ..... . 18 3.2.1 Television standard .
- Page 5 Contents v 6 Listing Services Editing the favourite list ..... . 36 How to use on-screen keyboard ....38 7 Recording and Playing Recording a programme .
-
Page 7: Introduction
Chapter 1 Introduction The TF 5300k digital receiver is fully compliant with the in- ternational Digital Video Broadcasting (DVB) standard, and thus is able to receive digital broadcasts of that standard. For its operation you need an antenna, which must be installed appropriately. -
Page 8: Controlling The Digital Receiver
2 Introduction • You can create favourite lists of your favourite services. • You can view information about the current television or radio programme. • Has an electronic programme guide that provides an overview of scheduled programmes. • You can update the firmware of the digital receiver to the latest version which would be provided by the manufac- turer. -
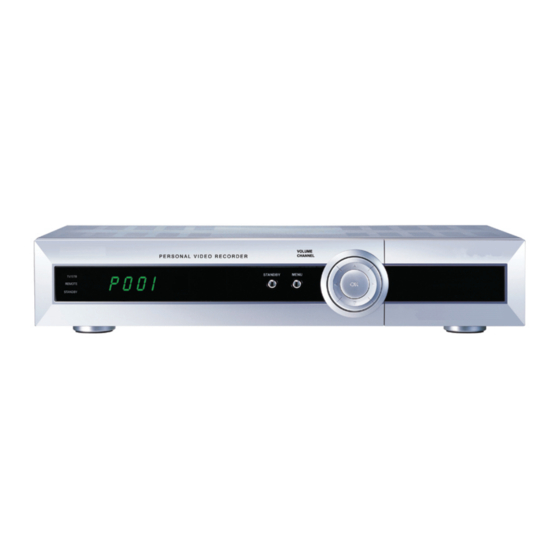
Page 9: The Front Panel
1.2 Controlling the digital receiver 3 1.2.1 The front panel The front panel of the digital receiver has buttons to control the digital receiver, and specific lamps and a display to indicate its status. The following indicates what they mean. TV/STB REMOTE STANDBY... -
Page 10: The Remote Control
4 Introduction Pull the right edge of the front panel to open the flap. You have to insert your subscription card into the front slot to watch pay services. 1.2.2 The remote control button switches the digital re- ceiver between standby mode and operation mode. - Page 11 1.2 Controlling the digital receiver 5 switches between television services and radio ser- vices. displays the main menu. It is also used to return MENU to the previous menu from a submenu. is used to select an audio track and a sound mode, or a video track of multifeed programme.
- Page 12 6 Introduction is used to start recording. pauses live television or playback of a recorded pro- gramme. changes the position of sub-picture counterclockwise. It is also used to jump back to beginnng of recording during a playback. changes the position of sub-picture clockwise. It is also used to jump to end of recording during a playback.
-
Page 13: Setup
Chapter 2 Setup 2.1 Unpacking Before going any further, check that you have received the following items with your digital receiver. • Remote control unit • Two batteries for the remote control (AAA 1.5 V) • One loop cable to connect the first tuner with the second tuner •... - Page 14 8 Setup • The mains power must be 90 to 250 volts. Check it before connecting the digital receiver to the wall outlet. For the power consumption of the digital receiver, refer to Table 2.1. • The wall outlet should be near the equipment. Do not run an extension lead to the unit.
-
Page 15: Rear Panel Connections
3.4 kg Operating temperature 0 to 45 °C Storage relative humidity 5 to 90 % 2.3 Rear panel connections The TF 5300k has a wide range of connections on the back. VIDEO RF OUT ANT 1 ANT 2 RF IN... -
Page 16: Connecting Up Your Digital Receiver
10 Setup AUDIO L/R Stereo audio output socket for the television set or the audio system. (white/red) S-VIDEO Super video output socket for the television set. TV Audio and video output socket for the television set. VCR Audio and video input/output socket for the video cassette recorder or suchlike. -
Page 17: Connecting The Antenna
2.4 Connecting up your digital receiver 11 2.4.1 Connecting the antenna Whatever sort of connection you have be- tween the digital receiver and the television, you need to connect the digital receiver to your television antenna so that it can receive digital television services. - Page 18 12 Setup 2. S-Video connector (S-VIDEO) 3. Composite connector (VIDEO) 4. RF connector (RF OUT) You should configure audio and video settings after connecting up the digital receiver. See § for detailed description. To use the SCART connector For best results with a standard television set, you should use a SCART cable, plugging one end into the TV socket on the digital receiver and the other end into a free SCART socket...
- Page 19 2.4 Connecting up your digital receiver 13 To use the composite video connector You will need to obtain a composite video cable (RCA cable) to use the composite video connector. Plug one end of the cable into the VIDEO (yellow) socket on the digital receiver, and the other end into the matching socket on your television.
-
Page 20: Connecting To Your Video Cassette Recorder
14 Setup In this case, you will need to connect a ca- ble from the RF OUT socket to the antenna connector on your television. To ensure your television can also pick up existing analogue channels as well, you will need to connect a cable from RF LOOP 2 OUT connector on the back of the digital receiver to the RF IN connector. -
Page 21: Powering On And Checking Picture
2.5 Switching on for the first time 15 If the digital receiver no longer reacts properly to remote con- trol commands, the batteries may be flat. Be sure to remove used batteries. The manufacturer accepts no liability for the damage resulting from leaking batteries. NOTE Batteries, including those which contain no heavy metals, may not be disposed of with household waste. -
Page 22: Preference Settings
16 Preference Settings Chapter 3 Preference Settings 3.1 Language settings You can select the language in which the menu would be dis- played. In addition to that, you can select which language of au- dio track and of subtitle track should be output. - Page 23 3.1 Language settings 17 Subtitle language Set the 1st Subtitle Language option and the 2nd Subtitle Lan- guage option to your desired languages. When you watch a programme, if the programme has a subtitle track of the lan- guage that is designated for the 1st Subtitle Language, it will be displayed.
-
Page 24: Video And Audio Settings
18 Preference Settings 3.2 Video and audio settings You have to configure the video and audio settings appropriately to your television set and other appliances. Select the System Setting A/V Output Setting menu. You should see a screen like the left figure. -
Page 25: Colour Model
3.2 Video and audio settings 19 3.2.2 Colour model Through the TV SCART connector, the digital receiver is able to output video in various colour models. If you have the digital receiver linked to your television via this connector, you should set the Video Output option to your desired colour model. -
Page 26: Television Aspect Ratio
20 Preference Settings 3.2.4 Television aspect ratio If you have a wide-screen television, set the TV Aspect Ratio option to 16:9. Otherwise, if you have a normal-screen television, set the TV Aspect Ratio option to 4:3. You cannot fully enjoy wide-screen programmes with your normal-screen television as the above figures show. -
Page 27: Radio Frequency Output
3.3 Local time setting 21 3.2.6 Radio frequency output If you have connected your television to the RF OUT socket, you should configure the radio frequency output. The digital receiver can make analogue television from digital television and output it via the RF OUT socket. Set the RF Output option to the television standard that your country supports referring to Table 3.1. - Page 28 22 Preference Settings Table 3.2: Time offset table Time offset City 12:00 Eniwetok, Kwajalein 11:00 Midway Island, Samoa 10:00 Hawaii 09:00 Alaska 08:00 Pacific Time US, Canada 07:00 Mountain Time US, Canada 06:00 Central Time US, Canada, Mexico City 05:00 Eastern Time US, Canada, Bogota, Lima 04:00 Atlantic Time Canada, La Paz...
-
Page 29: Parental Control
3.4 Parental control 23 To set the local time yourself, set the Mode option to Manual and enter your local time to the Local Time option with the numeric buttons. The time format is day/month/year 24-hour:minute. 3.4 Parental control Select the System Setting Parental Control menu. -
Page 30: To Turn On The Time Shift Feature
24 Preference Settings option as you desire. Its available range is from 1 to 30 seconds. If you set this option to No Info Box, the information box will not be displayed when you switch services. However, pressing button will display the information box. If you set this option to Never Hide, the information box will always be displayed. -
Page 31: Service Search
Chapter 4 Service Search After connecting up the digital receiver, you will need to per- form a service search. 4.1 Searching broadcasting services To perform service search, select the Installation Service Search menu. You should see a screen like the left figure. If you have an antenna booster, you should set the Antenna Sup- ply 5V option to On to supply... -
Page 32: Resetting To Factory Settings
26 Service Search transponder. To do that, set the Search Mode option to Manual, and then at the Channel option select your desired transponder. The number ranges from 5 to 12 in VHF and 21 to 69 in UHF. You can search pay services as well as free services as follows: •... -
Page 33: Daily Usage
Chapter 5 Daily Usage 5.1 Volume control Use the buttons to alter the volume to a com- fortable level. You may need to adjust the volume on your television set too. To temporarily switch off the sound, press button. Press it again to restore the sound to previous level. - Page 34 28 Daily Usage On the services list, you can see the service information: • Service number and name • Transponder information A dollar sign ($) may be marked on some entries, indicating pay service. To watch pay services, you need the subscription card.
-
Page 35: The Favourite Services List
5.2 Watching television 29 You have to enter your personal identification number to watch or unlock it. • To add the highlighted service into a favourite group, select the Add to Fav option; then the favourite groups will be displayed. Put the highlight bar on a desired group and press the button. -
Page 36: Viewing Programme Information
30 Daily Usage Besides that, you can add or delete a favourite group or service. To add the service you are currently watching into a favourite group, put the highlight bar on a desired group and press the button. To create a new group, press the button;... -
Page 37: Selecting Audio Tracks
5.2 Watching television 31 • Multifeed symbol ( ) if the current programme is pro- vided as a multifeed programme. To use this feature, refer to § 5.4. Pressing the button once more displays detailed informa- tion about the current programme. To hide the information box, press the button. -
Page 38: Viewing Electronic Programme Guide
32 Daily Usage 5.3 Viewing electronic programme guide The Electronic Programme Guide shows the current and sched- uled programmes that are or will be available on each service with a short summary for each programme. Pressing the button dis- GUIDE plays the electronic programme guide, on which you can see the following:... -
Page 39: Using Time Shift
5.5 Using time shift 33 If a multifeed programme is provided on the current service, the multifeed symbol ( ) will be marked on the information box. Press the button, then available video tracks will be listed. Once you select one, it will be presented. At this time, you have to press the button once more to select audio tracks. -
Page 40: Using Picture In Picture
34 Daily Usage • You can jump forward 30 seconds at a time by pressing button. • You can jump backward 20 seconds at a time by pressing button. • You can change playback speed. For slow motion see § 7.3.2. For fast motion see § 7.3.3. •... - Page 41 5.6 Using picture in picture 35 1. Press the button to display a sub-picture, on which another service will be presented. 2. Pressing the button once more minifies the sub-picture, and pressing it once again hides the sub-picture. 3. To display the services list for the sub-picture, press the button.
-
Page 42: Listing Services
36 Listing Services Chapter 6 Listing Services 6.1 Editing the favourite list You can make your own favourite services list. In fact, you can define multiple favourite services lists, each being a ‘group’ of chosen services. Select the Organizing Favorites menu. - Page 43 6.1 Editing the favourite list 37 You can add up to 30 groups. To add a group, select the NEW option in the group list; then the on-screen keyboard appears. See § for how to use the on-screen keyboard. To rename a group, put the highlight bar on the group entry you want and press the button;...
-
Page 44: How To Use On-Screen Keyboard
38 Listing Services services list after adding radio services, press the button again. With your favourite services list, you can select your favourite services more easily. Refer to § 5.2.2 for detailed description. 6.2 How to use on-screen keyboard You can move the highlight key horizontally with the buttons and vertically with buttons. -
Page 45: Recording And Playing
You can record two different services while watching another if two of the services are provided through the same transponder The TF 5300k digital receiver has two tuners so that you can enjoy the following: • While playing a recording back, you can watch a service in the sub-picture using the picture-in-picture feature. -
Page 46: Recording A Programme
40 Recording and Playing 7.1 Recording a programme Once recording has started, a symbol like the left fig- ure will be displayed at the top right of the screen for a few seconds. When you are watching a service dif- ferent from the service being recorded, you can view a number on the centre of the symbol, which indicates the order that the recording is started. - Page 47 7.1 Recording a programme 41 Pressing the button will pause the live show and begin time shifting within the current recording even with the Time Shifting option disabled. How- ever, it is still possible to pause a recording. After a recording is started, pressing the but- ton displays a menu like the left...
-
Page 48: Current Programme Recording
42 Recording and Playing To stop recording, press the button; then a box like the left figure appears, which shows programmes currently be- ing recorded. If you select one, its recording will stop. While a recording is going on, you can watch or record another service. -
Page 49: Timer Recording
7.1 Recording a programme 43 displays a services list, from which you can select your desired service. To start recording immediately from now on, set the Start Time option to Quick. If you are watching a programme by time shift and wish to record it from the beginning, set this option to Current Event. - Page 50 44 Recording and Playing 1. Set the Record option to On to make a recording. If this option is set to Off, the digital receiver will turn on at the specified time but not record; instead, you may record with your video cassette recorder or suchlike in this case. 2.
-
Page 51: Scheduling Recordings Using The Programme Guide
7.1 Recording a programme 45 anything, it will be named after the service name. See § for how to use the on-screen keyboard. 8. To set a timer recording with the above settings, select the OK option; otherwise, it will not be saved and will not occur. -
Page 52: Recording A Time-Shifted Programme
46 Recording and Playing 4. To make a timer event without recording, press the button; the letter P is displayed. To make a timer event with recording, press it once more or alternatively press button; then the letter R is displayed. 5. -
Page 53: To Delete A Recording
7.2 File archive 47 Press the button to dis- play the recorded programme list. The file information is com- prised of the following elements: file number, file name, recording time, playing duration, file size and so on. You can play, move, delete, rename and lock a recording file. You can also sort the recording files by file name, playing dura- tion or file size. -
Page 54: To Rename A Recording
48 Recording and Playing 1. Put the highlight bar on a desired recording. 2. Press the button to display the additional options. 3. Set the Lock option to Locked. 4. Press the button. EXIT 5. The lock symbol ( ) is displayed on it. If you select a locked recording to play it back, you will be asked for your personal identification number. -
Page 55: Playing Back A Recording
7.3 Playing back a recording 49 7.3 Playing back a recording When a programme is recorded, its additional contents such as audio tracks or teletext are also recorded together. So you can enjoy them while playing back a recording. The instructions on how to play a recording are as follows: 1. -
Page 56: To Play In Slow Motion
50 Recording and Playing • To go forward, hold down the button; to go back- ward, hold down the button. • To bookmark a position, refer to § 7.3.4. • If there are no bookmarks, you can jump forward 30 seconds at a time by pressing the button. -
Page 57: To Make A Bookmark
7.3 Playing back a recording 51 7.3.4 To make a bookmark You can mark favourite parts of a recording by creating book- marks, and then jump to them. You can have up to 64 book- marks. Bookmarks are stored with the recording so that you can use them again afterwards. -
Page 58: To Play Back Recordings In Sequence
52 Recording and Playing 2. Move to the beginning scene of the part you want to play repeatedly by holding down the button. 3. Press the button, then the pointer starts to blink. 4. Move to the end scene; the part is marked in purple. 5. -
Page 59: Copying A Recording
7.5 Copying a recording 53 2. Move to the beginning scene of the part you want to edit by holding down the button. 3. Press the button, then the pointer starts to blink. 4. Move to the end scene; the part is marked in purple. 5. -
Page 60: Formatting The Hard Disk
54 Recording and Playing 7.6 Formatting the hard disk You can delete all contents stored in the hard disk drive by formatting it. If you wish to do that, select the Installation Format Hard Disk menu, then you are asked for confirmation. If you select Yes, formatting will start. -
Page 61: Firmware Update
Chapter 8 Firmware Update To check up whether there is a new variable firmware, select the Installation menu. If there is a new one, the System Soft- ware Upgrade menu will become enabled. If you select the System Software Upgrade menu, the digital receiver will ask you whether to start firmware update, displaying the infor- mation about the new firmware. -
Page 62: Index
56 INDEX Index 16:9, Date, 16:9 Display Format, Duration, 41, 1st Audio Language, DVB, 1st Subtitle Language, 2nd Audio Language, Electronic Programme Guide, 2nd Subtitle Language, Every Day, 4:3, Every Weekday, Every Weekend, A/V Output Setting, Access Control, Factory Setting, Add to Fav, File Name, 43, After next program,... - Page 63 mono, Service, 42, multifeed, Service Search, services list, NEW, Show Provider, normal-screen television, Size, NTSC, Sorting, Sound Mode, One Time, Space, Organizing Favorites, specifications, 8–10 OSD Transparency, Start Search, Start Time, 43, PAL, stereo, Parental Control, Stop, picture-in-picture, subtitle, PIN, System Setting, 23, progress bar, System Software Upgrade,...
- Page 66 Correct disposal of this product This marking shown on the product or its literature indicates that it should not be disposed with other household wastes at the end of its working life. To prevent possible harm to the environment or human health from uncontrolled waste disposal, please separate this from other types of wastes and recycle it responsibly to promote the sustainable reuse of material resources.
Need help?
Do you have a question about the TF 5300k and is the answer not in the manual?
Questions and answers