Table of Contents
Advertisement
Quick Links
Advertisement
Table of Contents

Summary of Contents for Focus Ebhancements FS-H200
- Page 1 FS-H200 Portable DTE Recorder User Guide MANL-1158-04...
-
Page 3: Legal Notices
FOCUS ENHANCEMENTS. FOCUS ENHANCEMENTS cannot be responsible for unauthorized use of equipment and will not make allowance or credit for unauthorized use or access. FS-H200 Portable DTE Recorder... - Page 4 A Focus Enhancements Company Lise-Meitner-Str. 15 24223 Schwentinental/ Germany www.focusinfo.com Serial Number The serial number for this equipment is located inside the unit, in the battery compartment. Please record this serial number and keep it in a secure area. FS-H200 Portable DTE Recorder...
- Page 5 LEGAL NOTICES Regulations and Safety Focus Enhancements, Inc. 1370 Dell Avenue Campbell, CA. 95008 Model Number: FS-H200 Portable DTE Recorder Date of Manufacture: Reference the Serial Number label attached to the unit. BATT-0012-01LF (Accessory Part Number: ASYF-1323-01LF) Date of Manufacture: Reference the Serial Number label attached to the unit.
- Page 6 • Consult the dealer or an experienced radio/TV technician for help. Compliance FS-H200 is a device marketed for use in industrial or business environments. The FS-H200 complies with the regulations the following testing agencies: Australia and New Zealand European Union...
- Page 7 This symbol indicates the presence of an un-insulated Dangerous Voltage within the product’s enclosure that may constitute a risk of electric shock to persons. In the FS-H200 Documentation Caution Title This symbol indicates important operating or maintenance (servicing) information that the user should read and understand.
-
Page 8: Power Sources
Verify Power Plugs are Fully Inserted To prevent potential electrical shock to personnel, verify that the FS-H200 power cord plug is fully inserted in to a grounded receptor and that the plug blades are not exposed. ATTENTION POUR PREVENIR LES CHOCS ELECTRIQUES NE PAS... - Page 9 Lightning and Power Surges During electrical storms or when left unattended and unused for long periods of time, unplug the FS-H200 from the power source and disconnect the antenna or cable system. Power Lines...
- Page 10 Safety Check Upon completion of any service or repairs to this product, ask the service technician to perform safety checks to determine that the product is in proper operating condition. FS-H200 Portable DTE Recorder viii...
-
Page 11: Operating Environment
LEGAL NOTICES Operating Environment • Avoid moisture, dust, extreme heat or cold. FS-H200 Portable DTE Recorder... - Page 12 FS-H200 Portable DTE Recorder...
-
Page 13: Table Of Contents
Video I/O - IEEE1394 Camera FireWire Connector . 13 DV Audio ....... 14 FS-H200 Portable DTE Recorder... - Page 14 Computer I/O - USB 2.0 ..... . 14 Powering the FS-H200 ......15 Connecting the FS-H200 to AC Power .
- Page 15 Table of Contents FS-H200 Functions ......45 General Menu Information ......46 Welcome .
- Page 16 FS-H200 Resolution and Frames ....98 FS-H200 Accessories ......98 Technical Specifications .
- Page 17 Index ........109 FS-H200 Portable DTE Recorder...
-
Page 19: Introduction
DTE Eliminates Pre-edit Processing The FS-H200 DTE disk recorder eliminates the need to capture, transfer or convert video clips before editing. The FS-H200 is a stand- alone device that records DV25, HD 720p, and HD 1080i video to a Compact Flash (CF) memory card as a NLE native file. In HD... -
Page 20: Unpacking
Introduction Unpacking Verify that the FS-H200 has the following items: FS-H200 unit Li-Ion battery pack BATT-0012-01LF (Accessory Part Number: ASYF-1323-01LF) Power adapter with connector cable. PWRS-0038-03 Cable, power (If required for included power supply.) CBLA-0166-01LF Cable, USB, 2.0, Type A-A... -
Page 21: Features
When shooting is finished, transfer video files to the NLE by either: Mounting the FS-H200 to a Mac or PC editing system like a typical USB hard disk drive. Transfer clips to your NLE's disk drive or edit instantly in real-time using the FS-H200 as your media source. - Page 22 • Easy to Use, Control and Update a. The FS-H200 interfaces with the camcorder via FireWire. b. The FS-H200 uses USB 2.0 to connect to a computer. c. The FS-H200 works with camcorders and record clips with or without the use of a tape in the camera.
- Page 23 FireWire port on a computer. FireWire Connection Is Not A Data Interface Mounting the FS-H200 to a computer for file transfer is done exclusively through the USB2 interface. • Multiple Control Modes External, Normal, and Syncro -- coordinate control between camera and FS-H200.
-
Page 24: Overview Of This Guide
This chapter describes how to setup and use the FS-H200. FS-H200 Functions This chapter provides detailed information about each of the FS-H200 functions. FS-H200 with Other Devices This chapter describes how to connect the FS-H200 to Windows and Mac computers. Technical Specifications Index FS-H200 Portable DTE Recorder... -
Page 25: Quick Start
This chapter covers the topics: Physical Description and Controls Front View - Controls Top View - Input/Output and Power Connectors Powering the FS-H200 Connecting the FS-H200 to AC Power Battery Operations Inserting Compact Flash Card Removing Compact Flash Card Preparing CF Card for FS-H200... -
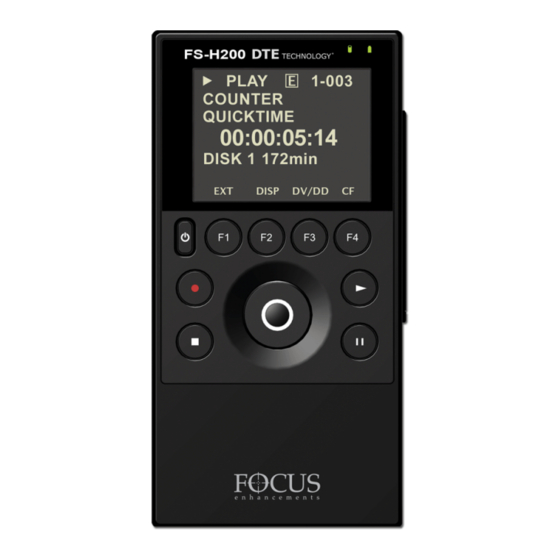
Page 26: Physical Description And Controls
Power FS-H200. Power ON Power OFF Press the key to shut down. During power off, the FS-H200 beeps, indicating that it is turning off. Reset Is a function of turning off and on the FS-H200. FS-H200 Portable DTE Recorder... -
Page 27: Record / Play Controls
Quick Start Record / Play Controls Record Play Stop Pause Use these keys to control FS-H200 playback and record functions. Typically, these functions are used while on the HOME menu. Record Press Record when the FS-H200 is in mode to start Stop recording. -
Page 28: Pause
Left Soft Button Soft Button Down Soft Button Previous Video Clip Use the Scroll Wheel, Select and Soft buttons to navigate through the FS-H200 menus. The navigation keys are Left , and Right Down Select The soft buttons are areas on the Scroll Wheel that when pressed, function the same way as a normal key button. -
Page 29: Scroll Wheel And Select Key
Quick Start Scroll Wheel and Select Key The Scroll Wheel has multiple functions. • Menu Navigation Moving through the FS-H200 menu tree. • Input Values When selecting values for fields, use the Scroll Wheel dial to an item in a list of options. Then press the... -
Page 30: Function Keys
Quick Start Function keys Below the FS-H200 LCD display are four user-defined function keys: , and . Use them as short-cut keys to select functions displayed at the bottom of the LCD display. The function of these keys changes, depending on the options set and displayed on the LCD. -
Page 31: Top View - Input/Output And Power Connectors
HDV camcorders equipped with a 1394 connection. Powering the FS-H200 Via the FireWire Connection The FS-H200 can also draw power for recording, playback, and battery charging operations through the FireWire IEEE 1394 connector. This requires an active Firewire connector with power and a 6-pin to 6-pin cable. -
Page 32: Dv Audio
4-ch (12-bit, 32kHz) -- Available in the Raw DV DTE file format only. • MPEG 1, Layer II Not all HD Frame Rates Are Supported with the FS-H200 in Quicktime. For all available DTE frame rates supported with the FS-H200, see page DTE Video Formats on page 100. -
Page 33: Powering The Fs-H200
Installing a Battery Battery 1. Place the FS-H200 so that the unit is face up. 2. Position the battery pack, so that the connector tab is on the upside. The connector tab must align with the power tab on the inside of the FS-H200. -
Page 34: Removing A Battery
Quick Start Removing a Battery Release Button 1. Depress and hold the Release button on the FS-H200’s right side. 2. Give the FS-H200 a light straight downward shake: the battery loosens and slides out. Charging the Battery The battery begins charging anytime the FS-H200 is connected to the AC power adapter that is supplied with the FS-H200. -
Page 35: Battery Data
Connect the FS-H200 to a computer through an active, powered FireWire port. • The Battery Charge LED flashes whenever the FS-H200 has both the battery and AC power installed. This indicates that the battery is receiving a charge. • When the battery is charged, the battery charge symbol in the LCD is solid green. -
Page 36: Low Battery Power During Operation
Quick Start Low Battery Power During Operation If during operation, the FS-H200 senses that the battery charge is low resulting in a low voltage condition, the unit alerts the user with warning beeps -- less than 3% charge remaining -- and then powers down in an orderly manner, protecting the stored video clips. -
Page 37: Operation
Quick Start Operation When operating the FS-H200 at 12V rather than 14.4V, the power consumed remains the same, but the current draw increases by a factor of 1.2 (14.4/12.0). When charging the batteries, the FS-H200 applies as much power as possible to the battery, up to a limit of about 1A charging current. -
Page 38: Inserting Compact Flash Card
Do Not Remove CF Card Without Running COMPACT FLASH Utility First If a compact flash card is removed while the FS-H200 is powered on and without running the COMPACT FLASH utility, video clip(s) on the card may be damaged. For the safe removal and replacement of CF cards during operation, see Removing Compact Flash Card on page 21. -
Page 39: Removing Compact Flash Card
Removing Compact Flash Card These are the only recommend methods to use when removing a CF card from the FS-H200 when it is powered on. During a recording session it is possible to swap CF cards on the fly. To do this, use the Utility, . -
Page 40: Remove Card Using Compact Flash Utility
Focus Enhancements can not guarantee the number of write cycles the user can expect to get with a particular CF card and the FS-H200. Incorrect Insertion/Removal of CF Card If the CF card is removed while the FS-H200 is powered on, but without running the COMPACT FLASH utility, video clips on the card may be damaged. -
Page 41: Preparing Cf Card For Fs-H200
Quick Start Preparing CF Card for FS-H200 If the FS-H200 is started without a CF card in the card slot a menu appears. It is necessary to insert a CF card and prepare it for use and removal with/from the device. -
Page 42: Connecting Fs-H200 To Dv/Hdv Camcorder
If you are unclear of its location, consult your video camera manual. FS-H200 Supplied with Two FireWire Cables The FS-H200 is provided with both 4-pin to 6-pin and 6-pin to 6- pin FireWire cables. Check to see which type the camcorder requires. -
Page 43: Fs-H200 User Interface
Quick Start FS-H200 User Interface The FS-H200 menu system provides access to all the functions available in the unit. Each of the displays below (except the Welcome and Home menus which come up automatically when the unit starts) are accessed by pressing the left or right soft buttons on the Scroll Wheel. - Page 44 UTC, country, state, or continental, and ocean city within the time time zone ranges. code range. DST ADJUST AUTOMATIC MANUAL AUTO LCD BRIGHT 1 through 16 KEY BRIGHT 1 through 16 (Does not include Scroll Wheel) FS-H200 Portable DTE Recorder...
- Page 45 GRAY NO VIDEO EXTL CTL PAUSE FRAME FILE TC SET UB SET TC MODE DROP (If FS-H200 in EXT NON-DROP TC, TC Mode has no effect.) PLAY MODE PLAY CLIP LOOP CLIP PLAY ALL LOOP ALL UDF FS PERM READ-ONLY...
-
Page 46: Types Of Fs-H200 Displays
Selection DELETE CLIP SYSTEM RESET DIAGNOSTIC STATUS VERSION COMPACT FLASH Types of FS-H200 Displays The FS-H200 has three types of displays: • Informational These displays provide information only and do not permit setting values: examples, (see page WELCOME VERSION 85). -
Page 47: Record And Playback
Quick Start Record and Playback Before using the FS-H200, set up the unit as outlined in the following sections: Set Up the FS-H200 Power On FS-H200 Set Date and Time Select Record/Play Mode Select the Control Mode Select the Recording Format (REC FORMAT) -
Page 48: Set Up The Fs-H200
Power On FS-H200 1. Press the key and release it. Power 2. The display appears while the FS-H200 Welcome initializes. Set Date and Time Date and Time Must Be Set The date and time must be set because they are used in the FS- H200 file naming function. - Page 49 7. Press the key. Select The display returns to the SETUP menu which displays the new date. For more information on the TIME ZONES DST ADJUST other functions, refer to the section, SETUP SETUP Menus on page 60. FS-H200 Portable DTE Recorder...
- Page 50 CONTROL NORMAL REC MODE NORMAL REC FORMAT DTE FORMAT QUICKTIME TIMECODE EXT TC By default, the FS-H200 is setup for the most typical recording situations. The Operation defaults are: OPERATION FUNCTION Reference MODE REC/PLAY See MODE on page 52. CONTROL NORMAL See CONTROL on page 53.
-
Page 51: Select Record/Play Mode
The two operation modes are: • REC/PLAY This for recording and playback operations. • This for mounting the FS-H200 to a computer so that it functions as a hard drive on the computer. 3. Pick and press the Select key. REC/PLAY The display returns to the menu. -
Page 52: Select The Control Mode
Select the Control Mode OPERATION CONTROL NORMAL EXTERNAL SYNCRO This determines which controls, the FS-H200’s or the camera’s, are used during recording, see on page 53. Select the CONTROL mode to use and the display returns to the menu. OPERATION... -
Page 53: Select The Dte Format
DV-24p Advanced mode. • 24p is comparable to DV QuickTime and AVI Type 2. • PAL 25p camcorders require no special 25p DV format • There are different FS-H200 models for NTSC and PAL recording FS-H200 Portable DTE Recorder... -
Page 54: Select The Timecode
SYSTEM SETUP Menu Overridden by EXT TC Settings When EXT TC is selected, the FS-H200 follows the timecode mode of the camera, Drop Frame or Non Drop Frame, regardless of the setting in the SETUP menu. FS-H200 Portable DTE Recorder... -
Page 55: Record With The Fs-H200
Before beginning recording, verify that: 1. Time and date are set. 2. Recording format is set. 3. DTE Format is set. 4. The FS-H200 is connected to the video camera according to the explanation in Connecting FS-H200 to DV/HDV Camcorder on page 24. - Page 56 If the Counter does not increment while recording the camera, it is an indication that there is no active connection between the FS- H200 and the camera. • Verify that the FS-H200 1394 DV I/O and the camera connections are secure. It may be necessary to unplug and then reconnect them.
-
Page 57: Normal Recording
1. Set the video camera to mode. Camera 2. Verify that an image appears in the viewfinder. 3. On the FS-H200, press Record The FS-H200 begins to record. The timecode value shows on the display. Record Pause Stop 4. Press once to put the FS-H200 to mode. -
Page 58: External Recording
Quick Start EXTERNAL Recording External control allows the camcorder to control the FS-H200 record function via the camcorder trigger. 1. Verify that the FS-H200 is in mode. Stop 2. From the FS-H200 Home menu, press the soft Right button once and the... -
Page 59: Syncro Recording
Pause the upper left-hand corner. Next to it is a indicating that FS-H200 is following the state of the camcorder’s tape controls, i.e. record when the camcorder records and pause when it pauses. FS-H200 Portable DTE Recorder... -
Page 60: Recording Timecode In The File
Quick Start 7. Now the FS-H200 will respond to the camcorder’s tape controls. The recording signal goes both to the tape in the camera and to the FS-H200. Recording Timecode in the File OPERATION TIMECODE EXT TC FREE RUN REC RUN REGEN 1. -
Page 61: Playback From Fs-H200 To Camcorder Viewer
Quick Start Playback from FS-H200 to Camcorder Viewer Verify that both the video camera and the FS-H200 are powered on and that they are connected together with the FireWire cable from the FS-H200 DV/IO port to the camcorder 1394 port. - Page 62 FS-H200 Portable DTE Recorder...
-
Page 63: Fs-H200 Functions
General Menu Information OPERATION Menus SETUP Menus FUNCTIONS Menus UTILITIES Menus FS-H200 menus are organized in a flat hierarchy. Every menu has a unique name, and it is possible to cycle continuously through the menus using the navigation buttons. Left... -
Page 64: General Menu Information
FS-H200 Functions General Menu Information The FS-H200 LCD menus are organized by function with each menu displaying a list of items. An item can be: • A value that can be set, such as the date. • A switch similar to a check box, that can be enabled along with other options in the display. -
Page 65: Welcome
FS-H200 Functions Welcome The Welcome display appears briefly after boot-up, and automatically switches to the Home menu when the FS-H200 is ready for operation. Home Menu The Home menu combines displaying operation information and providing function controls through the function buttons. To leave the Home menu use either the Navigation button. - Page 66 74 for more information. Menus Functions with as the default, refer to DV/DD FUNCTIONS on page 74 for more information. Menus information field that displays data type. DISP information field displays current data for DISP Recording Format FS-H200 Portable DTE Recorder...
-
Page 67: Disp (Display) Information Fields
Displays the set user bit value in a particular clip. A user bit value must be added for this to display, refer to UB SET on page 70. ABSOLUTE Displays an absolute timecode value for the particular session: the sum of all COUNTER timecodes on connected volumes. FS-H200 Portable DTE Recorder... -
Page 68: Fs-H200 System Information Messages
Line 11 displays the Standard Digital (SD) video format. It can not be changed. HD RECORDER Line 11 displays the HD resolution of the current track which depends on the camcorder in use with the FS-H200 unit. Possible values are: • 1080i50/60 TC (QuickTime and m2t) • 1080/30f TC (m2t) •... -
Page 69: Operation Menus
SYNCRO REC MODE NORMAL NORMAL RETRO CACHE REC FORMAT DTE FORMAT QUICKTIME RAW DV AVI TYPE 1 AVI TYPE 2 CANOPUS AVI MATROX AVI QUICKTIME QUICKTIME TIMECODE EXT TC EXT TC FREE RUN REC RUN REGEN FS-H200 Portable DTE Recorder... -
Page 70: Mode
MODE OPERATION MODE REC/PLAY • REC/PLAY Use this option to set the FS-H200 controls to disk recorder mode. • HDD Use this option when connecting the FS-H200 to a computer. The FS-H200 functions as a volume visible to the computer. -
Page 71: Control
FS- CONTROL H200 to operate in three different control modes during record and playback. • NORMAL Record and Play modes are controlled through the FS-H200 controls. • EXTERNAL when controlling recording through an EXTERNAL external device. -
Page 72: Rec Mode
FS-H200 Functions REC MODE OPERATION REC MODE NORMAL RETRO CACHE menu permits setting the FS-H200 to various REC MODE recording modes see REC MODEs with Home Menu Indicators page 54. Once a recording mode is selected, the recorder remains in that mode until a different mode is chosen. -
Page 73: Normal Record
FS-H200 Functions NORMAL Record This is the standard recording mode. • All control is from the FS-H200 front panel. Initially, the menu displays Home STOP • Pressing Record puts the FS-H200 into record mode. • Pressing Pause stops recording. • Pressing Pause a second time resumes recording to the original video clip. -
Page 74: Rec Format
• DV • HDV DTE FORMAT OPERATION DTE FORMAT AVI TYPE 1 AVI TYPE 2 CANOPUS AVI Depending on which was selected, this menu REC FORMAT displays a list of available Direct To Edit formats: above, display FS-H200 Portable DTE Recorder... -
Page 75: Dv Formats
M2T and QuickTimeSupport Recordings Larger Than 2GB The following formats support file sizes larger than 2GB: • M2T (HDV) • QuickTime (DV and HDV) The latest DTE supported applications and file formats are listed on the Focus Enhancements website: www.focusinfo.com FS-H200 Portable DTE Recorder... -
Page 76: Timecode
Choose mode to clear any TC EXT stored number. SETUP Menu Overridden by EXT TC Settings When EXT TC is selected, the FS-H200 follows the timecode mode of the camera, Drop Frame Non Drop Frame, regardless of the setting in the SETUP menu. - Page 77 • Adds 1 to the number. • Stores the new timecode as the number that will be assigned to the first frame of the next recording session. If the drive is empty, i.e. no existing recordings, the FS-H200 uses the value.
-
Page 78: Setup Menus
TIME ZONE Select time for specific time zone by selecting geographical region and city. DST ADJUST AUTOMATIC AUTOMATIC STANDARD ALTERNATE AUTO LCD BRIGHT 1 -16 KEY BRIGHT 1 -16 ALARM ON/OFF STOP NO VIDEO NO VIDEO FS-H200 Portable DTE Recorder... -
Page 79: Date
TC SET 00:00:00:00 UB SET 00:00:00:00 TC MODE NON-DROP DROP NON-DROP PLAY MODE PLAY CLIP PLAY CLIP LOOP CLIP PLAY ALL LOOP ALL UDF FS PERM READ-ONLY READ-ONLY READ-WRITE DATE SETUP DATE 06/15/08 Default is 06/15/08. FS-H200 Portable DTE Recorder... -
Page 80: Time
FS-H200 Functions TIME SETUP TIME Default is 08:00:00 Date and Time Must Be Set The date and time must be set. They are used in the FS-H200 file naming function. FS-H200 Portable DTE Recorder... -
Page 81: Time Zone
Mexico City Arctic Miqueton For FS-H200 time features to accurately display local time, it is necessary to select the time zone where the FS-H200 is to operate. In addition, on page 64 depends on this setting.: DST DST ADJUST means Daylight Savings Time. -
Page 82: Dst Adjust
AUTOMATIC STANDARD ALTERNATE Use this function to set Daylight Savings Time for the locale where the FS-H200 is operating. There are three settings: • AUTOMATIC Default The FS-H200 adjusts to daylight savings time changes automatically between Standard and Daylight Savings Time. -
Page 83: Lcd
Permanently sets LCD backlight to • Permanently sets LCD backlight to • AUTO Turns off the backlight after one minute. On the FS-H200, pressing any button pad button turns the backlight back on. Any information message turns the backlight on. LCD BRIGHT SETUP... -
Page 84: Key Bright
FS-H200 Functions KEY BRIGHT SETUP KEY BRIGHT Sets the brightness of the FS-H200 control keys: range of 1 to 16 with 16 the brightest. This control does not effect the Scroll Wheel brightness. Default is ALARM SETUP ALARM Toggle switch controlling the Alarm. -
Page 85: Stop
FS-H200 Functions STOP SETUP STOP NO VIDEO These settings depend on the REC FORMAT selected and determine which video is output from the FS-H200 when using the Soft button to view recorded clips. Search Index Mode the options are: • FRAME (Default) Displays the first frame of the clip. -
Page 86: Ext Ctl
EXT CTL PAUSE FRAME FILE These external control options permit the use of a device to control the FS-H200 using a simple contact closure. • Default Use this option when connecting an external device with an RS232C cable. This requires the use of a a 3.5mm-to-DB9 adapter cable, plugged into FS-H200 port. -
Page 87: Tc Set
At the start of the next recording, the FS-H200 uses the TC SET value as the start of the timecode count. • REGEN If the drive is empty, i.e. no video clips, the FS-H200 uses the value as the starting timecode value. TC SET • REC RUN After a power cycle, the FS-H200 begins the first recording’s... -
Page 88: Ub Set
Professional applications employ user bits to add metadata to recordings to assist in post production. For example, multiple cameras are used during a shoot. Each FS-H200 has a unique UB setting that identifies it and the camera it serves. Later, the user bits are used to determine from which camera station the footage was recorded. -
Page 89: Tc Mode Ntsc Only
Disables drop-frame. No frames are dropped during recording and the timecode reflects the actual time during recording. If the FS-H200 is in EXT TC mode, the TC MODE selection has no effect on the recorded video's timecode. FS-H200 Portable DTE Recorder... -
Page 90: Play Mode
PLAY ALL LOOP ALL • Play Clip Default In this mode, the FS-H200 plays the selected clip from start to finish when you press the PLAY button. At the end of the particular clip, the FS-H200 pauses. • Loop Clip In this mode, the FS-H200 plays the selected clip from start to finish. -
Page 91: Udf Fs Perm
Setting to Read-Only permits faster mounting times. For more information about operating systems, see Windows and on page 88. MAC Operating Systems FS-H200 Portable DTE Recorder... -
Page 92: Functions Menus
• There are four groups of functions , and displayed via the Functions menu. • The function groups are independent of each other. • In each group only one selection is active at a time. FS-H200 Portable DTE Recorder... -
Page 93: Functions List
LCD on page 65. BLANK No Function. DISP DISP (Toggles the different TC display modes). (Default) ALARM ALARM/MUTE Turns the FS-H200 alarm on or off. FILE FILE (Toggles display between normal and the file name.) BLANK No Function. LOCK LOCK/UNLK Locks the buttonpad (Default) - toggles between LOCK and UNLK <Unlock>... -
Page 94: Utilities Menus
Provides details of power state and internal temperature of unit. VERSION Not Applicable Displays the current software version for the unit. COMPACT FLASH Not Applicable Use to safely remove and insert CF cards from the FS-H200. FS-H200 Portable DTE Recorder... -
Page 95: Format
FS-H200 before each recording session. Save Files Before Formatting The formatting process erases all data on the disk and is not reversible. Backup all files and clips on the FS-H200 before formatting. This selection formats the disk as follows: 1. From the Utilities menu, Select Format 2. -
Page 96: Repair Disk
Use this utility if a recording session does not complete properly and the file may be damaged. For example, recording terminates due to a sudden loss of power to the FS-H200. Repair Disk scans the flash card checking for and repairing file errors and incomplete files. -
Page 97: Repair Clip
Use this utility to repair a specific file that may be damaged. For example, a recording session terminates due to a loss of power to the FS-H200 and a video clip may be damaged. Repair Clip scans the specified file checking for and repairing file errors. Once the file is repaired it can be used in the NLE system. -
Page 98: File Name
Original Clip Name This utility displays a file name but does not permit changing it. The FS-H200 uses the date and time the clip is recorded to create the file name. 1. From the Utilities menu, go to FILE NAME 2. -
Page 99: Upgrade
Reformat CF Card As FAT32 Before Upgrading System Software It is necessary to reformat the FS-H200 CF card as a FAT32 file system BEFORE upgrading the system software. Remember to copy all data from the drive before reformatting. To upgrade system software: 1. -
Page 100: Upgrade Abort
Utilities menu. Rember to Dismount FS-H200 Before Exiting HDD It is important that the FS-H200 be correctly dismounted from the computer’s file system before exiting the HDD bypass mode, see MODE on page 52. 8. Select the utility Upgrade 9. -
Page 101: Delete Clip
BACK Utilities When a clip is deleted, the FS-H200 re-organizes and displays the remaining clips in sequence. For instance, if there are three clips on the disk: 001, 002, 003. If clip 002 is deleted, the remaining clips are reorganized and clip 003 becomes clip 002. -
Page 102: System Reset
CONTINUE TO RESET SYSTEM? BACK utility restores the factory default settings for SYSTEM RESET the FS-H200 unit. This feature is useful for diagnosing problems with the unit. System Reset A System Reset can not be reversed. DIAGNOSTIC DO NOT CHANGE THE SETTINGS OF THIS FUNCTION... -
Page 103: Status
STATUS BATTERY: 7.69 V TEMPERATURE: BACK The FS-H200 Status message provides details of the systems power state as well as internal temperature. This message may assist Focus Enhancements Technical Support in determining power and thermal problems with your unit. VERSION VERSION 1.0.0.08052909... -
Page 104: Compact Flash
To protect video clips from damage, it is necessary to run the COMPACT FLASH utility every time a CF card is removed from the FS-H200. If the F4 function key is set to CF, pressing F4 runs this utility. FS-H200 Portable DTE Recorder... -
Page 105: Fs-H200 With Other Devices
/ digitize the footage using a video capture card. The FS-H200’s DTE functionality eliminates the capture stage. All that is necessary is the moving of the video files from the FS-H200 to a computer. This can be done by either: •... -
Page 106: Windows And Mac Operating Systems
Read/Write Read/Write Improving Mounting Time for Mac OS 10.5 and Later When there are a large number of files on the FS-H200 and it is set mode, it can take several minutes for mount the UDF Read/Write FS-H200 to the Mac desktop. -
Page 107: Udf
UDF does not have the 2GB limitation on file size which permits the FS-H200 to record clips of up to 1.5 hours in length. Mac OS 10.5 and UDF Perm Setting When using Mac OS10.5 and UDF Perm is set to Read-Write, it may take several minutes for the disk drive to mount on the computer. -
Page 108: Moving Cf Card To A Card Reader
To protect the files on the CF card, use the Compact Flash utility to prepare the card for removal from the FS-H200. After the card is removed from the FS-H200 it can be inserted into the NLE computer’s card reader. -
Page 109: Connecting Fs-H200 To A Computer
FSH-200 with Other Devices Connecting FS-H200 to a Computer The FS-H200 can be connected directly to a computer using a USB A- A cable. Video I/O Computer I/0 IE 1394 USB 2.0 1. With FS-H200 powered off, connect the FS-H200 through its USB 2.0 port to the computer system. -
Page 110: Mounting To Windows And Mac
MODE message appears. HDD BYPASS HDD BYPASS SAFELY REMOVE HARDWARE (EJECT / UNMOUNT FS-H200 ON COMPUTER) AND UNPLUG USB CABLE BEFORE EXITING EXIT It is now possible to mount the FS-H200 drive onto the operating system. FS-H200 Portable DTE Recorder... -
Page 111: Mounting And Dismounting The Fs-H200
1. Open the Windows file system via MyComputer, Windows Explorer, or a similar Windows application. 2. Locate the FS-H200 drive and open it. Often, it appears as a standard disk drive and may be labeled E:, F:, G:, and so on. -
Page 112: Close Fs-H200 Directory/Dismount From Windows
Many USB devices, that once mounted to a Windows computer must then be dismounted using the Safely Remove Hardware function. The FS-H200 does not require that step. It safely dismounts itself from the computer file system. FS-H200 Portable DTE Recorder... -
Page 113: Mac
FAT32 volume with a PC label, as shown below: 2. Locate the FS-H200 on the desktop and open it up. 3. Open the folder with the most recent date code (for example, 20050127-110345-01). It should look similar to... -
Page 114: Close Fs-H200 Directory/Dismount From Mac
FSH-200 with Other Devices Close FS-H200 Directory/Dismount From MAC Dismount FS-H200 Before Powering Off It is important to dismount the FS-H200 from the Mac system BEFORE powering down the FS-H200. To dismount the FS-H200 from a Mac: 1. Select the FS-H200 on the computer's desktop. It is marked with a PC symbol. -
Page 115: Video File Types And Name Formats
YYYMMDDHHMMSSb01 .AVI or 24p AVI Type2 Canopus AVI YYYMMDD-HHMMSSb01 .AVI Matrox AVI YYYMMDD-HHMMSSm01 .AVI This file has a separate .wav audio file per track. QuickTime .MOV or 24p Quicktime HDV File Types YYYYMMDD-HHMMSSX01.m2t .M2T QuickTime .MOV FS-H200 Portable DTE Recorder... -
Page 116: Fs-H200 Resolution And Frames
FS-H200 Resolution and Frames M2T or QUICKTIME (MOV) filename format: YYYYMMDD- HHMMSS 01.m2t or .mov where the is a letter indicating the resolution of the captured video file. The table below lists letters and associated resolutions. Not all HDV camcorders support these resolutions. -
Page 117: Technical Specifications
• 9 control buttons with conductive rubber keypad. • Scroll Wheel I/F. • Menu system integrated with control buttons to provide access to unit: Operations System Setup Functions Utilities Compliance • CE • FCC Class A • C-Tick • RoHS FS-H200 Portable DTE Recorder... -
Page 118: Connectors
Frame rates: 480i @ 30 fps. 480p @ 24 and 30 fps. 576i/p @ 25fps. • HD/HDV Frame rates: 720p @ 24, 25, 30, 50 and 60 fps. 1080i @ 24F, 30F, 50 and 60 fps. FS-H200 Portable DTE Recorder... -
Page 119: Audio
Technical Specifications Not all HD Frame Rates Are Supported with the FS-H200 in Quicktime. Check the Focus website for the latest frame rate information with Quicktime and MXF formats: www.focusinfo.com. Audio Embedded in the FireWire signal • DV Embedded 2-channel (16-bit, 48kHz), Embedded 4-channel (12-bit, 32kHz), •... -
Page 120: Compact Flash (Cf) Memory Card
CF card and the FS-H200. Card Removed Without Using CF Utility If the FS-H200 is powered on and a CF card is removed without running the utility the video clip(s) on the card COMPACT FLASH may be damaged. -
Page 121: Cf Card Troubleshooting
Technical Specifications CF Card Troubleshooting Compact Flash utility runs and will not complete This can be caused when the FS-H200 is powered on and: 1. The CF card is removed and re-inserted without running the Compact Flash utility. 2. Running the CF utility. -
Page 122: Dte File Formats Supported
AVI 2 – 24p Canopus AVI Matrox AVI QuickTime - supports recordings larger than 2GB QuickTime 24p - supports recordings larger than 2GB • HDV M2T - supports recordings larger than 2GB QuickTime - supports recordings larger than 2GB FS-H200 Portable DTE Recorder... -
Page 123: Error Messages
Technical Specifications Error Messages The FS-H200 will display error messages on its LCD display if certain conditions occur that can effect FS-H200 operation. Below is a list of the error messages and the actions to take: Error Message Description Action LOW BATTERY! Battery power is low. -
Page 124: Power
DC battery device is dependent on the load placed on the FS-H200. Consider the following when using external DC battery devices to power the FS-H200. The typical external DC video device is 12V or 14.4V. FS-H200 Portable DTE Recorder... -
Page 125: Warranty
0.6 A maximum based on the 15V input adapter. The result is that when a big load is added, the FS-H200 automatically reduces the amount of the charging current so that the total current through the adapter never exceeds approximately 0.6 Amps. - Page 126 FS-H200 Portable DTE Recorder...
-
Page 127: Index
FireWire ......24 technical specifications .. 101 FireWire, 6-4 pin ....2 FireWire, 6-6 pin ..2, 5, 16 Canopus ......3 FireWire,6-6 pin ....13 Matrox ......3, 97 power ........2 AVI 1 ......... 3 FS-H200 Portable DTE Recorder... - Page 128 Index USB, 2.0, A-A ...... 2 power ........8 camcorder previous video clip ... 11 connect to FS-H200 ..24 recordrecording ....9 timecode ......49 rec-pause ......9 camera connector ....13 release button, battery ..16 Canopus ........3 reset ........
- Page 129 6-pin to 6-pin . 2, 5, 16 file not found ....105 charging battery ....16 high temperature .... 105 connect FS-H200 to camera 24 lost communication, disk 105 connector, camera .... 13 low battery ...... 105 do not disconnect ..... 38 no space left on disk ..
- Page 130 ........14 message, status ...... 85 formats ......57 mode no output ......67 control ......34, 53 stop options ...... 67 control, external ....34 high temperature ....105 display ........ 52 DTE format ......35 FS-H200 Portable DTE Recorder...
- Page 131 ........37 normal ....... 54, 55 normal recording ....37 normal, control ...... 53 QuickTime ....... 3 NTSC ......... 38, 50 24p ........3, 35 number clip ........48 volume ....... 48 rate transfer ......... 3 FS-H200 Portable DTE Recorder...
- Page 132 105 alarm ........66 time, setting time zone ..63 control mode ....34 time remaining on disk ..48 date ........30 time zone ........ 63 DTE format ....... 35 time, set ........62 FS-H200 Portable DTE Recorder...
- Page 133 ......83 diagnostic ......84 file name ......80 format ......... 77 repair clip ......79 repair disk ......78 status message ....85 system reset ....... 84 upgrade ......81 version ....... 85 FS-H200 Portable DTE Recorder...
- Page 134 FS-H200 Portable DTE Recorder...
- Page 136 FS-H200 Portable DTE Recorder MANL-1158-04...
Need help?
Do you have a question about the FS-H200 and is the answer not in the manual?
Questions and answers