Table of Contents
Advertisement
Advertisement
Table of Contents

Summary of Contents for Poki Cam SDV-G857-VP
- Page 1 User’s Manual SDV-G857-VP...
-
Page 2: Table Of Contents
Precautions ............. Product Overview…………………………………….. Preparing for Use…………........Charging the Battery……………....Installing the Memory Card…………………. Mounting the Camera…………………………..Cleaning Instructions………………………… Using the Camera…………………………………….. Taking Pictures………………………………... Recording Videos…………………………….. Connections…………………………………………... Remote Control Connection………………… Computer Connection……………………….. Smartphone Connection ……………………. “Poki Cam” APP Features………………………….. Product Specifications………………………………... -
Page 3: Precautions
Precautions Thank you for purchasing this camera. Please read these operating instructions carefully in order to use the camera correctly. Then store it in a safe place for future reference Before using the camera, please ensure that you read and understand the safety precautions described below. -
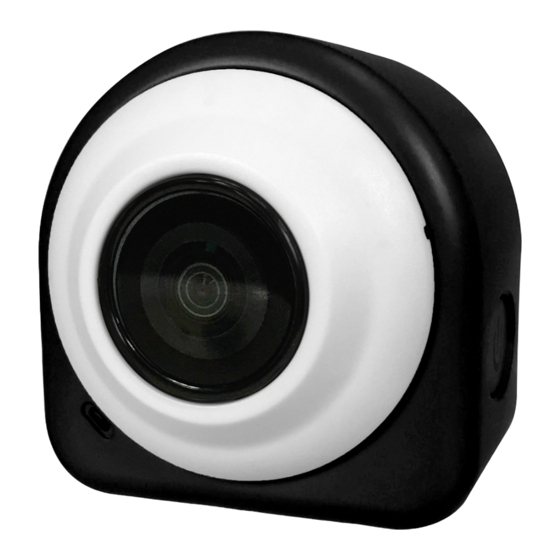
Page 4: Product Overview
Product Overview 1. Shutter Button 6. Tripod Mount 2. Power Button 7. Cover/Capping 3. Lens 8. USB Port 4. Charging/Working Indicator Light 9. Reset 5. Wi-Fi Button 10. microSD Card Slot... -
Page 5: Preparing For Use
Preparing for Use Charging the Battery Connect the camera to a computer through the provided USB cable. Red charging indicator will light up. Once camera is fully charged, the indicator light will turn off. NOTE: Camera will automatically power on when it’s charging. You may manually power it off by pressing power button for 3 seconds. -
Page 6: Mounting The Camera
Mounting the Camera Reversible suction pad and magnetic mount allows you to attach the camera onto many different materials and surfaces. Such as wood, glass, wall, plastic and metal surfaces. Remove camera from surfaces by lifting the camera from bottom up. Suction Pad Magnetic Mount Cleaning Instructions... -
Page 7: Using The Camera
Using the Camera Power On: Press and hold the power button. The power light will flash and then remains stable light. Power Off: Press and hold the power button NOTE: When the camera is idle for 3 minutes, it will turn off automatically. -
Page 8: Recording Videos
Recording Videos There are two different Video recording modes: Camcorder mode Vehicle Mode (Dash cam) Camcorder Mode Vehicle mode 1. Turn on Camera 1. Connect camera to a 2. Press and hold shutter button cigarette lighter USB port (not for 3 seconds and then supplied). -
Page 9: Connections
Connections Remote Control Connection Remote control is connected automatically once camera is powered NOTE: The remote is disabled if camera’s Wi-Fi® feature is enabled. Turn off Wi-Fi® mode on camera to use Remote control. Capture/Recording Button Video Protected Button Capture/Recording button Still Image Capture: Press the button once to take a photo. -
Page 10: Camera Mode
Video Protected Button Protect your files in case of an emergency or save your files from being looped-over. Protected files will be saved in a separate “EVENT” folder inside the memory card for easy access. Camera Press Video Protected button to… mode In standby mode Start a 3-minute video recording under... -
Page 11: Computer Connection
Computer Connection There are two ways to download files from the memory card to a computer Insert the memory card into a card reader Connect the camera to a computer through the provided USB cable. Using a Card Camera to PC with Reader USB cable 1. -
Page 12: Smartphone Connection
NOTE: When button beeps and flashes, this means there is insufficient power to for wireless connection. Please charge camera. 3. Connect smart device to camera Enable Wi-Fi® on your smartphone and search for “Poki Cam” from the list of found devices. Input password, “1234567890” to connect. -
Page 13: Poki Cam" App Features
4. Connection Successful Camera’s Wi-Fi® light will stop flashing and remains stable when connection is successfully paired. Open “Poki Cam” APP to operate and control the camera from your smart device. 5. Exit Wi-Fi® mode Press the Wi-Fi® button once to disable Wi-Fi® function. The light will flash several times before turning off. -
Page 14: Product Specifications
Wi-Fi® module support Remote Controller 2.4G Approx. 1.7”x1.7”x1.3” Dimensions (LxWxH) Windows® XP, Windows® Vista™, System Support Windows® 7, Windows® 8, Windows®10 and above Works with Mac 10.8 and above Poki Cam APP Supports IOS 7.0 and above, Android OS 4.1 and above... - Page 15 FCC (Federal Communications Commission) Warning: Changes or modifications to this unit not expressly approved by the party responsible for compliance could void the user’s authority to operate the equipment. NOTE: This equipment has been tested and found to comply with the limits for a Class B digital device, pursuant to Part 15 of the FCC Rules.
Need help?
Do you have a question about the SDV-G857-VP and is the answer not in the manual?
Questions and answers