Table of Contents
Advertisement
Advertisement
Table of Contents

Subscribe to Our Youtube Channel
Summary of Contents for Measupro BPM-A70
- Page 1 Blood Pressure Monitor with Alarm Clock Product Manual Copyright 2016 MeasuPro™ ©...
- Page 2 Overview Thank you for selecting the Blood Pressure Monitor with Alarm Clock. The monitor features blood pressure measurement, pulse rate measurement, and record memory. The device is designed for up to 2 users. Readings taken by the Upper Arm Blood Pressure Monitor are equivalent to those obtained by a trained observer using the cuff and stethoscope auscultation method.
- Page 3 • The materials of the cuff have been tested and found to comply with requirements of ISO 10993-5:2009 and ISO 10993-10:2010. It will not cause any potential sensitization or irritation reaction. Never apply the cuff over hurt skin. • Do not use the unit in case of existing polyester resp. synthetic allergies. •...
-
Page 4: Complied Standards List
Complied Standards List Risk ISO/EN 14971:2012 Medical devices — Application of risk management to medical management devices Labeling ISO/EN 15223-1:2012 Medical devices. Symbols to be used with medical device labels, labeling and information to be supplied. General requirements User manual EN 1041: 2008 Medical equipment manufacturers to provide information General IEC 60601-1: 2005+A1:2012 Medical electrical equipment - Part 1: General... -
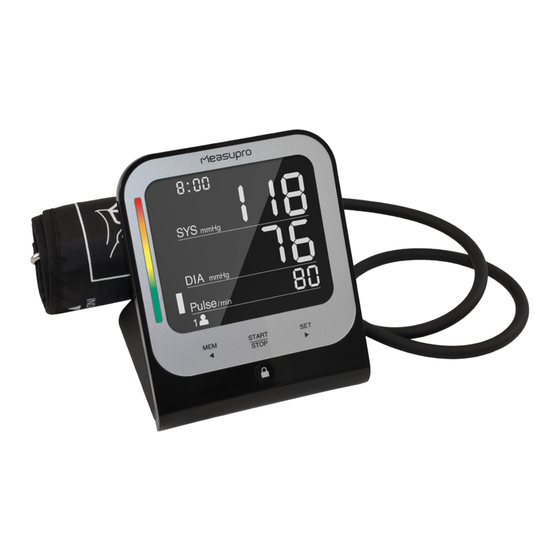
Page 5: Monitor Components
25%. Authorized Component Please use the MeasuPro authorized adapter. (Not included) Adapter Type: KH0601000UW Input: 100~240V~50/60Hz, 0.4A Max Output: 6V FCC Statement This device complies with Part 15 of the FCC Rules. - Page 6 LCD Screen Guide Symbol Description Explanation Systolic blood pressure High pressure result Diastolic blood pressure Low pressure result Pulse per minute Beats per minute, BPM Average value Average value of the latest three records The displayed measurement values is Memory from the memory Measurement unit of blood pressure Unit...
-
Page 7: Operating The Monitor
Battery Installation/AC Adapter • Slide the battery cover off. • Insert 4 x AAA batteries (included) with correct polarity. • Replace the cover. • This unit has an optional AC Power adapter which is available as an accessory. Please use only the recommended AC adapter model (not included). -
Page 8: Memory Recall
Taking the Measurement 1. When the monitor is off, press the START/STOP button to turn the monitor on, and start the measurement. 2. The cuff will automatically inflate. 3. After measurement is taken the results will display on the screen. 4. -
Page 9: Alarm Clock
2. To unlock the keys, press and hold the LOCK button until the LCD displays ON. You can press any buttons to use the blood pressure monitor. Alarm Clock 1. If you set the alarm clock, it will sound for 1 minute after the set time has been reached. During this time, you can press the START/STOP button to turn it off. -
Page 10: About Blood Pressure
About Blood Pressure What are systolic pressure and diastolic pressure? When ventricles contract and pump blood out of the heart, the blood Systolic Diastolic blood entering blood discharging pressure reaches its maximum value in the cycle, which is called vein artery systolic pressure. -
Page 11: Specifications
Specifications Power 6VDC 4 x AAA Batteries / AC Adapter powered mode: 6V 1A (not included). Please only use the recommended AC adapter model. Display mode Digital LCD V.A. 84mm×73mm Measurement mode Oscillographic testing mode Measurement range Rated cuff pressure: 0mmHg~300mmHg(0kPa ~ 40kPa) Measurement pressure: SYS: 60mmHg~230mmHg (8.0kPa~30.7kPa) -
Page 12: Utilisation Du Tensiomètre
Installation de piles / Adaptateur CA • Faites glisser le couvercle des piles • Insérez quatre (4) piles (fournies) dans la bonne polarité. • Remettez le couvercle. • Cet appareil comporte un adaptateur ca optionnel comme accessoire. Veuillez utiliser uniquement le modèle d’adaptateur ca recommandé (non fourni). Réglages Il est important de régler la date et l’heure avant d’utiliser votre tensiomètre de manière qu’une heure soit attribuée à... -
Page 13: Rappel De Mémoire
6. Prenez un repos de 5 minutes avant de prendre les mesures. Patientez au moins trois (3) minutes avant chaque mesure. Cela permet à votre circulation sanguine de reprendre. 7. Pour avoir une comparaison significative, essayez de prendre des mesures dans des conditions similaires. -
Page 14: Bouton De Verrouillage
Mode horloge 1. Si vous activez le mode horloge dans le mode de réglage, lorsque vous éteindrez le tensiomètre, le rétroéclairage de l’écran LCD s’éteindra mais affichera l’heure actuelle. Si vous désactivez le mode horloge dans le mode de réglage, lorsque vous éteindrez le tensiomètre, il s’éteindra complètement. - Page 15 Installazione delle batterie/Adattatore AC • Rimuovere il coperchio del vano batterie. • Inserire 4 batterie AAA (incluse) rispettando la polarità. • Riposizionare il coperchio. • Questa unità dispone di un alimentatore AC opzionale, disponibile come accessorio. Si prega di utilizzare esclusivamente il modello di alimentatore AC raccomandato (non incluso). Impostazioni È...
-
Page 16: Cancellazione Della Memoria
4. Posizione corretta per i pazienti con ipertensione: Scoprire il braccio o indossare soltanto i collant quando si inizia la misurazione. Sedersi comodamente con le gambe non incrociate, i piedi in piano sul pavimento, e un supporto per schiena e braccio. 5. -
Page 17: Modalità Orologio
3. Nota: Per uscire dalla modalità di cancellazione senza eliminare alcuna registrazione, premere il tasto START/STOP prima di premere il tasto SET per confermare gli eventuali comandi di cancellazione. 4. Se non vi sono registrazioni, lo schermo mostrerà ---. Modalità orologio 1. - Page 18 Einlegen der Batterie/AC-Adapter • Den Batteriedeckel aufschieben. • 4 x AAA (mitgeliefert) unter Beachtung der richtigen Polarität einlegen. • Batteriedeckel wieder einsetzen. • Dieses Gerät hat ein optionales AC-Netzteil, das es als Zubehör gibt. Bitte nur das empfohlene AC-Adaptermodell (nicht mitgeliefert) verwenden. Einstellungen Es ist wichtig, Datum und Zeit einzustellen, ehe Sie Ihren Blutdruckmonitor verwenden, damit jeder im Arbeitsspeicher vorhandenen Aufzeichnung ein Zeitstempel zugeordnet werden kann.
-
Page 19: Speicher Löschen
5. Die Mitte der Manschette sollte zum rechten Vorhof des Herzens hin abgeflacht sein. 6. Vor dem Messen 5 Minuten ruhen. Mindestens 3 Minuten zwischen den Messungen warten. So kann sich ihre Blutzirkulation erholen. 7. Versuchen Sie zum Zweck eines aussagekräftigen Vergleichs unter ähnlichen Bedingungen zu messen. -
Page 20: Pflege Und Reinigung
Uhr-Modus 1. Wenn der Uhr-Modus im Einstellungsmodus eingestellt wird, schaltet sich beim Ausschalten des Blutdruckmonitors die Beleuchtung des LCD aus. Das LCD wird die aktuelle Zeit anzeigen. Wenn der Uhr-Modus im Einstellungsmodus ausgeschaltet wird, wird das LCD beim Ausschalten des Blutdruckmonitors völlig ausgestellt. 2. - Page 21 Instalación de la batería/Adaptador AC • Deslice la cubierta de las baterías para sacarla. • Inserte 4 baterías AAA (incluidas) con la polaridad correcta. • Vuelva a poner la cubierta. • Esta unidad tiene un adaptador de electricidad AC optativo disponible como accesorio. Por favor, use solo el modelo de adaptador AC recomendado (no incluido).
- Page 22 4. Corrija la postura para los pacientes con hipertensión: Desnude su brazo o retire cualquier ropa ajustada cuando empiece la medición. Siéntese cómodamente con las piernas no cruzadas, los pies apoyados horizontalmente en el piso, con la espalda y el brazo apoyados. 5.
-
Page 23: Modo Reloj
luego, se apagará. Si sólo elimina el último disco, se mostrará “dEL 001” en su lugar. 3. Nota: Para salir del modo borrar sin eliminar ningún registro, presione el botón START/ STOP antes de presionar el botón SET para confirmar cualquier comando de eliminar. 4. -
Page 24: Warranty
Warranty The MeasuPro Blood Pressure Monitor with Alarm Clock is warrantied to the original owner for two years from the date of purchase for defects in material and workmanship under normal use and service. MeasuPro will not be liable for any damages, losses, or inconveniences caused by user negligence, abuse, or use that is not in accordance with this product manual.
Need help?
Do you have a question about the BPM-A70 and is the answer not in the manual?
Questions and answers