Table of Contents
Advertisement
Quick Links
USER MANUAL – FELIX PRO 1
June 4th, 2016
Revision 3
Copyright I nformation
This document contains proprietary information that is
protected by copyright. No part of this document may be
photocopied, reproduced, or translated to another language
without the prior written consent of FELIXrobotics
BV.
FELIXrobotics BV
Zeemanlaan 15
3401MV, IJsselstein
The Netherlands
Copyright © 2015 FELIXrobotics BV.
Advertisement
Table of Contents

Related Manuals for FELIXprinters FELIX PRO 1


Summary of Contents for FELIXprinters FELIX PRO 1
- Page 1 USER MANUAL – FELIX PRO 1 June 4th, 2016 Revision 3 Copyright I nformation FELIXrobotics BV Zeemanlaan 15 This document contains proprietary information that is 3401MV, IJsselstein protected by copyright. No part of this document may be The Netherlands photocopied, reproduced, or translated to another language Copyright ©...
-
Page 2: Introduction
Rev 3 1 INTRODUCTION Thank you for choosing FELIXprinters! It is highly recommended to read this manual. It explains in short how to make your first print and contains essential tips to operate the printer properly. If you are unable to continue or have any questions, you can check at the support section of our website... -
Page 3: Safety
Use the FELIXprinter in a dry environment Electronic safety Only use the power supplies and cables supplied by FELIXprinters. Always turn off and unplug the printer before perfoming maintenance or modifications. The power supply meets all CE mark regulations and is protected against short-circuit, overload, over voltage and over temperature. -
Page 4: Table Of Contents
3 CONTENTS Introduction ..................................2 Safety ....................................3 Printer specifications ................................ 5 FELIX Pro 1 at a glance ..............................6 Unboxing ..................................7 Contents of box ..............................7 Opening the box ..............................8 Install foot bracket and display unit ........................9 Prepare bed assembly. -
Page 5: Printer Specifications
User Manual – FELIX Pro 1 Rev 3 4 PRINTER SPECIFICATIONS Printing Electrical Print Technology Fused Filament Fabrication AC input: 100-240V, 50-60 Hz Build Volume 24 x 24.5 x 23.5 cm Power Requirements 12V DC, 15 Amps Print Quality 250 microns... -
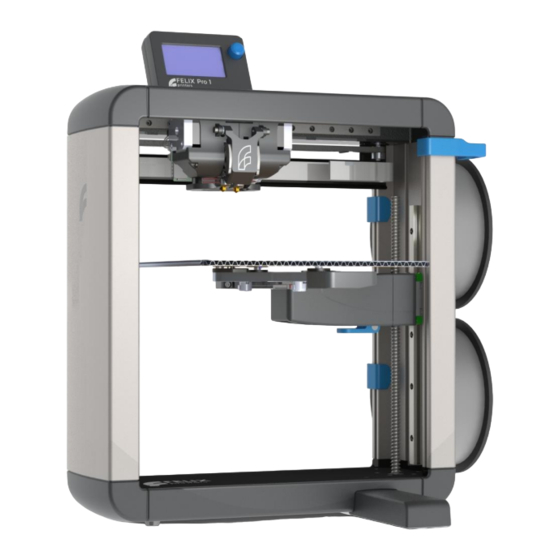
Page 6: Felix Pro 1 At A Glance
User Manual – FELIX Pro 1 Rev 3 5 FELIX PRO 1 AT A GLANCE Display unit Nozzles / Extruder Filament Guide Filament Holder Detachable Heated Bed Lever for rotating bed Filament Holder Power input USB connection On / Off switch Foot Bracket www.FELIXprinters.com... -
Page 7: Unboxing
User Manual – FELIX Pro 1 Rev 3 6 UNBOXING This chapter will guide you to setup your printer. 6.1 Contents of box Check if all the accessories are in the box. The box could contain extra parts like filament you have ordered. -
Page 8: Opening The Box
User Manual – FELIX Pro 1 Rev 3 6.2 Opening the box Place the foot bracket on a flat and stable Take out the foot bracket and leave the surface. printer in the box for now. www.FELIXprinters.com Page | 8... -
Page 9: Install Foot Bracket And Display Unit
User Manual – FELIX Pro 1 Rev 3 6.3 Install foot bracket and display unit Place the foot bracket on a flat and stable surface. Place the printer on top of it and fix the parts together with the supplied M4 bolts and Allen key. -
Page 10: Prepare Bed Assembly
User Manual – FELIX Pro 1 Rev 3 6.4 Prepare bed assembly. Flip out lever Turn table assembly, might cost a little force to turn, and flip lever back in place Flip lever back to fasten the table assembly. NOTE: When turning the table very often. -
Page 11: Heated Bed
User Manual – FELIX Pro 1 Rev 3 6.5 Heated bed Place the edge of the bed in the slot, indicated with the red line. Lower the bed until the three magnets match the positions on the bracket. Make sure when looking... -
Page 12: Install Accessories
User Manual – FELIX Pro 1 Rev 3 6.6 Install accessories 6.6.1 Filament arm and guide Snap in the two spool holders on the right back side of the frame and the filament guide on the right front side of the frame. - Page 13 User Manual – FELIX Pro 1 Rev 3 Take the end of the filament and insert it through the filament guide and then through the Teflon tube. Repeat this process for the second spool. The filament should come out of the Teflon tube and push it into the hole on the top of the extruder.
-
Page 14: Cables
User Manual – FELIX Pro 1 Rev 3 6.6.2 CABLES ON/OFF switch Power inlet 1. Turn the power off 2. Insert the power cable and connect with a power outlet. 3. Insert the USB cable and connect it to your computer 4. -
Page 15: 3D Print Preparations
User Manual – FELIX Pro 1 Rev 3 7 3D PRINT PREPARATIONS Basically to ensure your 3D print finishes successfully, at least make sure the following is true: A perfectly clean heated bed surface. A calibrated printer ... -
Page 16: First Checks
User Manual – FELIX Pro 1 Rev 3 7.2 First checks Due to shipping it could happen that the electrical contacts of the probe-mechanism inside the removable hot-ends are slightly loosened. To ensure this is not the case, please do the following. -
Page 17: Clean The Print-Bed
User Manual – FELIX Pro 1 Rev 3 7.3 Clean the print-bed A grease free bed is essential for proper print-object adhesion to the heated bed. Since the whole object depends on the adhesion of the first layer, it is the most important layer and you should make sure this layer finishes perfectly. -
Page 18: Turn On The Heaters
User Manual – FELIX Pro 1 Rev 3 7.4 Turn on the heaters Turn on the heaters by following the next steps on the display unit: Back Back Bed temp : 20.1/ 55°C Quick settings Temp. 1 : 20.1/ 0°C Print file Temp. -
Page 19: Load The Filament
User Manual – FELIX Pro 1 Rev 3 Load the filament After setting heater temperatures, you can load the filament into the printer. From previous step you have guided the filament through the guiding tube and the filament guide. The plastic that comes out of the tube it is recommended to cut off the end in a skew manner and throw the just cut off debris away. -
Page 20: Print An Object With The Sd Card Interface
8.1 SD card print If this is your first print with the FELIX Pro 1, it is recommended to confirm the printer is working properly after unboxing by starting a print from the SD card. Insert the provided micro SD card in the slot with the logo facing up. -
Page 21: Printer Software
User Manual – FELIX Pro 1 Rev 3 9 PRINTER SOFTWARE We officially support two software programs. FELIXbuilder which requires a license and Repetier-Host for FELIXprinters which is open source. On the supplied SD card including reader, there are several items present. -
Page 22: Felixbuilder
User Manual – FELIX Pro 1 Rev 3 9.1 FELIXbuilder Supplied with the printer we offer a year license of the FELIXbuilder 3D printer software. The function of the software is to control the printer and to prepare 3D CAD files for printing this is called slicing. - Page 23 User Manual – FELIX Pro 1 Rev 3 Go to the edit profiles menu. To make sure you have the latest updated slicing profiles. The OEM profiles should indicate version 0.0 After a new install there should profiles present. If there are profiles...
- Page 24 User Manual – FELIX Pro 1 Rev 3 When the configuration screen launches for the first time, the configuration on the left should be shown. This should be changed for the first print. Note the temperatures and the build platform selection.
- Page 25 User Manual – FELIX Pro 1 Rev 3 Start the FELIXbuilder software and open the Registration Wizard by clicking on the tool icon. When installing the software for the first time this will happen automatically when you start the FELIXbuilder software.
- Page 26 User Manual – FELIX Pro 1 Rev 3 Browse for the license key you stored on your computer in the previous step and press the next button Your license key is registered successfully and your software is ready to use. Press the finish button to exit the registration wizard.
- Page 27 User Manual – FELIX Pro 1 Rev 3 Click on the platform button. Choose the printer you want to print your object on. (The list is only longer than one item, when you have more printers installed in the configuration menu or...
- Page 28 User Manual – FELIX Pro 1 Rev 3 Then Press advanced button. Make sure configuration matches picture on the left. This way the object will re-orient and drop the object to the build plate. Press Ok or Apply. The object will orientate so that the indicated plane will touch the print bed.
- Page 29 User Manual – FELIX Pro 1 Rev 3 Match the platform settings in the picture from the left. Make sure the printer status is Online if this is not the case the connection established yet. Click preferences button to establish a connection.
- Page 30 User Manual – FELIX Pro 1 Rev 3 Close the configuration menu and press submit job. The printer will first slice the object and the printer should start the print job shortly after that. www.FELIXprinters.com Page | 30 support@FELIXprinters.com...
-
Page 31: Felixbuilder For Mac
User Manual – FELIX Pro 1 Rev 3 9.1.2 FELIXBUILDER FOR MAC Follow below instructions to install. Run FELIXbuilder.dmg and install FELIXbuilder dragging the symbol to the Applications folder. Approve the end-user license agreement. Enter the voucher code that you have received with the... - Page 32 User Manual – FELIX Pro 1 Rev 3 Select the FELIX Pro 1 and press continue. Optional: select two colors of filament. During preparation of multiple STL files it helps you to determine which object is printed with which nozzle.
- Page 33 User Manual – FELIX Pro 1 Rev 3 You are now ready to use FELIXbuilder together with your FELIX Pro 1. Now it is time to make a first print. First of all it is important to have an STL file. As example you could use this file: http://www.felixprinters.co...
- Page 34 User Manual – FELIX Pro 1 Rev 3 A menu will open. Select the right STL file and click on open. The object will be placed onto the build platform. menu, click ‘Transform’ to adjust the object. If you want to move an object, click on ‘Move’...
- Page 35 User Manual – FELIX Pro 1 Rev 3 Now it is time to connect the 3D printer to the computer. Plug the USB cable into the Pro 1 and into your computer. Turn on the 3D printer. Go to the ‘Print’ tab, Go to ‘Send to printer’,...
- Page 36 User Manual – FELIX Pro 1 Rev 3 The printer will first slice the object and the printer should start the print job shortly after that. In the bar displayed below the ‘Pause’ and Stop’ button, you are able to track the progress of the current print job.
-
Page 37: Slicing Profiles
User Manual – FELIX Pro 1 Rev 3 9.2 Slicing profiles To get the most out of your printer, you need to select the correct slicing settings for each print job. Choosing the correct settings, can have a big impact on the print output. - Page 38 User Manual – FELIX Pro 1 Rev 3 In general for the build strategy settings, the higher the detail, the longer the print job will take. But choosing the normal detail build strategy setting (which enables relatively high speeds) with a high detail (which requires lower speeds) layer height is not a good match.
- Page 39 User Manual – FELIX Pro 1 Rev 3 1_Support – Same material as part. This is the best option when printing with support material which is the same as the printed object. This is the fastest method. The support is printed in such a way that it is still easy to remove mechanically.
-
Page 40: Print Finished
User Manual – FELIX Pro 1 Rev 3 10 PRINT FINISHED Congratulations with your first 3D print on the FELIX Pro 1. 10.1 Remove the 3d printed object When print-job finished the display will indicate that the 3D printer is cooling down. - Page 41 User Manual – FELIX Pro 1 Rev 3 Don’t pull the object straight up, but twist it and start peeling at the edges. edges or use a spatula. Remove support material with a small pliers, or if you are using PVA dissolve it in water.
-
Page 42: Automatic Calibration
With the automatic calibration features properly executed, the chance of failure will be minimized. 11.1 What does the calibration do? The FELIX Pro 1, is able to calibrate the following automatically. Physically leveling the build plate. To ensure the distance between the bed and the nozzles is the same over the whole build plate. - Page 43 User Manual – FELIX Pro 1 Rev 3 00B_Extruder_Height_Calibration_Pro1.gcode, this file calibrates the height difference between the hot- ends www.FELIXprinters.com Page | 43 support@FELIXprinters.com...
-
Page 44: Dual Head Printing
User Manual – FELIX Pro 1 Rev 3 12 DUAL HEAD PRINTING 12.1 X,Y Calibration between nozzles At the moment of writing the calibration is not properly implemented in the FELIXbuilder software. This will be fixed in the next software release being released in 2016. To do this properly we have to do this via the display unit at the moment. - Page 45 User Manual – FELIX Pro 1 Rev 3 Back Position General Extruder Language Fan speed Acceleration SD card Feedrate Debugging Extruder Configuration Scroll down to extruder In main menu scroll down to configuration. Back Back Select extr. 1 Select extr. 1 Select extr.
-
Page 46: Filament Detection
User Manual – FELIX Pro 1 Rev 3 13 FILAMENT DETECTION The filament detection is implemented to prevent failure of a print job due to failure of filament. This saves a print-job which can save a lot of time and loss of money. -
Page 47: Maintenance
User Manual – FELIX Pro 1 Rev 3 14 MAINTENANCE 14.1 Replace hot-end For cleaning or maintenance purposes, the hot-end can be easily removed from the FELIX Pro. Please take the following steps. 1. Check if there is still filament loaded in the hot-end. If there is no filament loaded, then goto step 4. -
Page 48: Print Bed Contact Points
User Manual – FELIX Pro 1 Rev 3 14.2 Print bed contact points Make sure to keep the contact points on the bottom of the print bed clean. Use a detergent like alcohol and rub gently with a paper towel or cloth. Check this regularly, especially, when you remove the bed a lot from the printer. -
Page 49: Tips And Tricks
User Manual – FELIX Pro 1 Rev 3 15 TIPS AND TRICKS 15.1 Flexible Filaments Our 3d printers can in general handle flexible filaments. Depending on the amount of flexibility, you might need to take some extra precautions to print it well. -
Page 50: Trouble Shooting
The FELIX Pro 1, features automatic calibration. This calibration heavily relies on the probe switch, which is integrated in the hot-end flexure (This is the flange mounted on the side of the top part of the hot- end). -
Page 51: Click To Reheat" Dialogue, Filament Detection
User Manual – FELIX Pro 1 Rev 3 16.2 “Click to reheat" dialogue, filament detection If your print gets interrupted and you get the message “Click to reheat” on the display, that means the printer has detected that the filament is not being fed trough at the expected rate. -
Page 52: No Filament Is Coming Out Of Extruder
User Manual – FELIX Pro 1 Rev 3 16.3 No filament is coming out of extruder The most common causes to get a clogged hot-end are (ordered from most common to least common): Chosen print temperature too hot. Try printing at the recommended temperatures for the chosen filament. For instance, printing PLA at 210 degrees might work in some cases, but it is critical. -
Page 53: Z-Sensor Triggered
User Manual – FELIX Pro 1 Rev 3 This could cause buildup of filament in some internal cavities/edges. 16.4 Z-sensor triggered. This message normally is shown when the printer detects that one of the nozzles is touching the heated bed (we call that functionality "Z probing"). -
Page 54: Heater Decoupled / Def / Dec Message On Screen
User Manual – FELIX Pro 1 Rev 3 16.5 Heater decoupled / DEF / DEC message on screen This error presents itself when a part of the heater circuit is not working. It can generally be caused by one of the following things: Bad electrical connection with the hot end cartridge. -
Page 55: The Printer Doesn't Connect To Felixbuilder
16.6 The printer doesn’t connect to FELIXbuilder After connecting the FELIX Pro 1 to a computer and after installation of FELIXbuilder, the printer driver should be automatically installed on the computer. If this is not the case we need to do this manually.not updated correctly. - Page 56 User Manual – FELIX Pro 1 Rev 3 After installing the drivers, the printer and the software should communicate at the same speed (called baud rate). For Windows, this should work out of the box if the following is met:...
- Page 57 User Manual – FELIX Pro 1 Rev 3 "General" section, and then "Baud rate". Select the right baudrate and confirm it. To store the new settings permanently, select "Configuration", then "Store to EEPROM". www.FELIXprinters.com Page | 57 support@FELIXprinters.com...
-
Page 58: Safety
5. Only use the materials polyactide (PLA), Acrylonitrile butadiene styrene (ABS) or Arnitel as printing material. Consult FELIXprinters if you want to use a different material. 6. FELIXprinters are only suitable for professional use. 7. When removing or feeding material to the hot end, wearing heat-resistant gloves is recommended. -
Page 59: Material Data Safety Sheet
User Manual – FELIX Pro 1 Rev 3 18 MATERIAL DATA SAFETY SHEET 18.1 PLA Hazards Identification Appearance: Clear, translucent, opaque, pellets. Physical state: Solid Odor: Sweet Potential health effects: Eye contact: Contact with eyes may cause irritation. Skin contact: Substance may cause slight skin irritation. - Page 60 User Manual – FELIX Pro 1 Rev 3 diarrhoea. Long term toxicity: Did not cause skin allergic reactions in skin sensitization studies using guinea pigs. Specific effects: May cause skin irritation and/or dermatitis. Ingestion may cause gastrointestinal irritation, nausea, vomiting and diarrhoea. Inhalation of dust may cause shortness of breath, tightness of the chest, a sore throat and cough.
-
Page 61: Abs
User Manual – FELIX Pro 1 Rev 3 18.2 ABS Hazards Identification This product is not classified as dangerous according to EC criteria. First-aid measures Eye Contact: Flush eyes with plenty of water; remove contact lenses after the first 1-2 minutes then continue flushing for several minutes. - Page 62 User Manual – FELIX Pro 1 Rev 3 protection (EN 407), when needed. Use gloves to protect from mechanical injury. Selection of gloves will depend on the task. Respiratory Protection: In dusty or misty atmospheres, use an approved particulate respirator. Use an approved air- purifying respirator when vapors are generated at increased temperatures or when dust or mist is present.
-
Page 63: Appendix: Terms Of Service
If FELIXprinters delivers a Product or an amount of a Product that you did not order or activates a Product on your device by mistake, you shall immediately inform FELIXprinters of its mistake by email via info@FELIXprinters.com and you shall, at FELIXprinters’s request, immediately arrange for the return of the Product (the costs of which shall be met... - Page 64 Copyright and other intellectual, industrial and/or proprietary rights to the Software, to the Content, the Services and to any copies made of it are owned by FELIXprinters and/or its suppliers. FELIXprinters permits you to use the Software, Services and Content only in accordance with these Terms and Conditions. All rights not specifically granted in these Terms and Conditions are reserved by FELIXprinters.
- Page 65 OR NON-INFRINGEMENT WITH REGARD TO THE PRODUCTS. e) In order to make a claim under the Limited Warranty of a Defect, you must contact FELIXprinters by email during the Warranty Period via to explain the Defect and to obtain a Return Materials Authorization number if necessary. The Hardware must be returned to FELIXprinters as soon as possible following your notification of the Defect, along with an explanation of the Defect, to the address provided by FELIXprinters.
- Page 66 If any provision of these Terms and Conditions is deemed to be void, invalid, unenforceable or illegal, the other provisions shall continue in full force and effect. You and FELIXprinters are deemed to have agreed to new terms and conditions in substitution for such invalid provisions.
Need help?
Do you have a question about the FELIX PRO 1 and is the answer not in the manual?
Questions and answers