
Summary of Contents for Novatek NT96650
- Page 1 240.00 mm Driving Recorder Driving Recorder User Manual FULL HD HIGH DEFINITION VIDEO CAMCORDER User Manual Back Front...
- Page 2 Preface: Thank you for buying this driving recorder. This product is exquisite in appearance, with diversified functions to realize wide-angle shooting. This user manual explains in details on how to use it, as well as detailed information, including usage, operation cautions, technical specifications, etc.
- Page 3 Product Overview: This product is a multi-function driving recorder integrating high definition shooting, photographing, fill-in light, recording, external TF card memory. It adopts high- performance and high compression ratio video decoding technology and has HDMI high definition multi-media interface, which can transmit uncompressed high-definition video and multichannel voice data in high quality.
- Page 4 Product Features: Ultra small size, A+ high resolution and ultra wide lens, suitable for high definition shooting and photographing in all kinds of places I n l a i d w i t h 1 / 3 i n c h l o w - l i g h t h i g h - d e f i n i t i o n photosensitive element, which can catch ultra clear pictures in dark places Equipped with the function of ultra bright fill-in light...
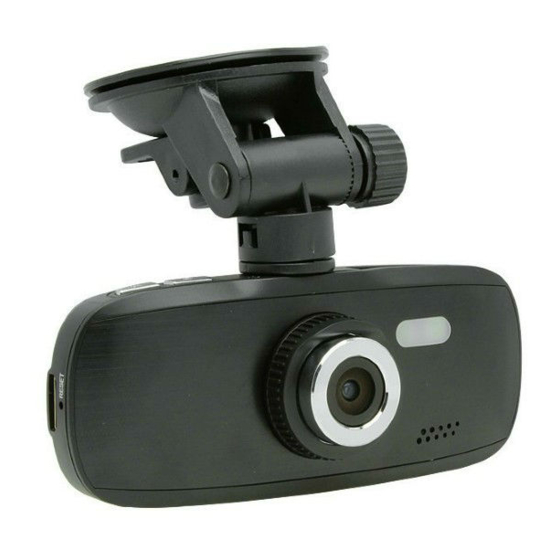
- Page 5 Product Structure 1.Camera 2. Fill-in light 18. Loudspeaker 13. Installation position of support 11. USB interface 15. Power indicator light 10. GPS interface 5. MENU key 19. AV interface 6. UP key 12. POWER key 9. REC key 8. DOWN key 3.
- Page 6 1. Camera 2. Fill-in light 3. MODE key 4. HDMI 5. MENU key 6. UP key 7. TF card slot 8. DOWN key 9. REC key 10. GPS interface 11. USB interface 12. POWER key 13. Installation position of support 14. Screen 15. Power indicator light 16.
- Page 7 Notes: 1. Please note the inserted direction of TF card; if it is reversed, the machine and TF card might be destroyed. 2. After inserting the TF card, the machine will set it as pre- installed storage equipment; materials in original TF card might fail to be read.
- Page 8 Press the MENU key once, and then press MENU key again to enter into “system settings” option. Now the “system settings” is listed. Date/Time: Which can adjust current date and time Key tone: Choose ON or OFF. Language Setting: Choose language according to the requirements.
- Page 9 2. Setting of Recording Function Press MENU key to enter into setting of recording options: Resolution ratio: which can be chosen to set: 1080HFD/720P- 60 FPS/720-30FPS/WVGA/VGA Loop recording: Off/2min/3min/5min for option WDR: full-time open Exposure compensation: +2.0, +5/3, +4/3, +1.0, +2/3, +1/3, +0.0, -1/3, -2/3, -1.0, -4/3, -5/3, -2.0 Motion detection: Start/Close Video Audio: Start/Close...
- Page 10 Photographing and Settings: After starting, press the mode key to enter into photographing mode. When the symbol is shown in top left corner, it is in photographing mode. 2. Aim the machine to the object to be photographed and press up and down keys to adjust digital zoom.
- Page 11 Playback Mode: When the machine is started and is in recording mode, press the MODE key to enter into single playback mode. Press up and down keys to browse pictures and audiovisual materials. 2. Press up and down keys to browse pictures and audiovisual materials.
- Page 12 Charging while Recording Connect the USB interface of machine with car charger, and the mode of charging while recording is on after starting the machine. Data Backup USB backup mode: Connect the machine and computer with USB cable and the machine will be started automatically. The following picture will show up.
- Page 13 Play on TV 1. Connection on TV with HDMI connecting line could realize play and browse of high definition audio & video and pictures. Connection on TV with AV line could realize record, browse, and play of pictures and video files Hint: It is not needed to install driver;...
- Page 14 GPS Instructions Connect GPS module on machine, as shown below: GPS interface GPS plug 2. After starting the car, the car charger will provide power for driving recorder. The machine is started and begins to record automatically (TF card needs to be inserted well). 3.
- Page 15 Install video player software, open the folder double click to install file. After installation, there will be on desktop of computer which means successful installation. Double click it and open Driving Recorder Player. 5. The methods of playing video files with player software and checking relevant information of satellite positioning are shown as below: Screen...
- Page 16 Operating Steps: click to open the folder, and the dialog box “Browse Folder” will show up: According to the save path, find out video folder and click (such as, the folder 10030101) the folder to choose, and press “confirm” to upload the video files to the video list. In the list, choose the video file and double click it to open and play.
- Page 17 Technical Specifications Master control Nt96650 DV Turnkey Platform DDR3 1GB Anti-shake technology Support 4 times Digital Magnification Factor 1080HFD 1920×1080/720P 1280×720 /WVGA Recording Resolution Ratio 848×480/VGA 640×480 Picture: JPG File Format Video: MOV Support Wide Dynamic Range (WDR) Colorful/Black and White/Sepia...
Need help?
Do you have a question about the NT96650 and is the answer not in the manual?
Questions and answers
Does the memory card automatically delete on this model then restart
There is no information in the provided context that confirms whether the Novatek NT96650 automatically deletes memory card data and then restarts. However, the context does mention issues with memory card compatibility and recording stopping unexpectedly, which may indicate potential firmware or hardware limitations.
This answer is automatically generated