Table of Contents
Advertisement
Quick Links
Advertisement
Table of Contents

Summary of Contents for ELECTRIC 88 PIANO
-
Page 2: Table Of Contents
CHAPTER 3 INTERFACE AND CONTROLS ..........................8 3.1 INTERFACE ............................................8 3.2 CONTROLS ............................................9 3.2.1 Keyboard Control ........................................9 3.2.2 Piano Module .......................................... 9 3.2.3 Effects Module ........................................13 CHAPTER 4 STANDALONE APPLICATION ..........................19 CHAPTER 5 THE WAVESYSTEM ..............................21 5.1 THE WAVESYSTEM TOOLBAR .................................... -
Page 3: Chapter 1 Introduction
Sign up at the support site and you’ll receive personalized information about your registered products, reminders when updates are available, and information on your authorization status. Acknowledgement The Electric 88 Piano samples library was recorded and produced by Yoad Nevo at Nevo Sound Studios in London, UK. Visit www.yoadnevo.com. -
Page 4: Product Overview
1.2 Concepts and Terminology The type of electric piano that became a pop, rock, and jazz favorite in the ‘70s was invented by Harold Rhodes in the 1940s. The technology behind the instrument consists of a hammer, similar to the ones in acoustic pianos. A hammer strikes a small metal rod, called a tine, that’s connected to a larger tone bar, which is, in essence, a tone generator. -
Page 5: Components
1.3 Components The Electric 88 Piano has one component: Electric 88 Piano Stereo Electric 88 Piano is a virtual instrument plugin and will appear under the related selection menus for virtual instruments under all supported DAW host applications. Waves Electric 88 Piano also works as a standalone application, using ASIO (Windows) or Core Audio (Mac) drivers to play through... -
Page 6: Functional Block/Flow Diagram
1.4 Functional block/flow diagram... -
Page 7: Chapter 2 Quick Start Guide
CHAPTER 2: QUICK START GUIDE Insert Electric 88 Piano on an instrument track in your DAW or launch the standalone application. Start to play and you will quickly understand how to get the sound you want. There are two modules with which to control the behavior and sound of the instrument. -
Page 8: Chapter 3 Interface And Controls
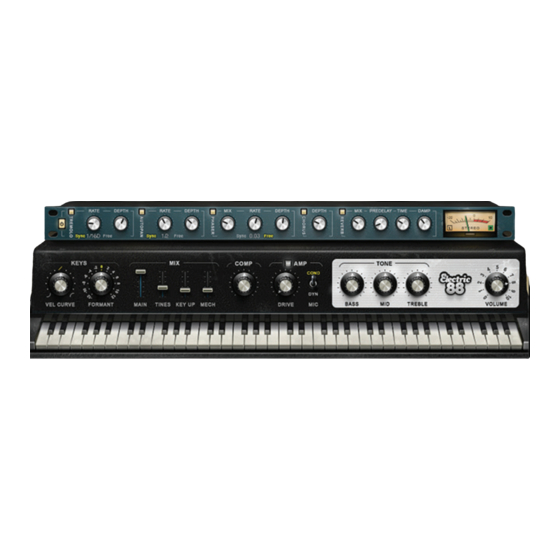
3. 1 Interface The ELECTRIC 88 Piano interface is arranged into two sections. Bottom: The Piano module includes tone controls, a vintage style compressor, and an amplified cabinet that was sampled with both a condenser mic and a dynamic mic. -
Page 9: Piano Module
The formant control changes the sound character but not the pitch. Each step equals a half-tone. This means that when set to -12, the piano sound character will be lower by one octave, but the pitch will not change. Range: -12 to +12... - Page 10 Mix Section Main The Main control is the sampled sound of the electric piano, without the mechanics and the release keys sounds. It controls the Main samples level in the overall mix. Range: 0–100 % Initial Value: 100% Reset Value: 100%...
- Page 11 Mechanics The Mechanics control is the sampled sound of the electric piano mechanics without the Main and the Key Up sounds. It controls the Mechanics (thump) samples level in the overall mix. Range: 0 – 100% Initial Value: 25% Reset Value: 0...
- Page 12 Drive Controls the level of the amplifier overdrive. Range: 0–100 Initial Value: 0 Reset Value: 0 Continuous control There are two microphone options in front of the amplifier: Condenser and Dynamic. Initial Value: Condenser Reset Value: Condenser Tone Section Bass The Bass control is a low shelf filter at 203 Hz, which can be decreased or increased by +/-18 dB.
-
Page 13: Effects Module
Treble The Treble control is a high-shelf filter at 1.875 kHz, which can be increased or decreased by +/-18 dB. Range: -50 to +50 Initial Value: 0 Reset Value: 0 Continuous control Volume Controls the output gain level after plugin processing. Range: 0–10 Initial Value: 8 Reset Value: 8... - Page 14 Tremolo Section Tremolo On/Off The Tremolo button turns the Tremolo section on or off. Range: Off, On Initial Value: On No reset value: Alt+click does not affect the current mode of this switch. Tremolo Rate Tremolo Rate provides control over Sync rates (such as ¼) or Free rates (in Hz), using the same knob. The middle position, 12 o’clock, is the slowest Free value.
- Page 15 Tremolo Depth The Depth control increases or decreases the amplitude level. Range: 0–100 Initial Value: 60 Reset Value: 0 Continuous control AutoPan Section AutoPan On/Off The AutoPan button turns the Autopan section on or off. Range: Off, On Initial Value: On No reset value: Alt+click does not affect the current mode of this switch.
- Page 16 Scaling: Custom. Range: Sync 1/32T-2/1 ; Free 0.25–28 Hz Initial Value: 1/2 sync rate Reset Value: 1/2 sync rate Continuous control Pan Depth Controls how far the panning extends from the center. Range: 0–100 Initial Value: 33 Reset Value: 0 Continuous control Phaser Section Phaser On/Off...
- Page 17 Phaser Mix Controls the level of the Phaser effect. Range: 0–100% Initial Value: 25% Reset Value: 0 Continuous control Phaser Rate Phaser Rate provides control over Sync rates that relate to the host (such as ¼), or Free rates (in Hz) that can be set independently of the host BPM, using the same knob.
- Page 18 Phaser Depth The Depth control controls the Phaser feedback. Range: 0–100 Initial Value: 53.5 Reset Value: 0 Continuous control Chorus Section Chorus On/Off The Chorus button turns the Chorus section on or off. Range: Off, On No reset value: Alt+click does not affect the current mode of this switch Depth The Depth control influences the dry/wet mix of the signal into the chorus and determines how much the module oscillator will influence the delay.
- Page 19 Reverb Section Reverb Mix Controls the balance between the dry and wet signal, and also controls the amount of reverb added. Range: 0% (dry) to 100% (wet) Default: 30% Reset Value: 0% (dry) Continuous control Reverb Predelay Controls the amount of the delay between the dry and wet signals. Range: 20 ms–400 ms (milliseconds) Initial Value: 55 ms Reset Value: 55 ms...
- Page 20 Reverb Damp Increases the level of high frequencies during the decay. Default: 0.8 Reset Value: 0.8 Continuous control Meters Meter Scale Peak meter: -30 dB to 0 dB, showing a VU meter scale calibrated for 18 dB of headroom (0 dBVU = -18 dBFS). Split Meters Separate left and right meter indicators.
-
Page 21: Chapter 4 Standalone Application
CHAPTER 4: STANDALONE APPLICATION The Electric 88 Piano application can be used as a standalone instrument. It requires an ASIO driver for Windows or a Core Audio driver for Mac OS X. Opening ELECTRIC 88.exe (Win) or ELECTRIC 88.app (MAC) loads the Electric 88 Piano standalone instrument and configuration preferences dialogs. - Page 22 The MIDI channel control allows the selected MIDI device to receive MIDI input only from certain channels, as selected in the checkboxes. User > Load Previous Settings: When checked, the Electric 88 Piano application loads with the last settings used. When unchecked, default settings load.
-
Page 23: Chapter 5 The Wavesystem
Waves software. The features of the WaveSystem toolbar are the same on practically all Waves plugins, however, Electric 88 Piano has its own set of controls that you access from the WaveSystem toolbar: see Section 5.2.2 below. Toolbar Functions Opens the plugin About box. -
Page 24: Loading Presets And Setups
3.2 Controls 3.2.1 Keyboard Control Factory Presets are permanent presets in the Load menu. Factory presets cannot be overwritten or deleted. When applicable, different component plugins may have different factory presets. User Presets are user-saved plugin parameters that are saved in the Load menu as “User Presets. ” Unlike factory presets, user presets can be overwritten and deleted. - Page 25 Load with Preset – MIDI, Arp-Seq and Tempo The Load with Preset filter is a custom toolbar used only with Electric 88 Piano; it lets you choose whether or not to load certain preset characteristics, such as MIDI assignments, arpeggiator/sequencer settings, and tempo. When checked, these parameters are loaded.
-
Page 26: Saving Presets And Setups
5.2.3 Saving Presets and Setups Click on the Save button to see the Save pop-up menu. Four options are available. If an option is not currently available it will be grayed out and inaccessible. Click on the Load button to see the Load pop-up menu. The menu is divided into four sections. If a section is not currently available it will not appear in the Load drop-down menu. - Page 27 Put into Preset Menu As… Save the current settings into a User Preset that will always be in your Load menu (until deleted). You will be prompted to give this preset a name. User Presets are stored in the plugin’s preference file. Please note: Special characters (such as: !, @, #, %, ^, etc.) are not supported in preset names.
-
Page 28: Interface Controls
5.3 Interface Controls Controls can be in one of three states: Not Selected The control is not the target of any user entry. Selected The control is the target of mouse control entry only. Selected and Active The control is the target for both mouse and keyboard entry. Toggle Buttons Toggle buttons display the state of a control and allow switching between two or more states. - Page 29 Using the arrow keys, click once with the mouse to select the button, and then use up/down or left/right (depending on the direction supported by that button) to move in the smallest incremental steps across the button’s range (holding down the arrow keys will move faster through the range).
-
Page 30: Waves Preferences (Pro Tools Only)
TAB Functions TAB moves the “selected” status to the next control, with shift-TAB moving in the reverse direction. Additionally, the Mac has an Option+TAB function for down movement and Shift+option+TAB for up movement, where applicable. If you have several Value Window Buttons selected, TAB functions will take you through the selected controls only. Clicking Esc or Return will return the “focus”...
Need help?
Do you have a question about the PIANO and is the answer not in the manual?
Questions and answers