Table of Contents
Advertisement
Advertisement
Table of Contents

Related Manuals for Grundig Sonoclock 691 DAB+


Summary of Contents for Grundig Sonoclock 691 DAB+
- Page 1 KITCHEN RADIO Sonoclock 691 DAB+...
- Page 2 ----------------------------------------------------------------------------------------------------------------------------------------------------------------------------- 2...
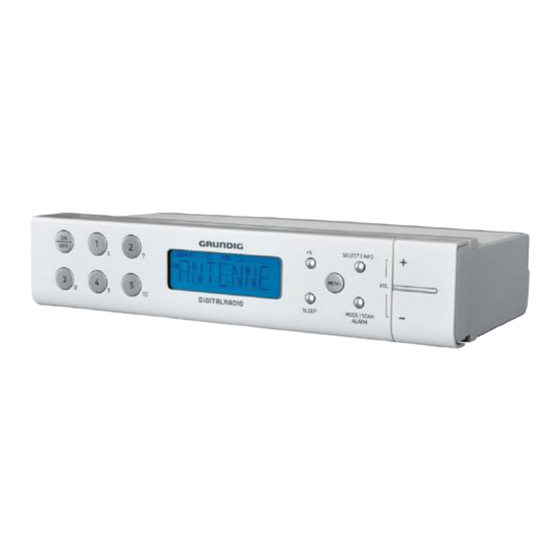
- Page 3 ----------------------------------------------------------------------------------------------------------------------------------------------------------------------------- ON/OFF DISPLAY +5 +VOL.– SELECT/ INFO PRESETS SLEEP MENU MODE 1–5 SCAN 6–10 ALARM 3...
- Page 4 ----------------------------------------------------------------------------------------------------------------------------------------------------------------------------- DEUTSCH PORTUGUÊS AUFSTELLEN UND SICHERHEIT 50 INSTALAÇÃO E SEGURANÇA AUF EINEN BLICK 51 VISÃO GERAL STROMVERSORGUNG/AUFSTELLEN 52 A LIMENTAÇÃO ELÉCTRICA/ INSTALAÇÃO EINSTELLUNGEN 53 DEFINIÇÕES BETRIEB 56 FUNCIONAMENTO TIMER-BETRIEB 57 MODO TIMER (TEMPORIZADOR) SONDERFUNKTIONEN 59 FUNÇÕES ESPECIAIS INFORMATIONEN ...
- Page 5 ----------------------------------------------------------------------------------------------------------------------------------------------------------------------------- DANKS 94 OPSÆTNING OG SIKKERHED 95 OVERSIGT 96 STRØMFORSYNING/INSTALLATION 97 INDSTILLINGER 100 FUNKTION 101 TIMER 103 SPECIELLE FUNKTIONER 104 INFORMATION SVENSKA 105 SÄKERHET OCH INSTALLATION 106 ÖVERSIKT 107 STRÖMFÖRSÖRJNING/INSTALLATION 108 INSTÄLLNINGAR 111 ANVÄNDNING ...
-
Page 6: Set-Up And Safety
SET-UPANDSAFETY ----------------------------------------------------------------------------------------------- This device is designed for the playback of audio signals. Any other use is expressly prohibited. Make sure the device is protected from drip- ping or splashing water. Do not place any vessels such as vases on the device. These may be knocked over and spill fluid on the electrical components, thus present- ing a safety risk. Do not place any naked flames such as candles on the device. Ensure that the device is adequately ventilated by placing it at least 10 cm from any other ob- ject. Do not cover the device with newspapers, table cloths, curtains, etc. Only use the device in a moderate climate. If malfunctions occur due to static electricity charges or fast transient (burst), reset the de- vice. To do this, pull out the power plug and connect it again after a few seconds. When deciding where to place the device, please note that furniture surfaces are covered by various types of varnish and plastic, most of which contain chemical additives. These addi-... -
Page 7: Controlsonthefront
OVERVIEW --------------------------------------------------------------------------------------------------------------------------------- See the figure on page 3. Controlsonthefront Controlsontheback ON/OFF S witches the device on and AC ~ P ower cable. off. P ull out the power cable when you want to discon- 1till 10 P reset buttons for storing nect the device from the and selecting radio stations. mains. Display S hows various information –... -
Page 8: Connecting To The Mains Supply
POWERSUPPLY/INSTALLATION ------------------------------------------------- Connectingtothemainssupply Settingupthedevice The speaker of the device is located at the bottom Note: of the device. To optimise the sound, mount the Check that the mains voltage on the type device holder on the bottom of the device. plate (on the bottom of the device) corre- sponds to your local mains supply. If this is 1 C lick the device holder in place in the recesses not the case, contact your specialist dealer. on the bottom of the device. 1 P lug the power cable into the socket (230 V ~ , 50/60 Hz). - Page 9 SETTINGS - -------------------------------------------------------------------------------------------------------------------------------------- Tuningandstoringradiostations StoringDABradiostationsto (DABandFM)–firstinstallation presets When the device is connected to the mains for After the automatic station search, all radio sta- the first time or after factory reset, the Auto Tun- tions will be stored in the program list. You can ing System will start to scan the whole DAB band- store your favored radio stations on presets 1 to width and store in the program list. The device will then scan the FM waveband and 1 Open the menu with »MENU«. store the first 10 radio stations as presets 1 to 10. 2 Select the option »STATION« with »+VOL.-« The time is updated automatically. and press »SELECT/INFO« to confirm. 1 Press »ON/OFF« to switch on the device. 3 Select DAB radio stations with »+VOL.-« and – Display: »WELCOME« and then »SCAN«. press »SELECT/INFO« to confirm – T he automatic station search starts, searches 4 For storing the DAB radio station on a preset,...
- Page 10 SETTINGS - -------------------------------------------------------------------------------------------------------------------------------------- ProgrammingFMradiostations– Settingtheclockformat manually (12or24hours) 1 To select FM radio as input source, press 1 Press »ON/OFF« to switch on the device. – Display: e.g. »B5 AKT«. »MODESCANALARM« for a short time. – D isplay: »FM«, then the name or the frequen- 2 Open the menu with »MENU«. cy of the FM radio station. 3 Select the option »SYSTEM« with »+ VOL. -« 2 Open the menu with »MENU«. and press »SELECT/INFO« to confirm. 3 Select the option »TUNE« with »+VOL.-« and 4 Select the option »TIME« with »+VOL.-« and press »SELECT/INFO« to confirm. press »SELECT/INFO« to confirm. 4 Press and hold down »+VOL.« or »VOL.-« to – Display: »SET TIME«.
- Page 11 SETTINGS - -------------------------------------------------------------------------------------------------------------------------------------- Updatingthetime– Updatingthetime–manually automatically 1 Press »ON/OFF« to switch on the device. – Display: e.g. »B5 AKT«. The device will normally update the time auto- matically when a time signal is received. You can 2 Open the menu with »MENU«. select from which source (DAB or FM) the update 3 Select the option »SYSTEM« with »+ VOL. -« starts or you can disable this function. and press »SELECT/INFO« to confirm. 1 Press »ON/OFF« to switch on the device. 4 Select the option »TIME« with »+VOL.-« and – Display: e.g. »B5 AKT«. press »SELECT/INFO« to confirm.
-
Page 12: Operation
RDS (Radio Data System) is an information sys- display »ERR: 0«), bit rate, broadcasting for- tem which is transmitted additionally by most FM mat, current time and date. stations. Notes: It may take some time before all RDS infor- mation is available. GRUNDIG has no responsibility for the ac- curacy of such information. 1 Press »SELECT/INFO« repeatedly. – T he following display appears in succesion: radio text (if offered), station type (PTY), name of the radio station, current time and date. ENGLISH 23... -
Page 13: Timer Mode
TIMERMODE -------------------------------------------------------------------------------------------------------------------------- Settingalarmtimes 13 P ress »SELECT/INFO« to confirm the alarm; or 1 Press »ON/OFF« to switch on the device. cancel the alarm, select the option »OFF« with – Display: e.g. »B5 AKT«. »+VOL.-« and press »SELECT/INFO« to con- 2 Open the menu with »MENU«. firm. – Display: »SAVED«. 3 Select the option »SYSTEM« with »+ VOL. -« Note: and press »SELECT/INFO« to confirm. Y ou can also activate and deactivate the 4 Select the option »ALARM« with »+VOL.-« and alarm by pressing »AUTOTUNE«, if the de- press »SELECT/INFO« to confirm. vice is switched off. – Display: »ALARM« flash. Pausingthealarm 5 Press »SELECT/INFO«, set the hours by press- ing »+VOL.-« and press »SELECT/INFO« to 1 Press any button (except »ON/OFF«) while confirm. -
Page 14: Sleep Timer
TIMERMODE -------------------------------------------------------------------------------------------------------------------------- SleepTimer ReminderAlarm The device has a sleep timer which switches off in The device can be set to function as a reminder radio mode at a preset time. It is possible to adjust by sounding the signal tone at a preset time. the sleep time between 10 and 90 minutes in 10 1 Press »ON/OFF« to switch on the device. minute increments. – Display: e.g. »B5 AKT«. Selecttheswitch-offtimeforthe 2 Open the menu with »MENU«. sleeptimer 3 Select the option »SYSTEM« with »+ VOL. -« 1 Press »ON/OFF« to switch on the device. and press »SELECT/INFO« to confirm. – Display: e.g. »B5 AKT«. 4 Select the option »NAP« with »+VOL.-« and 2 Open the menu with »MENU«. press »SELECT/INFO« to confirm. – Display: » 000:00«. 3 Select the option »SYSTEM« with »+ VOL. -«... -
Page 15: Special Functions
SPECIALFUNCTIONS -------------------------------------------------------------------------------------------- Selectingsoftwareversion DeletingprogramlistforDAB radiostations 1 Open the menu with »MENU«. If you move to a different part of the country, 2 Select the option »SYSTEM« with »+ VOL. -« some of the stored radio stations may no longer and press »SELECT/INFO« to confirm. be available. 3 Select the option »SW VER« with »+ VOL. -« 1 Open the menu with »MENU«. and press »SELECT/INFO« to confirm. – Display: current software version. 2 Select the option »PRUNE« with »+VOL.-« and press »SELECT/INFO« to confirm. -
Page 16: Technical Data
INFORMATION - ----------------------------------------------------------------------------------------------------------------- Technicaldata Environmentalnote This device is noise-suppressed This product has been manufac- according to the applicable EU tured with high quality parts and directives. This product fulfils the materials which can be reused European directives 2004/108/ and are suitable for recycling. EC, 2006/95/EC and 2009/125/EC. Therefore, do not dispose the product with nor- The type plate is located on the bottom of the mal domestic waste at the end of its service life. - Page 17 72011 411 5000 11/49...
Need help?
Do you have a question about the Sonoclock 691 DAB+ and is the answer not in the manual?
Questions and answers