Table of Contents
Advertisement
Advertisement
Table of Contents

Subscribe to Our Youtube Channel
Summary of Contents for BitaTek IT-8000
- Page 1 Microsoft® Windows® CE 5.0 Rugged Handy Terminal Version 1.0 November/ 24/ 2008...
-
Page 2: Table Of Contents
Table of Contents Charpt 1. References ....................4 1.1. General Use And Product Safety ..............4 1.2. FCC Compliance ..................5 1.3. SAR Compliance ..................6 1.4. WEEE Compliance..................7 1.5. System Specifications................... 7 1.6. Environment Standard .................. 9 1.7. Product Label.................... - Page 3 3.4.1. The Command Bar ................. 35 3.4.2. The Task Bar................... 35 3.4.3. Using the Stylus................35 3.5. Calibration of the touch Screen ..............36 3.6. Control Panel ....................36 3.6.1. Barcode Setting ................37 3.6.2. UDC Setting ................... 39 3.7. Backup and Restore Function..............
-
Page 4: Charpt 1. References
Charpt 1. References Reserves the right to make improvements or changes in the products described in this document at any time without notices. While reasonable efforts have been made in the preparation of this document to assure its accuracy, assumes no liability resulting from any errors of omissions in this guide, or from the use of the information contained herein. -
Page 5: Fcc Compliance
cable or Single Cradle (sold by optional) to transfer data to the computer. Manufacturer is not liable for any data damages or data loss caused by deletion or corruption by using of this device, or due to the drained battery. Lithium-ion battery packs might get hot, explode, ignite and/or cause serious injury if exploded by abusive using. -
Page 6: Sar Compliance
the limits for a Class B digital device, pursuant to Part 15 of the FCC Rules. These limits are designed to provide reasonable protection against harmful interference in a residential installation. This equipment generate, uses and can radiate radio frequency energy and, if not installed and used in accordance with the instructions, may cause harmful interference to radio communications. -
Page 7: Weee Compliance
Caution: Please also note that Terminal is limited in CH1~CH11 for 2.4GHz by specified firmware controlled in U.S.A. The FCC ID of Handy Terminal is SPY-PDT 1.4. WEEE Compliance This symbol is placed on the product to remind users to dispose of Waste Electrical and Electronic Equipment (WEEEE) appropriately, per Directive Europe 2002/96/EC. - Page 8 - Support Static, Pre-shared and Dynamic encryption 40-bit and 128-bit keys. WEP, WPA: TKIP and WPA2:AES - Support coexistence with Bluetooth -- Class II with V2.0 compliant RF Radio Support(Option) -Bluetooth WPAN -- Range 10 m -- Support coexistence with WiFi -One cradle connector support RS232, External Connect Ports DC-IN and USB Host/Client...
-
Page 9: Environment Standard
- 5Vdc/5.0Adc output - One 32 keys Numeric Alpha keypad Button/Key - LED keypad backlight - One Power/ LCD Backlight button - Keypad backlight will be turned on automatically when any key is pressed - One Barcode Scanner Button and four Navigation Buttons 175(L) x 66(56)(W) x 43(35)(H) mm Dimensions... -
Page 10: Warranty And After Service
Figure 1-1 1.8. Warranty And After Service Should this Handy Terminal be malfunctioned, please contact your original retailer providing information about the product name, the serial number, and the details about the problem. Handy Terminal User Guide... -
Page 11: Charpt 2. Introduction
Charpt 2. Introduction Congratulations on purchasing the Terminal, a Microsoft Windows® CE .Net rugged Terminal. It’s special combination of features make it perfect for using in a wide range of applications. These features as : Small rugged lightweight form factor Microsoft Windows®... -
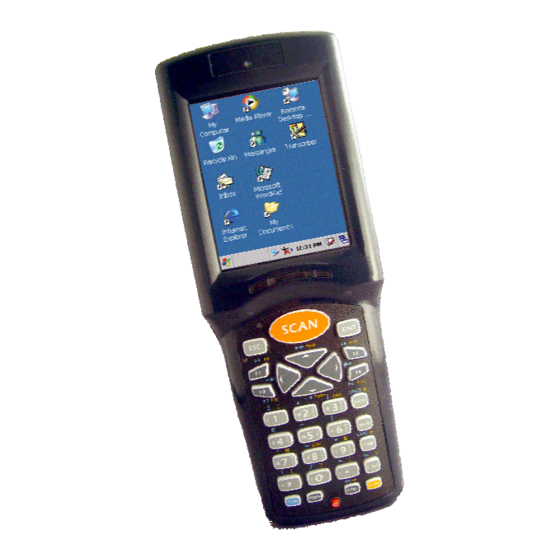
Page 12: Handy Terminal Front Side View
2.2.1. Handy Terminal Front Side View Figure 2-1 2.2.2. Handy Terminal Back Side View Figure 2-2 Handy Terminal User Guide... - Page 13 Table 2-1 Description of Terminal General View 1 Scanner LED Indicator “Red” color Scan is in progress “Green” color Scan is reading successful 2 Charge LED “Red” color Battery Pack is still charging Indicator “Green” color Battery Pack is charged full 3 LCM/ Touch Panel Do specific action through touch panel by stylus 4 Scan key...
- Page 14 1. This key is used to combination with other keys to type special character or perform system Fun key ( functions. 2. The status icon of task bar will display like when it is blue function mode. 12 Enter key This key confirms data entry 13 Ear phone jack A connector to plug a earphone set with microphone...
-
Page 15: Keypad Description
2.3. Keypad Description Figure 2-3 2.3.1. Key Maps and Behavior A 32-key numeric alpha keypad contain 0-9 digits as single keystrokes will be produced. The triple click behavior to Alphabetic keys is described elsewhere. Shift Orange Position Legend Default Function Function Blue Function Escape... - Page 16 Shift Orange Position Legend Default Function Function Blue Function [Increase Up Arrow [Page Up] Volume] [Reduce Down Arrow [Page Down] Volume] [Reduce Left Arrow Backlight] [Increase Right Arrow Backlight] ! ﹕ ﹔ € [Windows & Icon] [Screen Rotation] [K/B Lock "...
-
Page 17: Numeric Keypad Alpha Mode And Triple Click
Shift Orange Position Legend Default Function Function Blue Function , < ‘ ‧ > BkSp [Home Logo] Space Enter Shift Cancel mode Shift mode [Back Tab] Caps Lock Delete Enter Orange Function Cancel Blue Enter Blue Mode Cancel Function function mode Blue Function Mode Mode... - Page 18 Default Alpha mode produces lower case alphabetic characters. User can use Shift or Caps Lock to get upper case alphabetic characters. No keyboard messages will be generated until the character selection is finalized. Numeric Alpha Mode Mode First Second Third Fourth Fifth Sixth...
-
Page 19: Function Key
Press the Keys Press the Keys Enter Enter 2.3.3. Function Key The “Fun” key is used to combine with other key to type special character or perform system functions. The status icon of task bar will display like when it is Numerical mode. - Page 20 Numerical mode. If press key first, the status icon of task bar will display like it is Orange Function mode, If repress key again, then return to Numerical mode. Fn+ Main Definition Sequence Function 1. Increase the LED backlight brightness of display screen(Lighter) Backlight 2.
- Page 21 Fn+ Main Definition Sequence Function It is same as F10 key on the standard keyboard of desktop It is same as F11 key on the standard keyboard of desktop It is same as F12 key on the standard keyboard of desktop It is same as Alt key on the standard keyboard of desktop...
- Page 22 Fn+ Main Definition Sequence Function 】 】 It will display a “ “ character on cursor It will display a “ ` “ character on cursor It will display a “ ~ “ character on cursor " It will display a “ " “ character on cursor It will display a “...
-
Page 23: Rotating The Screen
2.3.4. Rotating The Screen If you change display from Portrait type to Landscape type, please double click the “ROTATION” icon from the control panel, the setting have 0 degree, 90 degrees, 180 degrees and 270 degrees four option. You can do it by keyboard . 1. -
Page 24: Scanning Barcode
for the current application(see Figure 2-5). Figure 2-4 Figure 2-5 2.4. Scanning Barcode To use the scanning function, complete the following steps: Press the scan key. The scanner scans as long as you hold the key or for few seconds. Upon reading a barcode, the red LED indicator comes on until the trigger is release or few seconds. -
Page 25: Resetting The Handy Terminal
b) The reader can be detected by a red beam. Bad Scanning Position a) Make sure that the bars enter the laser beam when scanning large barcodes. b) Scanning operations may fail if the laser beam position as below. Note: This product scans using laser light. -
Page 26: Cold Reset
2.5.2. Cold Reset You can use Cold Reset to initiate device if WINCE.NET OS lock up or Warm Reset still can’t work To perform Cold Reset, please press < & < & < > > > simultaneously until Cold reset start. Device will initiate boot up after Cold Reset. -
Page 27: Sd Card
The DiskOnChip Properties dialog will display the size of DiskOnChip folder。 2.7. SD Card The Handy Terminal provide for add a Micro SD memory storage card. You can do as follow step to insert the Micro SD memory storage card. Handy Terminal User Guide... - Page 28 When insert a Micro SD memory storage card to Handy Terminal Micro SD slot complete, the system will create a folder name “MultiMediaCard”. The system administrator can find this folder from “My Device”. The Handy Terminal support a Micro SD memory storage card, the maxima size is 2Gb。...
-
Page 29: Charpt 3. Getting Started
Charpt 3. Getting Started 3.1. Charging the Battery Pack Before using the Handy Terminal, perform the basic procedure of charging the battery pack through the following steps. 3.1.1. Installing the battery pack 1. On the Handy Terminal attached with a hand-strap, detach and loose the hand-strap. - Page 30 3. Insert the battery pack into the battery compartment with the label facing out, and ensuring the battery snaps into place Handy Terminal User Guide...
- Page 31 4. Replace the battery cover by insert the top first, switch lock the battery cover latch to secure the cover to the Handy Terminal. 5. Charge time. For the first time to charge the battery pack needs approximately 5 hours. Subsequent charging time needs approximately 3 hours.
-
Page 32: Charging The Battery Pack With Power Adapter
3.1.2. Charging the battery pack with Power Adapter 1. Plug in the DC-IN Converter to the Handy Terminal bottom connector 2. Connect the Power cord to the Power adapter 3. Plug in the connector of the power adapter with DC-IN Converter 4. - Page 33 b) Place the spare battery pack into the Single Cradle’s spare Battery charging slot 1. Connect the Power cord to the Power adapter 2. Connect the power cord to a power source 3. Plug in the connector of the power adapter with Single Cradle 4.
-
Page 34: Starting The Handy Terminal
3.2. Starting the Handy Terminal Press the Power key to turn on/off the Handy Terminal. If the Handy Terminal does not power on, please perform a cold boot. See 2.5 Resetting the Handy Terminal on page 25 Caution: When a battery is fully inserted in Handy Terminal for the first time, upon the Handy Terminal’s first power up, the device boots and powers on automatically. -
Page 35: Navigating The Display
3.4. Navigating the Display 3.4.1. The Command Bar Use the Command bar at top of the screen to perform tasks in programs, such a opening a file, or editing a file. 3.4.2. The Task Bar The Task bar at the bottom of the screen displays the icon, an icon for the active program, the current time, and system icons for utilities loaded in memory. -
Page 36: Calibration Of The Touch Screen
action as follow. Double Tap:Touch the icon twice on the screen to open or execute it. Tap:On the pop-up menu, tap the item that you want to perform. Drag:Firmly press the icon on the screen to drag across the screen. Caution:... -
Page 37: Barcode Setting
All applet programs are displayed as a icon on the screen. Figure 3-2 3.6.1. Barcode Setting Double click the “BC Settings” icon from control panel to open the barcode setting. The system administrator can enable /disable the barcode type from the “barcode”... - Page 38 Handy Terminal User Guide...
-
Page 39: Udc Setting
3.6.2. UDC Setting You can switch-able USB Host or USB Client by this program. The “UDC” is USB client that you can connect with PC by USB Y cable or cradle. The “Host2” is USB Host that support USB 1.1 device and you can connect with USB keyboard, USB mouse or USB flash disk by cradle. - Page 40 Figure 3-5 Handy Terminal User Guide...
-
Page 41: Charpt 4. Communication
Charpt 4. Communication 4.1. Bluetooth Device The system administrator has discovered and paired with a Bluetooth device from OBEX tools of Terminal. The system administrator can assign a friend name for Terminal that default friend name is “WindowsCE”. The OBEX tools also support file transfer between two Terminals by Bluetooth connection. - Page 42 Figure 4-1 Handy Terminal User Guide...
-
Page 43: File Transfer Between Two Terminals
4.1.2. File transfer between two Terminals The role of one terminal must set as “server” from OBEX tools, and another must set as “client”. The role of server can be assigned a folder ( Ex “DiskOnChip” folder ) to share for client. -
Page 44: Ethernet Network
4.2. Ethernet Network Terminal Wi-Fi 802.11 b/g model can communicate with the host computer using the on-board radio frequency component and Access point. To tap the icon at Task bar, then a Wireless LAN screen “ WLAN ” appear, select “Wireless information” page. There is a list of Wireless Manager access points, double click the access point on the list that you want connect , set up the Encryption, Authentication, Network key items according the access point... -
Page 45: Microsoft® Activesync
The default admin password is “SUMMIT”. The on-board radio frequency component of Terminal has an utility, it is visible on the desktop, please tap the “Summit Client utility” icon. You can find more information about this applet for the radio configuration from http://www.summitdatacom.com/SCU.htm.
Need help?
Do you have a question about the IT-8000 and is the answer not in the manual?
Questions and answers