Table of Contents
Advertisement
Advertisement
Table of Contents

Summary of Contents for B-AMP Bergantino
- Page 1 ™ Owner’s Manual...
-
Page 2: Table Of Contents
WARNING: This amplifier is capable of producing sound pressure levels that may damage your hearing. Always operate at a safe listening level or use hearing protection if operating at higher levels. Bergantino Audio Systems 1 Main Street, Building 12 Whitinsville, MA, 01588 508-234-4195 info@bergantino.com... -
Page 3: Important Safety Instructions
This manual should be kept for future reference. Verify AC Circuit Capacity Before Use: Your new Bergantino B AMP comes equipped with a UPS (Universal Power Supply) capable of operating from 100 – 240VAC (~), 50/60Hz with no user adjustments or switching necessary. -
Page 4: Introduction
Congratulations on your choice of the Bergantino Audio Systems’ B AMP as your amplifier and welcome to the Bergantino family! First we would like to thank you for choosing Bergantino Audio Systems as your amplifier company. This is something we never take for granted. We are confident that your new amplifier will bring you many years of trouble free use and we feel that our high quality design and build standards will help you reach your creative goals. - Page 5 Speaker Profiles = Intelligent Equalization: Having your speaker cabinet EQ’d and matched to the acoustic environment frees up your tone controls to be creative elements, rather than being used to ‘fix’ a speaker design or a bad acoustic space. Cool Running = Reliability: The B AMP uses a Class D amplifier topology that generates less than half the heat of conventional amplifiers.
-
Page 6: Quick Start
Set the Instrument Gain and Master Volumes at 0 (off). 5. Select Speaker Profile If you’re using a currently offered Bergantino speaker model, push and hold the Prog button to the right of the LCD display for 3 seconds to get into Program Mode. Quickly push the Prog button 3 times to get to the Profile Select screen. - Page 7 Bergantino cabinets as well as some Bergantino cabinet combinations from our website (www.bergantino.com) onto a FAT32 formatted thumb drive, and load it into one of the 12 dedicated Profile memory slots via the USB port (see Profile Select menu below).
-
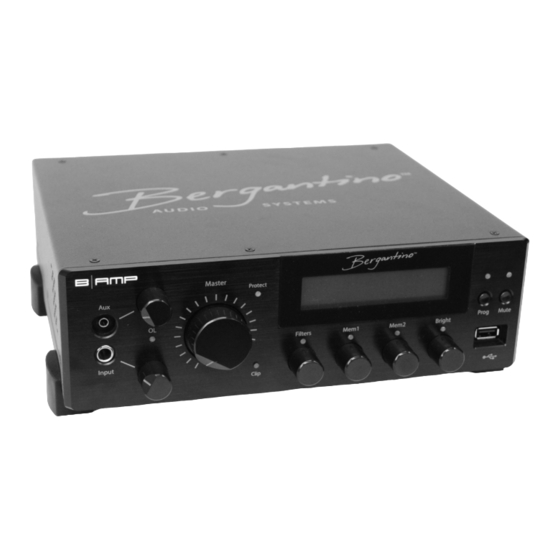
Page 8: Front Panel Controls And Operation
Front Panel Controls and Operation 1. Aux Input: A standard 1/8” mini stereo jack to plug in an external sound source (iPod, MP3 player, etc.). The Aux Input does not go to the DI. Maximum, unclipped input level is 2Vrms. 2. - Page 9 8. Clip (indicator): This indicator will flash yellow when the B AMP senses an overdriven or clipped signal at its output. This is an indication that the amplifier is being driven beyond its ability to produce a clean, undistorted output signal. It’s ok and normal to see the flashing of this indicator on loud peaks.
- Page 10 The VHPF (turn Bass/Filters knob to adjust frequency) allows frequencies above the displayed frequency to pass while cutting frequencies below. Factory default is 40Hz. Turning this knob adjusts the cut-off frequency from 32Hz – 80Hz in 2Hz increments. Use this control to clean up the very low end of the bass frequencies, which can often muddy the low-end program information and needlessly stress your speaker system and waste amplifier headroom.
- Page 11 switch. (See Mem1/Mem2 Save on how to save settings to this location). Push this knob again, and you will be taken back to the previous home screen. 12. Mem2/HMID Control: This control has multiple functions: As a Tone Control, turning the control Left or Right from the home screen will decrease or increase the level of the High-Mid frequencies in 1dB increments, from -9db to +9db.
- Page 12 If the B|AMP’s tuner is enabled, a fully digital chromatic tuner is activated and displayed on the LCD display. The first screen indicates there is no signal detected by the B|AMP’s tuner. The second screen indicates a properly tuned A1 string. The third and fourth screens show a sharp F#2 and a flat G2 respectively.
-
Page 13: Rear Panel Controls And Operation
Rear Panel Controls and Operation 1. Power Switch: Turns the amplifier on or off. 2. AC Receptacle: The power cord is detachable and plugs in here. 3. Line (output): This output is software selectable in Program Mode. It can be programmed as a preamp out (post Master volume), or it can be programmed as a tuner output. -
Page 14: Extended Amplifier Features
10: Cooling Fan: The onboard microcontroller monitors the amplifier temperature and engages the cooling fan when needed to reduce the amplifier temperature. The fan can be turned from Auto to On in Program Mode for extreme usage conditions. Note: The fan is automatically set to Auto upon each power recycle. Extended Amplifier Features Mem1/Mem2 Save You can save and store 2 independent tone settings in memory for future recall. - Page 15 Properly Adjusting Input Gain If using an active bass, start in Hi Output mode (Factory default setting), and with the input gain fully off, play your bass like you normally would, including hard dynamic attacks. Gradually turn the input gain up until you can see the OL led flash on the front panel of the B|AMP.
- Page 16 Pre-EQ ó Post- EQ Pre-EQ: This signal includes input gain and effects loop, but no tone controls Post-EQ: This signal includes input gain, effects loop and tone controls. ð The B AMP’s Profile EQ section will never go to the DI o utput, thus never to the FOH ...
- Page 17 Screen 5 – Profile USB Load This menu allows you to load new profiles, via the B|AMP’s USB port, from a FAT32 formatted thumb drive into one of the twelve dedicated Profile memory locations of the B AMP. In this menu, the B AMP will read any file off the thumb drive with a .PRF extension.
- Page 18 • Turn Bass/Filters Knob to select Line out Pre-Out ó Tuner Note: If Tuner is selected, this output will not be muted when the B|AMP’S Mute function is engaged, allowing music signal to pass to a user supplied tuner during system muting. If Pre- Out is selected, this output will be muted along with the B|AMP’s Main and DI outputs.
- Page 19 Screen 8- Main Phase Menu This menu allows you to reverse the phase of the main amplifier’s output (including pre-out, if selected as the line out) to help eliminate any possible feedback or phasing issues experienced in a live or recording environment. It does not affect the phase of the DI out. •...
- Page 20 Screen 10 – Fan Menu This menu allows you to select Auto or On for fan control. Although not recommended, it can be useful if you’re playing an outside venue in direct sunlight such that the case temperatures can get unusually warm just by the effects of the direct sun. Turning the fan on will keep air circulating through the case minimizing any heating issues under these extreme conditions.
-
Page 21: Firmware Upgrade
ð This reset will Not erase any stored Speaker Profiles in the B AMP’s memory, but it will erase any stored user memory settings in Mem1 and Mem2. ð It is Not recommended to do a Factory Reset with a speaker connected to the B|AMP’s output, as audible pops may be heard. -
Page 22: Installation And Maintenance
Consult your dealer or Bergantino Audio Systems for more information if needed. Avoid installation in extremely hot or cold locations, and areas that are exposed to direct sunlight, or near heating equipment. -
Page 23: Specifications
Specifications AMP Specifications: Output Power:(User selectable in Program Mode) 700Watts @ 4-Ohm 800Watts @ 2.67-Ohm 800Watts @ 2-Ohm Maximum Input Levels: Main Input: 1Vrms (post gain control) Aux. Input: 2Vrms Effects Return: 1Vrms Input/Output Impedances: Input Impedance 1M Ohm Aux. input Impedance 20k Ohm Send output Impedance 600 Ohm... -
Page 24: Warranty Information
ITEMS EXCLUDED FROM THIS Bergantino Audio WARRANTY This Bergantino Audio Warranty is in effect only for failure of a new Bergantino Audio product that occurred within the Warranty Period. It does not cover any product, which has been damaged because of any intentional misuse, accident, negligence, or loss, which is covered under any of your insurance contracts. - Page 25 No person has the authority to enlarge, amend, or modify this Bergantino Audio Warranty. This Bergantino Audio Warranty is not extended by the length of time that you are deprived of the use of the new Bergantino Audio product. Repairs and replacement parts provided under the terms of this Bergantino Audio Warranty shall carry only the unexpired portion of this Bergantino Audio Warranty.
Need help?
Do you have a question about the Bergantino and is the answer not in the manual?
Questions and answers