Advertisement
Available languages
Available languages
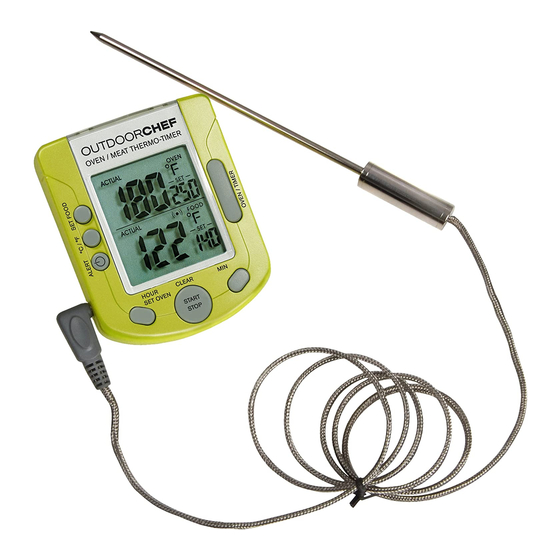
dual sensor thermometer / tImer 293a25
EN
dIrectIons For use: gourmet checK
1. InstallIng the battery
Open the battery cover on the back of the unit. Insert one AAA battery according to the polarity marks
inside the battery compartment. Close the battery cover tightly.
2. InsertIng the sensor
To avoid the cable being squashed by the lid, feed the cable with the sensor through a hole in the lid.
Next, insert the sensor plug into the socket on the side of the unit. Please also refer to section 9.
3. turnIng on the unIt
Press & hold the «ALERT» button for two seconds to turn the unit on/off. When the unit is turned on the
LCD will display:
ACTUAL OVEN:
Displays «---». Indicates the measured temperature after three seconds.
Set oven: 122° F (50° C) or last set memory.
ACTUAL FOOD:
Displays «---». Indicates the measured temperature after three seconds.
Set Food: 122° F (50° C) or last set memory.
Activating the audio alarm
Press the «ALERT» button to activate the audio alarm. «FOOD» (( )) appears on the display.
4. swItchIng between FahrenheIt and celsIus
Press the «° C /° F» button to select temperature readings in Celsius or Fahrenheit.
Temperature range (displayed):
Actual oven: 32° F – 523° F / 0° C – 250° C
Set oven: 32° F – 523° F / 0° C – 250° C
Actual food: 32° F – 523° F / 0° C – 250° C
Set food: 32° F – 523° F / 0° C – 250° C
Note: if the temperature exceeds 250° C on the display appears „HH".
The temperature of the barbecue is too high and must be reduced.
5. settIng the Food temperature
1.
Press the «SET FOOD» button to advance the set temperature by 1° C / 1° F.
2.
The temperature range which is displayed is 86° F – 523° F /30° C – 250° C
3.
If the actual food temperature exceeds the set temperature, the unit will beep and the actual food
temp display (digit + alert icon) will blink continuously.
4.
Press any button once to temporarily stop the beeping and the blinking. (The blinking continues for
as long as the actual food temperature remains higher than the set temperature).
5.
If the actual food temperature is still higher than the set temp after two minutes, the alarm is
re-activated.
ALARM PRIORITY
TIMER • FOOD • OVEN • OVERTIMEE
OVEN: 1x beep (per second) / FOOD: 2x beep (per second)
TIMER: 3x beep (per second) / OVERTIME: 4x beep (per second)
6. settIng the oven temperature
1.
Press the «SET OVEN» button to advance the set temperature by 1° C / 1° F.
2.
The temperature range which is displayed is 86° F – 523° F / 30° C – 250° C
3.
If the actual oven temperature exceeds the set temperature, the unit will beep for 20 seconds (1
beep per second) and the actual oven temperature display (digit + alert icon) will blink continuously.
4.
Press any button once to stop the beeping and the blinking. (The blinking continues for as long as
the actual food temperature remains higher than the set temperature).
5.
If the actual oven temperature is still higher than the set temperature after two minutes, the alarm
is re-activated.
7. settIng the countdown tImer
1.
Press the «OVEN / TIMER» button to select the timer display (default 0:00:00).
2.
Set the timer by pressing the «HOUR» and «MIN» buttons (for example 1 hr 30 min). The « » icon
appears and is continuously illuminated.
3.
Press the «START / STOP» button to start the timer. The « » icon will blink every second.
4.
Press the «START / STOP» button to stop the timer.
5.
When the timer is paused, press the «HOUR» and «MIN» buttons to readjust the time before
pressing the «START / STOP» button to re-start the countdown timer from the newly set time.
6.
When the timer reaches 0:00:00, it beeps (three beeps per second) for 20 seconds and the
numbers blink continuously. The «
» icon blinks and the overtime timer starts.
7.
When the overtime timer is paused, press the «HOUR» and «MIN» buttons to readjust the time.
Press the «START / STOP» button to re-start the overtime timer from the newly set time.
8.
When the overtime timer reaches the upper limit of 9:59:59, the numbers will reset to show 0:00:00,
a warning beep will sound (4 beeps per second) for 20 seconds and the display will blink.
9.
After 20 seconds, the timer will revert to (0:00:00) on the display without the «
10. Press the «SET OVEN / HOUR» and «MIN» buttons at the same time to reset / zero the time
(0:00:00).
8. countIng up
1.
Press the «OVEN / TIMER» button to enter timer mode.
2.
Press the «SET OVEN / HOUR» and «MIN» buttons at the same time to reset/zero the time (0:00:00).
3.
Press the «START / STOP» button to start or stop the count-up timer. The « » icon blinks every second.
9. posItIonIng the thermometer durIng use
Use with barbecues / For gas barbecues:
•
First, turn on the gas barbecue.
•
The electronic unit must not be placed in/on the barbecue.
•
Feed the cable with the sensor through one of the three holes in the lid and insert the sensor plug
into the socket on the side of the GOURMET CHECK.
•
Programme the GOURMET CHECK as required.
•
Insert the sensor into the food.
•
Close the lid.
•
Do not attach the GOURMET CHECK to either the barbecue lid/cover or the control panel.
•
Do not place the GOURMET CHECK on the control panel whilst the barbecue is in use.
•
Only touch the sensor or the cable with heat resistant gloves.
•
This device can be sensitive to electrostatic charge, which can lead to malfunctions.
For charcoal barbecues:
•
Start up the charcoal barbecue as normal.
•
The electronic unit must not be placed in/on the barbecue.
•
For barbecues without side shelves, we recommend using the removable OUTDOORCHEF side
shelves or placing a table near to the charcoal barbecue.
•
Insert the sensor plug into the socket on the side of the GOURMET CHECK.
•
Programme the GOURMET CHECK as required.
•
Insert the sensor into the food.
•
Close the lid. Position the cable so that it will not be damaged.
Do not fasten the electronic unit on to the barbecue hood or the control panel.
Use with ovens:
•
The electronic unit must not be placed in the oven. The sensor's cable is secured by the oven door.
•
Ensure the sensor plug at the other end of the cable is firmly plugged into the thermometer.
•
If drops of water or vapours get into the plug via the opening in the thermometer, this will result in a
faulty contact and an incorrect temperature reading. Always dry the sensor plug with a cloth before
plugging it into the thermometer.
•
When the food is ready, remove the metal probe from the meat with a heat resistant glove.
Do not touch the probe/cable with your bare hands
10. cleanIng
Wash the cable and the sensor after every use by wiping them with a damp cloth and washing up liquid.
Rinse with a fresh damp cloth and then dry.
If the probe sensor has turned brown, we recommend using a standard wire wool pad.
Do not wash the electronic unit, the sensor or the plug in running water or place them in
water at all. This could cause the device to stop working completely.
11. cautIons
•
Becareful not to sever or damage the cable or probe.
•
Do not expose the probe or cable to direct flames.
•
Always wear a heat resistant glove when handling the metal probe or cable during or just after cooking.
Do not touch it with your bare hands.
•
Keep the metal probe and cable out of reach of children.
•
Never leave the device in direct sunlight.
•
Do not use the device in the microwave.
•
The above content is subject to change without prior notice.
•
The displays printed in this manual may differ from the actual displays due to printing restrictions.
•
The manufacturer and its suppliers do not accept any liability towards you or any other person in
relation to damage expenses, lost profits or any other claims that arise from using this product.
•
Read the directions for use before using your GOURMET CHECK for the first time
12. specIFIcatIon
Temperature range: 32° F – 523° F / 0° C – 250° C
Thermometer timer unit batteries: DC 1.5 V size AAA x 1
This device can be sensitive to electrostatic charge, which can lead to malfunctions.
core temperature
Beef
Roast beef / Entrecôte / T-bone steak
Rib eye / Sirloin
Veal
Fillet medallions / Rump
Veal cutlets
Spare ribs
» icon.
Pork
Fillet / Loin
Boston butt
Spare ribs
Lamb
Tenderloin
Leg
Chicken, all cuts
For further details on internal temperatures, please contact your butcher.
DKB Household Switzerland AG
Eggbühlstrasse 28
Postfach
8052 Zürich-Switzerland
OUTDOORCHEF.COM
Optimal
54 - 57° C
58 - 62° C
57 - 62° C
58 - 64° C
86 - 90° C
58 - 62° C / 64° C
70 - 75° C
80 - 85° C
48 - 55° C
58 - 64° C
at least 70° C
Rare
40 - 44° C
37 - 40° C
Advertisement
Table of Contents

Summary of Contents for OUTDOOR CHEF 293A25 GOURMET CHECK
- Page 1 dual sensor thermometer / tImer 293a25 9. posItIonIng the thermometer durIng use Use with barbecues / For gas barbecues: dIrectIons For use: gourmet checK • First, turn on the gas barbecue. • The electronic unit must not be placed in/on the barbecue. •...
- Page 2 dual-sensor-thermometer / tImer 293a25 8. zeItmesser Drücken Sie die Taste «OVEN / TIMER», um den Timer-Modus zu aktivieren. bedIenungsanleItung: gourmet checK Drücken Sie die Tasten «HOUR» und «MIN» gleichzeitig, um die Zeit auf 0:00:00 zurückzusetzen. Drücken Sie die Taste «START / STOP», um den Countup zu starten oder zu stoppen. Das « »-Symbol blinkt 1x pro Sekunde.
- Page 3 thermomètre et mInuterIe double FonctIon 293a25 8. FonctIon chronomètre Appuyer sur la touche «MODE» pour accéder au mode minuterie. mode d’emploI: gourmet checK Appuyer sur les touches «SET OVEN / HOUR» et «MIN» en même temps que reset/clear pour remettre la minuterie à zéro 0:00:00. Appuyer la touche «START / STOP»...
- Page 4 termometro / tImer a doppIo sensore 293a25 8. conto In avantI Premere il pulsante «MODE» per accedere alla modalità Timer. IstruzIonI d‘uso: gourmet-checK Premere i pulsanti «SET OVEN / HOUR» e «MIN» contemporaneamente per resettare/azzerare l‘impostazione (0:00:00). Premere il pulsante «START / STOP» per avviare il conto in avanti o arrestarlo. L‘icona « » lampeggia ogni secondo.
- Page 5 doble sensor termómetro/temporIzador 293a25 8. para contar el tIempo Pulse el botón «MODE» para introducir el modo del temporizador. InstruccIones de uso: gourmet checK Pulse los botones «SET OVEN / HOUR» y «MIN» al mismo tiempo para poner el contador del tiempo a cero 0:00:00.
- Page 6 dual-sensor-thermometer / tImer 293a25 8. vooruIt tellen Druk op de knop «MODE» om de timermodus in te voeren. gebruIKsaanwIjzIng: gourmet checK Druk de knoppen «SET OVEN / HOUR» en «MIN» tegelijkertijd in om de tijd weer op nul (0:00:00) in te stellen. Druk op de knop «START / STOP»...
- Page 7 dual-sensor-termometer / tImer 293a25 9. håndterIng aF termometret gourmet-tjeK Anvendelse på grillen / Til gasgrill: brugsanvIsnIng: gourmet-tjeK • Først aktiveres gasgrillen. • Den elektroniske enhed skal anbringes uden for grillen. • Ledningen med sonden føres igennem et af de tre huller i låget, og stikket til sensoren sættes i den dertil beregnede bøsning på...
- Page 8 termometru cu senzor dual / tImer 293a25 8. pentru a contorIza crescator Apasati butonul «OVEN / TIMER» pentru a intra in modul timp. InstructIunI de utIlIzare: gourmet-checK Apasati butoanele «SET OVEN / HOUR» si «MIN» in acelasi timp pentru a reseta/sterge timpul la zero 0:00:00.
Need help?
Do you have a question about the 293A25 GOURMET CHECK and is the answer not in the manual?
Questions and answers