Table of Contents
Advertisement
Quick Links
- 1 Table of Contents
- 2 Capacity and Limitations / Capacité / Capacidad
- 3 Parts List / la Liste du Piéces / Lista de Partes
- 4 Assembly / Montage / Ensamblaje
- 5 Instructions and Adjustments / Instructions et Paramétres
- 6 Maintenance & Troubleshooting / Maintenance et Dépannage
- 7 Exercise Tips / Conseils D´exercice / Consejos para el Ejercicio
- 8 Correct Posture / Posture Corecte / Postura Correcta
- Download this manual
Seat post knob
Perilla de ajuste
Bouton de réglage
Seat Post
Poste de asiento
Tige de siège
Pedal
Pedal
Pédale
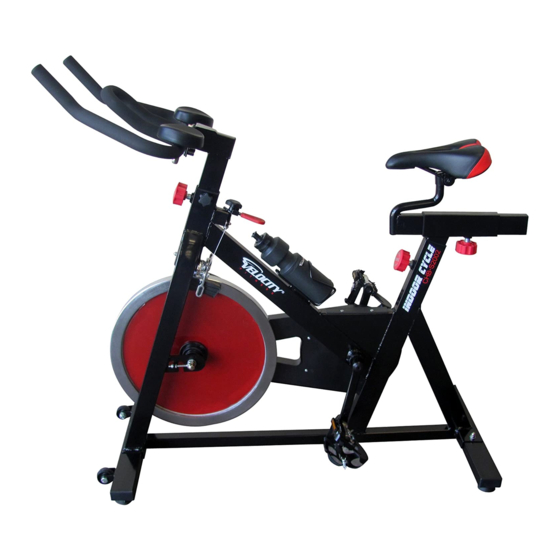
Model: CHB-S2002
Owner's Manual
MAXIMUM CAPACITY INCLUDING USER: 250LB
LA CAPACITÉ MAXIMALEY COMPRIS L'UTILISATER EST DE 113KG
LA CAPACIDAD MÁXIMA INCLUYENDO AL USUARIO ES DE 113KG
FOR HOME USE ONLY/POUR UN USAGE DOMESTIQUE/
PARA USO DOMÉSTICO SOLAMENTE
CAP BARBELL, INC.
Cycle De L'Intérieur
Bicicleta estacionaria
Resistance knob
Perilla de resistencia
Bouton de résistance
1-877-227-0955
Indoor Cycle
Handlebars
Manillar
Guidon
CHB-S2002
41 KG / 90 LB
130 x 51 x 105 cm
51 x 20 x 41.34 inch
WWW.CAPBARBELL.COM
Advertisement
Table of Contents

Subscribe to Our Youtube Channel
Related Manuals for Velocity CHB-S2002


Summary of Contents for Velocity CHB-S2002
- Page 1 CHB-S2002 41 KG / 90 LB 130 x 51 x 105 cm 51 x 20 x 41.34 inch Model: CHB-S2002 Owner's Manual MAXIMUM CAPACITY INCLUDING USER: 250LB LA CAPACITÉ MAXIMALEY COMPRIS L'UTILISATER EST DE 113KG LA CAPACIDAD MÁXIMA INCLUYENDO AL USUARIO ES DE 113KG FOR HOME USE ONLY/POUR UN USAGE DOMESTIQUE/ PARA USO DOMÉSTICO SOLAMENTE...
- Page 2 WARNING: SERIOUS INJURIES OR DEATH CAN OCCUR IF THE PROPER PRECAUTIONS ARE NOT FOLLOWED FOR WARRANTY REPAIR PLEASE DO NOT RETURN YOUR ITEM TO THE STORE! CONTACT VELOCITY EXERCISE FIRST WARNING WARNING • Misuse of this machine may result in serious injury or •...
-
Page 3: Table Of Contents
TABLE OF CONTENTS / LE CONTENU / ÍNDICE Introduction and Safety Guidelines / Introduction Sécurité Guidelines / ......1 Introducción y Pautas de Seguridad Warnings / Attention / Advertencia ..................2 Capacity and Limitations / Capacité / Capacidad ..............3 Exploded View & Tools / La Vue Éclatée / Vista Desarrollada ..........4 Parts list / La Liste du Piéces / Lista de Partes .............. -
Page 4: Introducción Y Pautas De Seguridad
IntroductIon / Safety GuIdelIneS A. INTRODUCTION This owner's manual contains assembly, operation, maintenance and safety information. In the interest of safety, please make certain that you read and fully understand all the information below. B. SAFETY GUIDELINES a. Consult a physician before beginning any exercise program. b. -
Page 5: Warnings / Attention / Advertencia
WARNING: Serious injury or death could occur if the proper precautions are not followed. 1. Read all instructions in this manual and all warnings before using your new product. Use it only as described in this manual. This product is not intended for children. Keep away from children and pets. 2. -
Page 6: Capacity And Limitations / Capacité / Capacidad
caPacIty and lImItatIonS IMPORTANT: THIS PRODUCT IS DESIGNED TO SUPPORT A MAXIMUM WEIGHT OF 250 LB INCLUDING THE USER DO’S AND DON’TS: • Do read all instructions in this manual before using your new product. • Do inspect and properly tighten all parts regularly and before each workout. Replace any worn parts immediately. • Do wear appropriate clothing, including athletic shoes during exercise. • Do NOT use this product in any commercial, rental or institutional setting. • Do NOT allow children or pets to play around this product. This is not a toy. caPacIté et lImItatIonS: IMPORTANT: CE PRODUIT EST CONCU POUR SUPPORTER UN POIDS MAXIMUM DE 113 KG COMPRIS D’UTILISATEUR FAIRE ET À... -
Page 7: Exploded View & Tools / La Vue Éclatée / Vista Desarrollada
exPloded vIew and toolS The "max indicator line" which marks on the seat tube represent that the minimum insert distance, while adjusting the seat, please do not extend beyond this line. 1 PC This equipment is not suitable for therapeutic purposes. -
Page 8: Parts List / La Liste Du Piéces / Lista De Partes
PartS lISt / la lISte du PIéceS / lISta de ParteS Description Quantity Nombre Description Quantité Número Descripción Cantidad Main frame / L'ossature principale / Armazones principales Front stabilizer / Stabilisatrice avant / Estabilizadora frontal Rear stabilizer / Stabilisatrice arrière / Estabilizadora trasera Seat post / Tige de selle / Tija de sillín Sliding tube / Glissade sur tube / Tubo deslizante Handlebar Post / Après guidon / Después de los manillares... -
Page 9: Parts List / La Liste Du Piéces / Lista De Partes
PartS lISt / la lISte du PIéceS / lISta de ParteS Description Quantity Nombre Description Quantité Número Descripción Cantidad Nut M8 / Écrou / Tuerca Nylon Nut M10 / Écrou en Nylon / Nylon Tuerca Washer ø 8 / Rondelles / Arandelas Transporting Wheels/Roues pour le Transport/Ruedas para el Transporte Hex Bolt M10 x 45mm / Boulons de Hexagonale / Tornillos de Cabeza Hexagonal Foot cap 60x30 / Bouchon à... -
Page 10: Assembly / Montage / Ensamblaje
aSSemBly / montaGe / enSamBlaje WARNING Please read! S'il vous plaît lire! ¡Por favor, lea! PEDALS IMPORTANT: READ ALL STEPS BEFORE ATTACHING PEDALS. a. The right and left pedals (40R & 40L) are marked "R" and "L". Connect them to their appropriate crank arm. b. -
Page 11: Assembly / Montage / Ensamblaje
aSSemBly / montaGe / enSamBlaje... - Page 12 aSSemBly / montaGe / enSamBlaje NOTE: "Height indicator" has max. and min. indication lines on seat post, please use slots between these two lines. REMARQUE: Le tube de selle a un "indicateur de hauteur" qui morque le maximum et minimum. Síl vous plaît utiliser les rainure entre ces deux lignes.
-
Page 13: Instructions And Adjustments / Instructions Et Paramétres
InStructIonS and adjuStmentS SEAT HEIGHT: Loosen pop pin knob and pull the knob out. Adjust seat to desired height between min and max lines. Tighten pop pin knob before use. HANDLEBAR: The angle of the handlebar can be adjusted. Loosen the tightening knob. Adjust the handlebar to preferred setting and tighten tightening knob. -
Page 14: Maintenance & Troubleshooting / Maintenance Et Dépannage
maIntenance & trouBleShootInG 1. Wipe machine regularly to prevent accumulation of dust. Use a damp cloth on plastic parts, use only dry cloth on metal frames. 2. For indoor use only. 3. Check regularly to ensure all parts are tight and in working condition. If a part is damaged do not use until the part is replaced or repaired. -
Page 15: Exercise Tips / Conseils D´exercice / Consejos Para El Ejercicio
exercISe tIPS Check with your physician before starting an exercise program. The information on this manual is for reference only. Each workout should include 6 to 10 different exercises. Select exercises for every major muscle group, emphasizing areas that you want to develop most. To give balance and variety to your workouts, vary the exercises from session to session. Schedule your workouts for the time of day when your energy level is the highest. - Page 16 conSejoS Para el ejercIcIo (contInuado): ENFRIAMIENTO Termine cada entrenamiento con 5 a 10 minutos de estiramientos. Incluya el estiramiento de brazos y las piernas. Muévase lentamente mientras se estira y no rebote. Hágalo en forma gradual y estire sólo hasta donde usted pueda hacerlo sin mucho esfuerzo. El estiramiento al final de cada entrenamiento es una forma efectiva para aumentar la flexibilidad.
-
Page 17: Correct Posture / Posture Corecte / Postura Correcta
correct PoSture 1. Before exercising, adjust the pedal straps comfortably around your feet, adjust the height of the seat and place your hands on the handle bar and sit securely on the seat and let your body relax. Try to pedal the machine at a smooth and steadily pace. -
Page 18: Important Safety Information
oPeratInG InStructIonS and trouBleShoot Note: Try these tips prior to every use to make sure you have a safe and comfortable exercise experience Resistance adjustment Pedal resistance is controlled by the tension knob located under the handle bar assembly. To increase resistance, turn the tension knob clockwise. - Page 19 mode d'emPloI et de déPannaGe Remarque: Suivez ces conseils avant chaque utilisation pour vous assurer d'avoir une expérience d'exercice sûr et confortable AJUSTEMENT DE RESISTANCE La résistance de pédale est contrôlé par le bouton de tension situé sous le guidon. Pour augmenter la résistance, tournez le bouton de tension dans le sens horaire.
-
Page 20: Instrucciones De Funcionamiento Y Solución De Problemas
InStruccIoneS de funcIonamIento y SolucIón de ProBlemaS Nota: Pruebe estos consejos antes de cada uso para asegurarse de tener una experiencia de ejercicio seguro y cómodo AJUSTE DE RESISTENCIA La resistencia del pedal es controlada por la perilla de tensión situada debajo del manillar. Para aumentar la resistencia, gire la perilla de tensión hacia la derecha.
Need help?
Do you have a question about the CHB-S2002 and is the answer not in the manual?
Questions and answers