Table of Contents
Advertisement
Advertisement
Table of Contents

Related Manuals for Tiny Audio C10

Summary of Contents for Tiny Audio C10
- Page 1 TINY AUDIO C10 Digital Audio Adapter User Guide...
-
Page 2: Table Of Contents
STARTING UP THE SYSTEM .................... 18 USING DAB ADAPTER ...................... 19 To Turn On or Off TINY AUDIO C10 ................19 To Scan for the DAB Stations ..................19 To Listen to the DAB Stations..................19 ... - Page 3 TINY AUDIO C10 User Guide To Restore to Factory Settings .................. 36 To Upgrade Module Software ..................36 To Display Software Version ..................37 TROUBLESHOOTING ....................... 38 TECHNICAL SPECIFICATIONS ..................40 INFORMATION ON WASTE DISPOSAL ................41...
-
Page 4: Introduction
TINY AUDIO C10’s AutoScan function instead. Note: TINY AUDIO C10 needs to operate with an RDS car radio in order to properly display the relevant system message of TINY AUDIO C10 via the in-car radio display. -
Page 5: Contents Of Package
TINY AUDIO C10 User Guide CONTENTS OF PACKAGE TINY AUDIO C10 unit Remote Control Power cable with CR2032 Battery with cigarette lighter Microphone with Dual Lock Tapes x3 Screw x2 Cable DAB Antenna User Guide... -
Page 6: Overview Of The Controls And Connectors
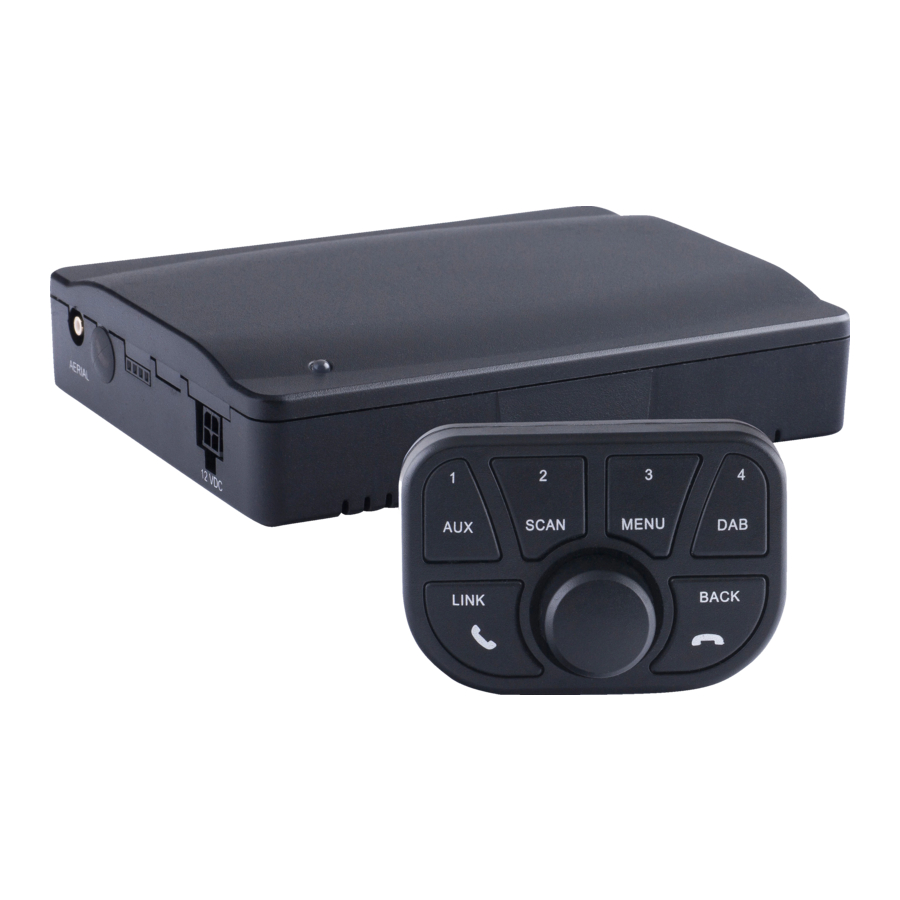
TINY AUDIO C10 User Guide OVERVIEW OF THE CONTROLS AND CONNECTORS Front Panel ❶ ❶ Left Side Panel ❶ SMB Connector, for DAB antenna ❷ SW update cable connector ➌ ❷ Power Jack, for power cable with ❶ Cigarette Lighter plug ➌... -
Page 7: Installation
For other locations, please store it away from metal objects and in an open area. Store TINY AUDIO C10 with the bottom cover up, and with the antenna cable, power cable, and connectors point to the back. - Page 8 For TINY AUDIO C10 to work with the active antenna, the antenna power must be set to ON; for TINY AUDIO C10 to work with a passive antenna, the antenna power must be set to OFF. Anytime you need to disconnect/connect the antenna from TINY AUDIO C10, please unplug TINY AUDIO C10 from the cigarette lighter first to avoid possible damage to the antenna.
- Page 9 TINY AUDIO C10 User Guide Plug one end of the power cable into TINY AUDIO C10’s SMB connector, and the cigarette-lighter plug into car’s cigarette lighter. Start using TINY AUDIO C10 with the remote control; please refer to the sections on...
-
Page 10: Securing Tiny Audio C10, Step By Step
Apply the pressure evenly to all 4 half pieces on TINY AUDIO C10 and the store location, so that the tapes adhere to both surfaces securely. Wait 8 hours, and then adhere TINY AUDIO C10 to the store location by joining the 4 half pieces of the tapes together. -
Page 11: Antenna Installation
TINY AUDIO C10 User Guide Antenna Installation Overview ➌ ❷ ❶ ❶ Antenna ❷ Signal Booster ➌ Copper Strip ➍ ➍ Antenna Cable ➎ Connector ➎ Warning: Please read the Antenna Installation section carefully prior to the actual installation. This glass-mount DAB antenna is exclusively for use inside the vehicle. - Page 12 TINY AUDIO C10 User Guide 1.1 UV protection layer If there is a UV protection layer across the top of the windshield then you must place the DAB antenna with the Antenna at least 5cm below the layer. 1.2 Windshield wiper For the best performance in the digital reception, the glass-mount antenna must be placed outside of the swept area of the windshield wiper.
- Page 13 TINY AUDIO C10 User Guide Metal Frame of A Pillar Dotted Area Black Shade 1.4 Fit the DAB antenna As the DAB antenna is designed to be attached once only, if the DAB antenna is removed, it will not adhere again; therefore, it is recommended that you try fitting the DAB antenna on the chosen location first before attaching the antenna permanently.
- Page 14 TINY AUDIO C10 User Guide Steps: Open and remove A Pillar plastic cover. Mount the DAB antenna on the left or right side of the windshield. Copper Antenna Strip Signal Booster Flap ➀ Attach the Signal Booster and Antenna Gently peel off the adhesive separator of the Signal Booster and Antenna;...
- Page 15 TINY AUDIO C10 User Guide ➂ Secure the Copper Stripe Secure the Copper Strip with sticky tapes on the metal frame. ➃ Secure the Antenna Cable Secure the antenna cable tightly down on the metal frame of the A-Pillar with sticky tapes.
-
Page 16: Installation, Do And Don't
TINY AUDIO C10 User Guide Installation, Do and Don’t As TINY AUDIO C10 has internal antenna and FM Transmitter, it is important to avoid signal interference from excessive cable coiling. Below are the do and don’t when you coil and store TINY AUDIO C10’s excessive antenna cable and power cable. -
Page 17: Main Microphone Installation
TINY AUDIO C10 User Guide Main microphone Installation TINY AUDIO C10 comes with an external microphone to be used for the Hands free function. To install the microphone, follow the diagram and procedure below. Once the microphone is installed and TINY AUDIO C10 is started, refer to the section on USING THE HANDS FREE FUNCTION to use the function. -
Page 18: Operation Controls
RDS text and displayed as 8 characters display on the LCD screen of your in-car audio system. Below is a list of TINY AUDIO C10 system messages displayed on the in-car audio system LCD display, while operating with the remote control:... - Page 19 Press Recall memory preset in group 1. Press and Hold Program memory preset in group 1 with the listening DAB station. Function AUX Switch TINY AUDIO C10 audio input to AUX mode to listen to audio streaming...
- Page 20 Press and Hold Program memory preset in group 4 with the listening DAB station. Function DAB Switch TINY AUDIO C10 audio input to DAB mode to listen to DAB programming. Press Display adaptor’s current FM transmitting frequency.
-
Page 21: Starting Up The System
FM TX frequency as below: Operating on TINY AUDIO C10 Press and hold LINK for 3 seconds, TINY AUDIO C10 will set a new and clear frequency to transmit the FM signal. Operating on Car Radio Tune the car radio’s FM frequency to match to TINY AUDIO C10 FM TX ... -
Page 22: Using Dab Adapter
To Turn On or Off TINY AUDIO C10 The TINY AUDIO C10 operating mode can be turned off or turned on by the following: Press and hold Rotary Knob to turn it off, while TINY AUDIO C10 is in the operating mode. -
Page 23: To Change Dls/Dl+ Information Display
The DAB sorting method for the station list, either by alphabetical order or by ensemble, is set thru the menu setting. To Change DLS/DL+ Information Display The TINY AUDIO C10 provides a number of information about the current listening station; this information can be displayed thru repeatedly pressing the Rotary Knob key. -
Page 24: To Recall A Memory Preset
The screen will display the first of 4 memory preset of the preset group X as 《 * station name 》if there is a station already saved, or《 * EMPTY 》if there is no station saved. If there is station already saved, TINY AUDIO C10 will tune to the preset station immediately. - Page 25 TINY AUDIO C10 User Guide Press BACK to recall the station that was most recently listened to. The screen will show 《 LS EMPTY 》 if the last listened station has not memorized a station name yet or 《 station name 》if it has.
-
Page 26: Using Audio Streaming
DAB station by the following: To listen to the last listened DAB station, you must press Rotary Knob and then DAB to return to DAB mode and then TINY AUDIO C10 will tune to the last listened DAB station. ... -
Page 27: Using Hands Free Function
TINY AUDIO C10 User Guide USING HANDS FREE FUNCTION The TINY AUDIO C10 is capable of providing the Hands Free function for incoming and outgoing phone calls from your mobile device using Bluetooth technology and listen to the audio through your car radio. To use this function, you must enable Bluetooth, do the Bluetooth pairing first. -
Page 28: Fm Transmitting Frequency Settings
FM TRANSMITTING FREQUENCY SETTINGS The FM transmitting frequency is used by TINY AUDIO C10 to transmit the audio and for car radio to receive the audio. The FM transmitting frequency can be changed by the following: 1. -
Page 29: To Display The Current Fm Transmitting Frequency
As unused FM frequency may vary from one area to another, it is suggested to save a few frequencies (up to 4 frequencies) in TINY AUDIO C10 so that you can switch to a new FM transmitting frequency instantly when you drive into an area where the original... -
Page 30: To Recall Fm Transmitting Frequency Saved In Memory
To Recall FM Transmitting Frequency Saved in Memory You may drive into an area where the FM frequency transmitted by TINY AUDIO C10 is used by an FM broadcaster. When this happens, your reception of DAB station will be getting worse with increasing interference from another FM program. -
Page 31: To Force Immediate Fm Transmitting Frequency Change
Press and hold LINK, the screen will show 《 AF Frequency 》 where Frequency is the new frequency that TINY AUDIO C10 will set and use to transmit FM signal and force radio to tune to the same frequency automatically. - Page 32 TINY AUDIO C10 User Guide Press and hold BACK twice in succession to reset FM transmitting frequency to 88.1MHz.
-
Page 33: Menu Settings
The default DLS/DL+ setting is ON. To Set DAB Sorting Order There are two ways that TINY AUDIO C10 can sort the stations in the station list, it can be either sorted by alphabetical order of the station name, or by DAB ensemble (channel) ID. -
Page 34: To Enable Bluetooth
The default DAB List Order setting is by alphabetical order. To Enable Bluetooth When you enable Bluetooth, you will be able to pair and connect TINY AUDIO C10 to your mobile device (Smartphone or Tablet) for audio streaming. In the menu function, rotate Rotary Knob [◄] [►] until the screen shows 《... -
Page 35: To Display Bluetooth Information
It may become necessary to change the FM transmitting frequency as you drive into an area where the FM frequency transmitted by TINY AUDIO C10 is used by an FM broadcaster. TINY AUDIO C10 has an AFC function that allows you to continuously listen to DAB programs through your car radio system without the need to change the FM frequency manually. - Page 36 AF feature of your car radio must be activated. When the AFC function of TINY AUDIO C10 is enabled and the AF feature of your car radio is activated, your car radio will tune to an unused FM frequency automatically when you drive into an area where the original FM frequency for DAB is no longer available.
-
Page 37: To Enable Autoscan
ATTENTION The TINY AUDIO C10 comes equipped with the AFC function. In order to use this function, your car radio must have AF (alternative frequency) feature, and AF must be enabled. Please consult your car radio manual or the car dealer for these requirements before using this function. -
Page 38: To Enable Rc Beep Tone
FM frequency to receive DAB services. To Enable RC Beep Tone When you enable RC beep tone, TINY AUDIO C10 will respond with a beep tone, each time an operation is performed on the remote control. -
Page 39: To Perform Dab List Reset
Note: Factory reset will erase all previous system’s settings and set them to default. To Upgrade Module Software This function is used by the maintenance personnel only, to upgrade the existing TINY AUDIO C10 module software to a new version. -
Page 40: To Display Software Version
TINY AUDIO C10 User Guide To Display Software Version This function allows you to display the current software version of your TINY AUDIO C10. In the menu function, rotate Rotary Knob [◄] [►] until the screen shows 《 VERSION 》. -
Page 41: Troubleshooting
Make sure that the car radio is not in mute and check the volume settings of the car radio. Make sure TINY AUDIO C10 is not in the Audio Streaming mode, if so, press Rotary Knob then DAB to return to DAB mode. - Page 42 Press and hold BACK to reset FM transmitting frequency to FM frequency preset 1. If TINY AUDIO C10 is in AutoScan mode, the FM channel you selected for DAB mode may be occupied by an existing radio station. You need to change the frequency settings of FM Transmitter.
-
Page 43: Technical Specifications
There are two calls in progress, one is active and one is on hold. If the active call is hung up (by you or the destination); although TINY AUDIO C10 displays the held call becomes active, but the actual call might be still on hold. -
Page 44: Information On Waste Disposal
Note about Remote control battery: There is a risk of explosion if battery is replaced by an incorrect type. Dispose of used batteries according to the instructions. Tiny Audio is distributed by TT Micro AS – Salg@ttmicro.no – www.ttmicro.no...
Need help?
Do you have a question about the C10 and is the answer not in the manual?
Questions and answers
userguide in norewgian