Table of Contents
Advertisement
Advertisement
Table of Contents

Summary of Contents for SAGEMCOM IB1100E
-
Page 3: Dear Customer
Dear Customer You have just purchased our product and we thank you for the trust you have placed in us. This user guide contains all the recommendations, descriptions and tips for using your machine. For your safety and comfort, we urge you to carefully read the chapter “Safety”, page 5 before attempting use. Rules for using symbols This document makes use of symbols designed to help the reader identify the information supplied: Symbol... -
Page 4: Table Of Contents
Table of contents Dear Customer.............................3 Rules for using symbols ............................3 Safety................................5 Safety Instructions of IB1100E product ........................5 Regulatory information ............................5 Certifications in Europe ................................5 Wi-Fi wireless network ................................5 Location conditions..............................6 Precautions for use ..............................6 Operating environment................................6 Precautions for using the machine ............................6 Safety information ..............................7... -
Page 5: Safety
9 March 1999 : Directive 1999/5/EC amended on radio and telecommunications terminal equipment and mutual recognition of conformity. The declaration of conformity can be consulted online at www.sagemcom.com in the "support" section or may be requested from the following address: Sagemcom Documents SAS - Customer service department 250, route de l’Empereur - 92848 Rueil-Malmaison Cedex - France... -
Page 6: Location Conditions
(see last page). Sagemcom disclaims any liability in the event of non-compliance with the existing regulations at the place of installation, or for any radio interference created with regard to third parties and due to national regulations for this application not being complied with. -
Page 7: Safety Information
• Prevent any water or other liquids from being spilled on or near the machine. Any contact of the machine with water or liquid may cause a risk of fire or electric shock. • If liquid or a metal part accidentally penetrates the machine, disconnect immediately the mains cable and contact your retailer. -
Page 8: Environment
Registered trademarks Given the permanent evolution in technology, Sagemcom Documents SAS reserves the right to change the technical characteristics indicated for this product at any time, without prior notice, and/or to interrupt the production of this product. -
Page 9: Presentation Of The Machine
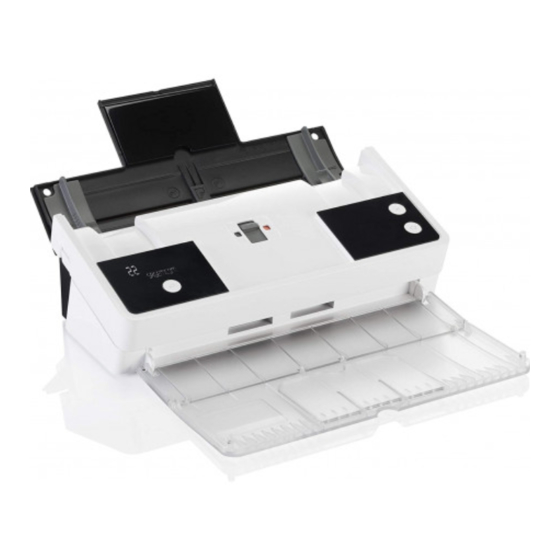
Presentation of the machine Description of the machine Front view Back view Service button is used to scroll the different Button to validate the operation in progress choices or options Output paper tray Green to indicate a normal condition Red to indicate an error condition Orange to indicate a boot condition LCD screen Master USB connector (USB key) -
Page 10: Description Of The Lcd Screen
Description of the LCD screen The LCD screen displays the following: Scanned sheet counter Icon indicating the status of the network cable connection with the Internet box. Off: no connection Flashing: connecting Steady: connection established Icon indicating the status of the Wi-Fi connection with the Internet box. -
Page 11: Installation
Installation Packaging contents The packaging contains the components listed below: A machine A mains power supply unit A power cable A network cable An installation guide A safety instructions Installing the machine 1 Unpack the machine and remove all protective shims, as illustrated in the installation guide. 2 Install the machine in a suitable place respecting the safety instructions described in the section Safety [... -
Page 12: Starting Up The Machine
Starting up the machine WARNING Before connecting the mains cable, you must consult the Safety Instructions 1 Take the power supply and power cord supplied. 2 Always first plug in the mains adapter cord into your machine (1), then the power cord into the mains adapter (2) and finally the power cord into the power socket (3). -
Page 13: Wi-Fi Wireless Connection (Wps)
Wi-Fi wireless connection (WPS) To connect your machine using the Wi-Fi wireless network (WPS), follow these steps: 1 Set the machine to WPS association mode by pressing the Setup button on the back of the machine. 2 Set Internet box to WPS association mode. For further information, refer to the Internet box manual. 3 The connection steps take place successively. -
Page 14: Connection Via A Network Cable
Connection via a network cable WARNING ONLY CONNECT THE MACHINE TO AN ETHERNET LAN THE WIRING OF WHICH DOES NOT GO OUTSIDE THE BUILDING AND IS NOT SUBJECT TO EXTERNAL SURGES. Remark: the network cable connection takes priority over the Wi-Fi connection. To connect your machine, follow these steps: 1 Connect the network cable supplied between your machine and your Internet box. -
Page 15: Advanced Connections
Advanced connections If you do not have Wi-Fi (WPS) or if your network is connected to the Internet through a proxy or more generally, if the Wi-Fi or the network cable connection failed, please use the configuration method below. WARNING To configure these types of connection, you need a computer connected to your machine with the network cable supplied. - Page 16 12 Press the key, the following messages are displayed alternately on the LCD screen: PAIRING... CODE : xxxxxx 13 Log onto the service provider's website from your computer and go to your machine's settings page. Depending on your service provider, you may have to enter a pin code in a field. If this is the case, please enter the code value displayed on your machine as this pin code.
- Page 17 4 Configure the settings according to your needs. The screen below gives an example of how to configure LAN settings. There is also a similar screen in Wi-Fi menu for configuring Wi- Fi settings. 5 If your network is connected to the Internet through a proxy, check the Use a proxy server box and then fill in the proxy settings.
-
Page 18: Using The Machine
Using the machine Loading documents The scanner can scan original documents containing one or more sheets. You can load up to twenty 80 g/m² sheets in the feeder. Accepted formats • A5, A4, Letter, Legal and other format complying with the following conditions: •... -
Page 19: Use Of Services
3 Place your documents in the scanner feeder then move the paper guides up against the document. Use of services To find out about the services offered, see you service provider's literature. To scan your documents, follow these steps: 1 Load the sheets to be scanned taking into account the instructions given in the Document loading section. 2 Press the key to select the desired service. -
Page 20: Using Tree Structure Services
Using tree structure services Depending on your service provider, the services may be organized as a tree structure. This allows you for example to group similar services together. Contact your service provider to find out about the tree structures provided. The names (Group, Subgroup, Service, etc.) presented below are given by way of example. -
Page 21: Multiple Service Providers
Multiple service providers Your machine can manage several service providers and/or offers. The name of your service providers is displayed at the top of your tree structure. This allows you to switch from one service provider to another quickly. Operator 1 Operator 2 Level 1 Level 1... -
Page 22: Scanning To A Usb Flash Drive
Scanning to a USB flash drive Depending on your service provider, scan services to a USB flash drive may be available on your machine. This feature allows you to carry out additional local scans, for example, if no Internet connection is available. 1 Insert a USB flash drive into the back of your machine. -
Page 23: Web Interface
Web interface The web interface allows you to view, configure and customize the machine’s settings. To access the web interface, you need: • to have a computer connected to the same network as the machine or connected to the machine directly with the cable supplied •... -
Page 24: Standby
Standby The power saving time allows you to configure the idle time after which your machine automatically switches over to power saving mode. In this mode, your machine's power consumption is minimal (less than 0.5 W) the display is off, and only the green LED flashes. -
Page 25: Maintenance And Incidents
Maintenance and incidents Maintenance General information Caution For your safety, you must read the safety instructions in the chapter Safety [ In order to maintain your machine in good working order, it is recommended to periodically clean the inside. Normal use of the machine, requires the following rules to be respected: WARNING Firstly, disconnect the mains power cable and all interface cables. -
Page 26: Removing Paper Jams
3 Clean the two analysis windows (A) and (B) with a soft, lint-free cloth moistened with isopropyl alcohol or mild detergent. 4 Close the scanner cover. 5 Plug the power cord into the wall socket to turn the machine on. Cleaning the separation pad and rollers The accumulation of paper dust and other debris on the rollers may cause paper feeding problems. -
Page 27: Several Sheets Of Paper Taken At The Same Time
Several sheets of paper taken at the same time If your machine takes several sheets of paper at the same time, make sure that: • the selector is not set to "Thick mode" • there are not more than 20 sheets of standard paper weight in the feeder, •... -
Page 28: Error Code
An error occurred when saving your settings on the flash drive. Please SAVING ERROR repeat the operation using a properly formatted flash drive with enough free space and do not remove it until the operation is completed. Your machine did not find the file on your flash drive containing the NO FILE FOUND settings to be restored. - Page 29 To access the maintenance menu, follow this procedure: 1 Simultaneously press the and Setup keys (key located on the back of the machine). The order in which the first 2 keys is pressed is not important, but the Setup key must be the last key pressed in the sequence. The following screens are displayed alternately: MAINTENANCE MENU 1>PAIRING 2 Use the...
- Page 30 Is used to calibrate the scanner. This operation may be necessary when the quality of the scanned pages is not good enough. Two calibration options are available. It is recommended to use the internal calibration option. To carry out a calibration, follow these steps: 1 Once the CALIBRATION menu is displayed, press the 2 Select INTERNAL or WHITE PAPER by pressing CALIBRATION...
-
Page 31: Software Updating
(language, network connection settings, etc.) 1 Go to the Sagemcom support site (support.sagemcom.com), choose your country and find your machine in the "scanners" section. On your product's home page, select the "Software/Drivers" section. Download the file whose name starts with "fw_"... -
Page 32: Packing And Transporting The Machine
3 Your machine starts in recovery mode and displays the following messages on the screen alternately: Recovery process Insert USB stick 4 Insert the USB flash drive on which you have saved the downloaded software file, into the back of your machine. After a few seconds, your machine displays the following messages on the screen alternately: Recovery process Press... -
Page 33: Frequently Asked Questions
Frequently asked questions 1- Your machine's website cannot be accessed Except in cases of WPS Wi-Fi Internet and DHCP Internet via a direct LAN, case of Internet through a proxy, for example, the Wi-Fi or LAN settings must be configured on the machine's website. First, note the machine's IP address by entering the maintenance menu. -
Page 34: Characteristics
Characteristics Physical characteristics Dimensions (trays folded) : Width: 303 mm Depth: 163 mm Height: 109 mm Weight: Approx. 2,2 kg Electrical and environmental characteristics Power (see identification plate): 220V-240V AC / 47Hz~53 Hz Electric consumption: ≤ 0,5 W on standby ... - Page 36 Sagemcom Documents SAS 250, route de l'Empereur 92848 Rueil-Malmaison cedex - FRANCE www.sagemcom.com 05/2013...