
Related Manuals for Craig CMP1230F


Summary of Contents for Craig CMP1230F
- Page 1 4GB DIGITAL MP3 PLAYER 4GB DIGITAL MP3 PLAYER WITH LCD BACKLIGHT WITH LCD BACKLIGHT DISPLAY DISPLAY Owner's Manual PLEASE READ BEFORE OPERATING THIS EQUIPMENT. Model: CMP1230F...
- Page 2 FCC NOTICE: This equipment has been tested and found to comply with the limits for a Class B digital with the limits for a Class B digital device, pursuant to part 15 of the FCC Rules.These limits are designed to provide residential protection against harmful interference in residential installation.
-
Page 3: Important Safety Instructions
IMPORTANT SAFETY INSTRUCTIONS This manual contains important safety precautions and information for correct usage. Please be sure to read this manual carefully before use to avoid any damages to the device. Please do not place the product in hot, wet or dusty environment. -
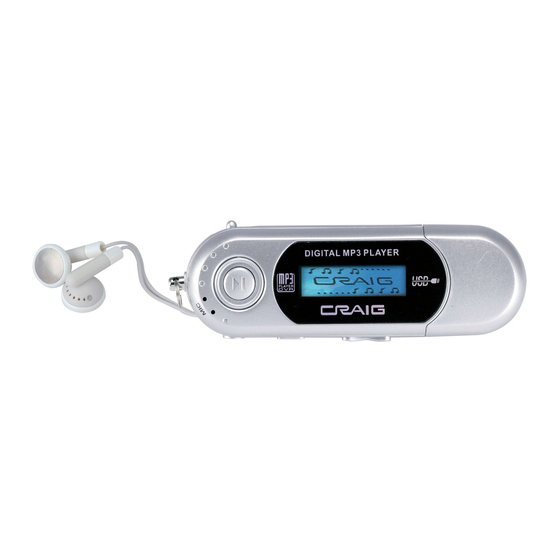
Page 4: Location Of Controls
LOCATION OF CONTROLS LCD Display Phones Jack Play/Pause/Stop Button Wrist Strap Holder VOL (Volume) +/- Buttons Hold Switch MODE Toggle Switch Built-in Microphone USB Plug Cover of USB plug... -
Page 5: Battery Installation
Battery Installation Install or replace the battery when the battery indicator is showing low power(see the icons Battery Full Battery low on the right) as follows: Open the battery door on the rear of the unit by sliding it out 2. - Page 6 Downloading and Transferring Files Pull out the cover of the USB Port on the Player as the figure below then connect the Player to the USB Port on the PC. Download MP3/WMA files into the unit. Power On/Off 1. Press and hold the Button for approximately 2 seconds to power on the unit.
- Page 7 earbuds. Please turn down the volume or stop using if you get a roaring in your ears. Hold Switch To avoid pressing any buttons during playback, lock the buttons on the unit ~ Sliding the Hold Switch to Hold position, will appear on the display a few seconds then all the buttons on the unit will not be functioning.
- Page 8 Indicators on the display: When a song is selected, the following screen will appear on the display. Current Song’s Name and Information Lyric Indicator Format and Bitrate of Current Track Repeat mode Current Track Number. Total Number of Tracks. EQ Mode Elapsed Time of Current Track Total Time of Current Track Battery power meter...
- Page 9 Main Menu When power on the unit, the main menu will appear on the display as below: Slide and release the MODE Toggle Switch to left or right to select desired menu. SYS(Systems) ~ If SYS (System) is selected, press the MODE Toggle Switch to enter.
- Page 10 3. In “Power off “setting menu Off time Set the auto power off (when idle) timer to 0 (the unit will not turn off automatically when idle) or 1, 2, 3, 4 minutes as desired. Sleep Set the sleep timer to 0 (Sleep timer will not function) or time 10-120 minutes as desired.
- Page 11 3. During playback, slide the MODE Toggle Switch to left or right to skip the tracks. 4. During playback, slide the MODE Toggle Switch to left or right and hold to fast search the specific track. 5. When finished listening, press and hold the Button until “Bye-Bye”...
- Page 12 Switch to delete the current song. · If No is selected. Press the MODE Toggle Switch to exit. · Repeat the same procedures until all the specific tracks were deleted. · If "Delete all "is selected, press the Delete all MODE Toggle Switch to enter, "...
-
Page 13: Voice Recording
Random Playback the tracks in the current folder randomly. Intro Play the first 10 seconds of each tracks in the current folder. Equalizer Set the Equalizer modes to Natural ; Rock ; Pop ; Clas sic ; Soft ; Jazz or DBB as desired. ·... - Page 14 2. Press Button to start recording then speak into the Microphone at normal tone of voice. 3. During recording, press the Button to pause, press again to resume recording. 4. When finished, press and hold the Button until "SAVING ..." appear on the display to save the recordings.
-
Page 15: Specifications
SPECIFICATIONS Built in flash 4GB( Due to some memory being used for internal memory operation, only approx 3.71GB memory is available for download) Power source 1.5V, 1 x AAA size battery (Not included) Audio 20Hz~20KHz frequency Music MP3,WMA format Compatible Recording WAV, 32kbps format... -
Page 16: Limited Warranty
LIMITED WARRANTY Craig warrants this product to be free from manufacturing defects in material and workmanship under normal use for a period of 90 days from date of purchase. If service is required, please return the product to the store where it was purchased for exchange; or, pack the unit in the original packing material with all accessories if applicable, a copy of your sales receipt and a Cashier’s check or Money Order for $7.00... - Page 17 Under no circumstance shall Craig be liable for any loss or consequential damage arising out of the use of this product. This warranty gives specific legal rights. However, you may have other rights which may vary from state to state.
Need help?
Do you have a question about the CMP1230F and is the answer not in the manual?
Questions and answers