Advertisement
Advertisement

Summary of Contents for Livart LPAC12CRWGR
-
Page 2: Table Of Contents
CONTENTS 1.SAFETY RULES................2.NAMES OF PARTS................3.ACCESSORIES................4.OPERATION PANEL OF THE AIR CONDITIONER......5.OPERATING INSTRUCTION FOR THE AIR CONDITIONER ..6.INSTALLATION................7.MAINTENANCE................8.TROUBLE SHOOTING..............NOTE The rating data indicated on the energy label is based on the testing condition of installing the un-extended air exhaust duct without adaptor A &... - Page 3 SOCIABLE REMARK The follow contents apply only the countries of Europe. DISPOSAL: Do not dispose this product as unsorted municipal waste. Collection of such waste separately for special treatment is necessary. It is prohibited to dispose of this appliance in domestic household waste. For disposal, there are several possibilities: A) The municipality has established collection systems, where electronic waste can be disposed of at least free of charge to the user.
-
Page 4: Safety Rules
SAFETY RULES 1. This air conditioner has no ventilator for taking in fresh air from out of doors. You must open doors or windows frequently when you use gas or oil heating appliances in the same room, which consume a lot of oxygen from the air. Otherwise, there is a risk of suffocation in extreme cases. -
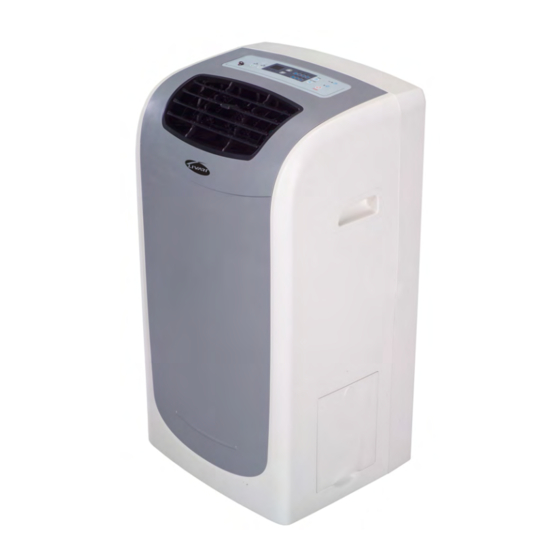
Page 5: Names Of Parts
NAMES OF PARTS Operation Panel Vertical Louver Blade Blades Control Handle Carrying Handle (both side) Water Tank Horizontal Louver Blade Caster Fig.1 Air Inlet (indoor) Power Cord Band Drain Plug (insert) Air Outlet outdoor Power Cord and Plug Air inlet outdoor Bottom Drain Plug Fig.2... -
Page 6: Accessories
ACCESSORIES PARTS : PARTS NAME : QUANTITY : Exhaust Duct Adaptor A (for permanent duct mounting) Adaptor B (for temporary duct mounting) Expansion plug Power Cord Band (for bundling the power cord) Drain Hose(Continuous drainage) (Some models without) Drain Hose(Connected with water tank) Window Slider Kit Check all the accessories are included in the package and please refer to the installation instructions for their usage. - Page 7 Key Pad Functions Fig.3 TIMER ON Button: Used to initiate the AUTO ON start time program, and used to adjust Auto-Timer settings. TIMER OFF Button: Used to initiate the AUTO OFF stop time program, and used to adjust Auto-Timer settings. TEMP.
-
Page 8: Operating Instruction For The Air Conditioner
OPERATING INSTRUCTING FOR THE AIR CONDITIONER Before Starting This Unit 1) Select a suitable location, make sure you have easy access to an electrical outlet. 2) Install the Flexible Exhaust Hose and the Adjustable Window Slider Kit as depicted in Fig.4 & Fig.4a Fig.4a Fig.4... - Page 9 Operating Instructions COOLING OPERATION (Operating temperature range: 17 C-32 C/62 F-92 F ) Press the "MODE" button several times until the "COOL" indicator light comes on. Press the "TEMP ADJUST buttons " " or " " to select your desired room temperature. The temperature can be set within a range of 17 C-30 C/62 F-88 F.
- Page 10 WATER TANK DRAINAGE A) During Cooling Mode: Install the Flexible Exhaust Hose and the Adjustable Window Slider Kit . When the water level inside the internal tank reaches a predetermined level, the unit stop operation automatically. The fan motor will continue to operate. Carefully remove the water tank from the cabinet and dispose of the water.
-
Page 11: Installation
INSTALLATION 1. Window Kit Installation Your window kit has been designed to fit most standard Vertical and horizontal window applications, However, it may be necessary for you to improvise/modify some aspects of the installation procedures for certain types of window. Please refer to Fig. 7 & Fig. 7a for minimum and maximum window openings. - Page 12 A) TEMPORARY- 1. Attach one end of the duct to the exhaust air outlet of the Expansion plug position mobile air condition, push it downwards, be sure to fix thoroughly. (See Fig.9) 2. Attach the other end of the duct to adaptor B. Adapter A 3.
-
Page 13: Maintenance
MAINTENANCE IMPORTANT: 1) BE SURE TO UNPLUG THE UNIT BEFORE CLEANING OR SERVICING. 2) DO NOT USE GASOLINE, THINNER OR OTHER CHEMICALS TO CLEAN THE UNIT. 3) DO NOT WASH THE UNIT DIRECTLY UNDER A TAP OR USING A HOSE. THE ELECTRICAL CAUSE DANGER. -
Page 14: Trouble Shooting
TROUBLE SHOOTING TROUBLES POSSIBLE CAUSES SUGGEST REMEDIES 1. UNIT DOES NOT - Water full indicator blinks, water tank Dump the water in the water tank. START WHEN is full. PRESSING POWER BUTTON - Room temperature is higher than Reset the temperature. the set temperature.(Heating mode) - Room temperature is lower than Reset the temperature. - Page 15 United States. If the air conditioner exhibits a defect in normal use, LIVART, INC. will, at its option, either repair or replace it, free of charge within a reasonable time after the air conditioner is returned during the warranty period. After the warranty expires, the customer must pay for service and parts if the unit has come to be serviced.
Need help?
Do you have a question about the LPAC12CRWGR and is the answer not in the manual?
Questions and answers