DxO One User Manual
Hide thumbs
Also See for One:
- User manual (143 pages) ,
- Getting started (16 pages) ,
- Warranty and legal information (12 pages)
Table of Contents
Advertisement
Quick Links
Advertisement
Table of Contents

Related Manuals for DxO One


Summary of Contents for DxO One
-
Page 2: Table Of Contents
......................... Single photo review ........................Video review ..........................Deleting photos in single image view ................... Favorite photos ..........................Gallery view ..........................Using Multi-selection mode ......................DxO ONE - User Guide - Copyright © DxO Labs 1999-2015 - All rights reserved... - Page 3 ........................Manage settings ..........................Capture settings ......................... Application Settings ........................Index and Assistance ........................Optional accessories ........................Firmware Updates ........................DxO ONE Warranty Card ........................DxO ONE - User Guide - Copyright © DxO Labs 1999-2015 - All rights reserved...
-
Page 4: Introduction
DxO Connect, the complementary desktop software that enables you to make your best photos even better. If there's a topic or question that isn't covered here, please reach out to us. Our DxO Customer Support team is always ready to help at http://support.dxo.com/. -
Page 5: Dxo One At A Glance
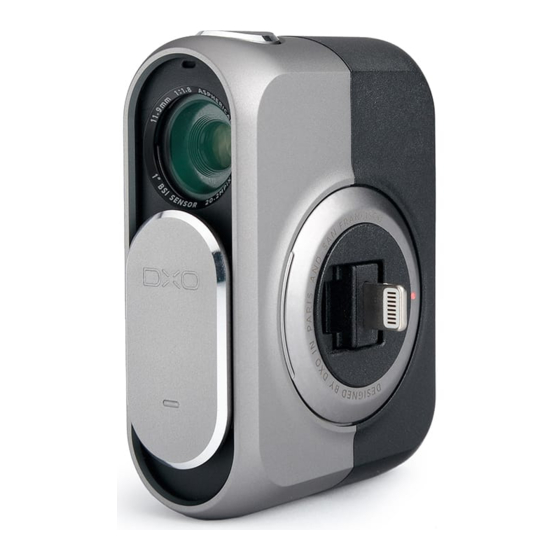
Introduction DxO ONE at a glance We recommend you quickly review the few, but important parts of your DxO ONE to help you get started. DxO ONE key features World’s smallest 1” sensor camera – well under 3” (7.6 cm) tall and weighing less than an iPhone 6. -
Page 6: What's In The Box
Introduction What's in the box Before use, make sure the following items are included in the package of your DxO ONE. If anything is missing, please contact your retailer. DxO ONE Camera Supplied USB Cord and Wall Charger Plug Cleaning Cloth Getting Started booklet Memory card is not included. -
Page 7: Quick Start
Insert a UHS-1 U3 microSD card (not included) 2. Slide the lens cover down to power on the DxO ONE. You’re ready to capture detailed photos and dynamic videos with the ONE in stand-alone mode. 3. Slide the lens cover further down to open the integrated Lightning Connector. - Page 8 App Store as a free download. 5. You are now ready to control every aspect of your DxO ONE camera via the iOS app. DxO ONE - User Guide - Copyright © DxO Labs 1999-2015 - All rights reserved...
- Page 9 DxO ONE - User Guide - Copyright © DxO Labs 1999-2015 - All rights reserved...
-
Page 10: When Finished Shooting
Introduction When finished shooting 1. Before detaching the DxO ONE camera from your iPhone, align the connector with the dots on the circular hub. The black dot should align with the red dot. 2. You can now detach the camera from your iPhone by pulling the two devices apart (do not fold the phone onto the camera to release). - Page 11 4. Slide the lens cover closed to power off the camera. DxO ONE - User Guide - Copyright © DxO Labs 1999-2015 - All rights reserved...
-
Page 12: Conserving Battery Power
To conserve the battery power of both your DxO ONE camera and your iPhone, it is recommended that you power DxO ONE down when not actively taking photos or shooting video. 1. To sleep the ONE, with the camera still attached to your iPhone, slide the lens cover closed to power off the ONE camera. - Page 13 4. For brief periods in between actively taking photos, your DxO ONE will automatically switch to Power Saving mode. 5. To wake your DxO ONE from Power Saving mode, simply tap the iPhone display, or press the physical shutter half way.
-
Page 14: Safety Precautions
Avoid contact with water, dust, sand or salt. These could cause a malfunction. Wipe the camera to dry off any rain or water drops. If your DXO ONE camera comes in contact with liquids, this may cause a short circuit, a fire, or an electric shock. -
Page 15: Certifications
Reorient or relocate the receiving antenna. - Page 16 Please note that the use of this accessory with iPhone or iPad may affect wireless performance. Only use DxO ONE with the specific models of iPhone and iPad that are identified in your user manual. Only use DxO ONE with the specific models of iPhone and iPad that are identified in your user manual.
-
Page 17: Getting Started
Inserting the UHS-1 U3 microSD card™ The microSD™ card slot is located behind the door on the back of the DxO ONE device. You’ll find both the microSD™ card slot and the microUSB connector under this door. Check and make sure that microSD™ card is inserted before using your DxO ONE, as it will not operate Check and make sure that microSD™... - Page 18 If excessive force is required, it is most likely not positioned correctly. card into the slot. If excessive force is required, it is most likely not positioned correctly. DxO ONE - User Guide - Copyright © DxO Labs 1999-2015 - All rights reserved...
-
Page 19: Holding The Camera
Connected Mode When the DxO One is attached to your iPhone, you will be able to access all of the shooting modes of the camera, and use the attached iPhone LCD screen as your viewfinder for previewing and reviewing images and video. - Page 20 Connect the DxO ONE to the lightning connection with the lens of the camera facing toward you. The camera will now be in your left hand, and the shutter button at the top.
-
Page 21: Make Sure The Battery Is Charged
Make sure the battery is charged The DxO ONE includes an integrated lithium-ion battery. It can be charged by using the provided DxO ONE USB cord and wall charger plug. The amount of charge available in the camera battery is displayed on the camera... - Page 22 2. Insert the USB cord into the USB slot, and attach the other end to your computer. 3. Make sure that the OLED display indicates that charging is in progress: Charging in progress - Battery uncharged Charging in progress - 50% DxO ONE - User Guide - Copyright © DxO Labs 1999-2015 - All rights reserved...
- Page 23 Charging in progress - Battery charged Charging times vary when using a computer. Charging times vary when using a computer. DxO ONE - User Guide - Copyright © DxO Labs 1999-2015 - All rights reserved...
-
Page 24: Using Your Dxo One With Your Iphone
Using your DxO ONE with your iPhone Installing DxO ONE application on your iPhone 1. Unlock your iPhone, and plug the DxO ONE into it via the lightning connector. 2. You will be prompted to download the DxO ONE app from the App Store. - Page 25 3. Click App Store to open the DxO ONE page in the App Store. DxO ONE - User Guide - Copyright © DxO Labs 1999-2015 - All rights reserved...
- Page 26 4. Install the app and launch it once the installation is done. DxO ONE - User Guide - Copyright © DxO Labs 1999-2015 - All rights reserved...
- Page 27 5. You will be prompted to allow DxO ONE to access your location while using the app. 6. An automated instruction booklet will help get you started. DxO ONE - User Guide - Copyright © DxO Labs 1999-2015 - All rights reserved...
-
Page 28: Processing Your Images With Dxo Connect
Getting started Processing your images with DxO Connect Apply automated image processing to your best DxO ONE photos to make them look even better. 1. Download DxO Connect from our website. Windows OS X 2. Plug the DxO ONE into your Mac or PC. - Page 29 4. You may also use DxO Connect to import your DxO ONE photos directly to DxO FilmPack to apply analog film looks to your digital images, or to DxO OpticsPro which allows you to control every aspect of the RAW image.
-
Page 30: Formatting The Microsd Card
1. Open the DxO ONE app settings panel by tapping the gallery view button at the top left of the toolbar. 2. Tap the App settings button to enter the app settings. DxO ONE - User Guide - Copyright © DxO Labs 1999-2015 - All rights reserved... - Page 31 All existing data on the microSD card will be lost Do not disconnect the camera during the formatting process. Do not disconnect the camera during the formatting process. DxO ONE - User Guide - Copyright © DxO Labs 1999-2015 - All rights reserved...
-
Page 32: Connecting And Disconnecting The Camera
Turning the camera On and Off The DxO ONE camera has two operating modes, Stand-alone mode and Connected mode. When the DxO ONE is connected to an iPhone, you have access to the full functionality of the camera and control over shooting modes, aperture, shutter speed, exposure compensation, focus mode and metering modes, ISO and more. -
Page 33: Opening The Dxo One Connector
Connecting and disconnecting the camera Opening the DxO ONE connector In order to connect the DxO ONE to your iPhone, you will need to open the DxO ONE lightning. 1. Slide the lens cover down to power on the DxO ONE. -
Page 34: Connecting The Camera To The Iphone
Connecting and disconnecting the camera Connecting the camera to the iPhone To connect your DxO ONE to your iPhone, insert the lightning connector on the DxO one into the lightning slot on the bottom of your iPhone. DxO ONE - User Guide - Copyright © DxO Labs 1999-2015 - All rights reserved... -
Page 35: Closing The Dxo One Connector
Connecting and disconnecting the camera Closing the DxO ONE connector 1. Return the DxO ONE lightning connector to the circular hub by first aligning the dots on the ring on the outside of the connector. You will hear a click when the dots align. - Page 36 If the dots are not aligned you will not be able to return the connector to the circular hub. Do not force the connector closed. the connector closed. DxO ONE - User Guide - Copyright © DxO Labs 1999-2015 - All rights reserved...
-
Page 37: Launching The Dxo One Ios Application
1. Connect your powered-on DxO ONE to your iPhone via the lightning connector. 2. If your iPhone is unlocked with no apps open, connecting the powered-on DxO ONE to the iPhone will automatically launch the app in capture mode. - Page 38 DxO ONE app by tapping its icon. If your iPhone is locked, you will need to unlock it, then launch the DxO ONE App by tapping on its icon.
-
Page 39: Oled Status Screen
Icons displayed during operation The OLED Display on the DxO ONE provides information about battery charge state, the shooting mode and file type selected, the image count remaining on the microSD card, the file type being recorded as well as error messages if something has gone awry in both connected and stand-alone modes. - Page 40 Speed Priority Aperture Priority Manual Mode Autofocus Focus attaine Connected Video Shooting Modes Auto Slow Motion Video Recording Stand-Alone Shooting Modes Mode Selection Still Video DxO ONE - User Guide - Copyright © DxO Labs 1999-2015 - All rights reserved...
-
Page 41: Battery Status
Remaining Shutter Progress 1. Focus achieved 2. Shooting USB Connected Temperature Warnings Camera is hot Warning: Camera is too hot Busy (processing or storing images) DxO ONE - User Guide - Copyright © DxO Labs 1999-2015 - All rights reserved... -
Page 42: Warning Messages
Warning Messages USB Error microSD microSD Card Error Card not inserted Firmware Updates Firmware Update in progress DxO ONE - User Guide - Copyright © DxO Labs 1999-2015 - All rights reserved... -
Page 43: Connected Capture Modes
Connected capture modes DxO ONE App at a glance The DxO ONE App puts all of the controls at your fingertips, controlling the camera from your iPhone screen. The user interface is simple and intuitive, but also very powerful: The app opens in Auto Mode, and shoots in RAW +JPEG by default. The JPEGs are rendered from the RAWs and are instantly available to share. -
Page 44: Taking A Picture
Shutter Buttons There are two shutter button options available to you when your DxO ONE camera is attached to your iPhone. DxO ONE Shutter There is a physical shutter button on the top of the DxO ONE device. - Page 45 2. During the focusing process, a dot on the OLED screen will blink. 3. Once focus is achieved, the dot on the OLED will stop blinking and the iPhone LCD screen will display a green square. DxO ONE - User Guide - Copyright © DxO Labs 1999-2015 - All rights reserved...
- Page 46 6. After the image has been taken, it is displayed on the iPhone for two seconds for review. Note, the display time can be modified in Settings DxO ONE - User Guide - Copyright © DxO Labs 1999-2015 - All rights reserved...
- Page 47 DxO ONE - User Guide - Copyright © DxO Labs 1999-2015 - All rights reserved...
- Page 48 Zoom is controlled by the iPhone, either by a pinch action or by sliding the cursor displayed on the screen. Capture Grid The DxO ONE iOS application has a built in compositional grid to help you compose great photos. The grid divides the viewfinder into 9 quadrants, for easy composition using the rule of thirds. To activate the capture grid, open the app display settings and turn the capture grid on.
-
Page 49: Changing The Capture Mode
2. Tapping this button will open the display of the different capture modes available to you. 3. Simply tap the mode icon to select the shooting mode that you wish to use: DxO ONE - User Guide - Copyright © DxO Labs 1999-2015 - All rights reserved... - Page 50 Shutter button or tap the current selected mode. To close the Capture modes display , half press the Shutter button or tap the current selected mode. DxO ONE - User Guide - Copyright © DxO Labs 1999-2015 - All rights reserved...
-
Page 51: Using Scene Modes
3. Tap the icon that best matches the scene that you want to capture to open that mode. 4. There are four scene modes to choose from: DxO ONE - User Guide - Copyright © DxO Labs 1999-2015 - All rights reserved... - Page 52 Sport For use with fast moving subjects. Portrait Use the portrait mode to isolate your subject's face by creating a lovely bokeh. DxO ONE - User Guide - Copyright © DxO Labs 1999-2015 - All rights reserved...
- Page 53 Night To capture great photos in low light conditions. The DxO ONE app will automatically select the best settings to use for each scene. The DxO ONE app will automatically select the best settings to use for each scene. DxO ONE - User Guide - Copyright © DxO Labs 1999-2015 - All rights reserved...
-
Page 54: Using The Advanced Modes
Using the advanced modes The DxO ONE also allows you to choose from four advanced modes that let you creatively control the look of the photo by changing shutter speed, aperture and ISO settings. When an advanced mode is selected, the toolbar on the left expands to reveal the advanced controls: 1. -
Page 55: Aperture Priority
1. Select to open Aperture Priority mode. This allows you to control the aperture that you wish to use for your photo. The DxO ONE will pick the corresponding shutter speed to achieve the best exposure based on your chosen aperture. - Page 56 3. To change the aperture, dial the aperture picker up or down until you find the aperture that you wish to select. 4. The settings are displayed on the OLED screen of the DxO ONE device. DxO ONE - User Guide - Copyright © DxO Labs 1999-2015 - All rights reserved...
-
Page 57: Speed Priority
2. The shutter settings will be active, and tapping the shutter speed icon will open the shutter speed picker. DxO ONE - User Guide - Copyright © DxO Labs 1999-2015 - All rights reserved... - Page 58 3. To change shutter speed, dial the picker up or down until you find the speed that you wish to select. 4. The settings will also be displayed on the OLED screen of the DxO ONE device. DxO ONE - User Guide - Copyright © DxO Labs 1999-2015 - All rights reserved...
-
Page 59: Program Mode
Program Mode 1. Select to open Program mode. Program mode allows you to simultaneously adjust both shutter speed and aperture. DxO ONE - User Guide - Copyright © DxO Labs 1999-2015 - All rights reserved... - Page 60 3. The settings will also be displayed on the OLED screen of the DxO ONE device. DxO ONE - User Guide - Copyright © DxO Labs 1999-2015 - All rights reserved...
-
Page 61: Manual Mode
Manual. 2. A menu will appear on the left hand side of the iPhone screen. Tapping each icon in turn will open the associated picker. DxO ONE - User Guide - Copyright © DxO Labs 1999-2015 - All rights reserved... - Page 62 3. To change each setting, dial the appropriate picker up or down until you find the setting that you wish to select. 4. The settings will also be displayed on the OLED screen of the DxO ONE device. DxO ONE - User Guide - Copyright © DxO Labs 1999-2015 - All rights reserved...
- Page 63 Aperture priority Shutter priority Manual (M) Program (P) *In Program mode, Aperture and Speed are adjusted in sync with one another to maintain proper exposure. DxO ONE - User Guide - Copyright © DxO Labs 1999-2015 - All rights reserved...
-
Page 64: Video Mode
1. To select video mode, switch the on-screen shutter button from the photo icon to the video icon. 2. The on-screen shutter button will switch to video mode. DxO ONE - User Guide - Copyright © DxO Labs 1999-2015 - All rights reserved... - Page 65 2. The app shutter button will turn red when recording and the app will display the time elapsed during the recording. 3. The DxO ONE OLED will display a flashing dot to indicate that recording has started. DxO ONE - User Guide - Copyright © DxO Labs 1999-2015 - All rights reserved...
- Page 66 Auto video to Slow Motion: 1. Tap on the bottom right of the iPhone display to open the video modes panel. 2. Select the Slow Motion mode by tapping DxO ONE - User Guide - Copyright © DxO Labs 1999-2015 - All rights reserved...
- Page 67 3. The app shutter button will turn red when recording and the app will display the time elapsed during the recording. 4. The DxO ONE OLED screen will also display the Slow Motion icon. DxO ONE - User Guide - Copyright © DxO Labs 1999-2015 - All rights reserved...
- Page 68 To switch from SLOW MOTION to Auto (1080p, 30fps) video mode: 1. Tap on the bottom right of the iPhone display to open the video modes panel. 2. Select the Auto video mode by tapping DxO ONE - User Guide - Copyright © DxO Labs 1999-2015 - All rights reserved...
-
Page 69: Activating Flash
Tap the flash icon on the right to turn the flash on or off. iPads do not have built-in flash devices, and therefore there is no flash function for the DxO ONE when iPads do not have built-in flash devices, and therefore there is no flash function for the DxO ONE when used with an iPad. -
Page 70: Activating Timer Mode
Activating timer mode The DxO ONE timer allows you to set the camera up to take a photo either 2 or 10 seconds after pressing the shutter. It is useful for reducing camera shake when using the camera in low light situations and for taking group selfies. -
Page 71: Selfie Mode
Connected capture modes Selfie mode 1. Connect the DxO ONE and the iPhone with the lens and screen facing you to activate the Selfie mode. 2. The Selfie icon will be displayed in the lower right corner. 3. Take a photo using the shutter button of the iPhone display. - Page 72 5. Get ready to smile as the app’s 'softbox' naturally illuminates your face. The photo can be taken using either shutter button. Using the shutter button on the DxO ONE will The photo can be taken using either shutter button. Using the shutter button on the DxO ONE will immediately take the image, without the countdown.
-
Page 73: Superraw
Connected capture modes SuperRAW™ The DxO ONE leverages the very latest in advanced noise reduction technology to create beautiful images in very low light. The SuperRAW setting captures four RAW images in quick succession and uses advanced image processing on the desktop to merge them into one dynamic, detailed photo for you. -
Page 74: Microsd Card Error Messages
MicroSD card missing A microSD card must be inserted into the slot of the ONE in order for the camera to function. If your microSD card is missing, you will see the following warning on the OLED and the iPhone screen. The message will appear whenever the shutter button is depressed. - Page 75 MicroSD card is full When your microSD card is full, the following warning will be displayed on the OLED and iPhone screens: DxO ONE - User Guide - Copyright © DxO Labs 1999-2015 - All rights reserved...
-
Page 76: Stand-Alone Capture Modes
To turn the camera On, slide the lens cover down to reveal the lens. Select mode To change between still and video mode, swipe left or right on the OLED screen on the rear of the DxO ONE device. DxO ONE - User Guide - Copyright © DxO Labs 1999-2015 - All rights reserved... - Page 77 Still mode selected Video mode selected DxO ONE - User Guide - Copyright © DxO Labs 1999-2015 - All rights reserved...
-
Page 78: Taking A Picture
2. Half press the shutter button to obtain focus. 3. The focus indicator dot, displayed between the photo count and File Type indicators on the OLED screen, stops blinking when focus is achieved. DxO ONE - User Guide - Copyright © DxO Labs 1999-2015 - All rights reserved... - Page 79 The DxO ONE device does not have a viewfinder display of it’s own. You will not be able to review The DxO ONE device does not have a viewfinder display of it’s own. You will not be able to review images until you connect the device to your iPhone or desktop computer.
-
Page 80: Recording A Video
2. Press and release the shutter button on the DxO ONE to start recording. 3. A blinking dot on the OLED screen shows that you are recording video. DxO ONE - User Guide - Copyright © DxO Labs 1999-2015 - All rights reserved... - Page 81 4. Press the shutter button to stop recording. DxO ONE - User Guide - Copyright © DxO Labs 1999-2015 - All rights reserved...
-
Page 82: Browsing And Sharing
2. Review photos in full screen mode by tapping on the photo to hide the tool bar. 3. Swipe the screen right and/or left to scroll through and review the photos. DxO ONE - User Guide - Copyright © DxO Labs 1999-2015 - All rights reserved... - Page 83 Pinching on the photo itself will also close image view and return you to gallery view. Pinching on the photo itself will also close image view and return you to gallery view. DxO ONE - User Guide - Copyright © DxO Labs 1999-2015 - All rights reserved...
- Page 84 Open Gallery View You can use the iPhone display to review photos that are stored on the microSD card of the DxO ONE You can use the iPhone display to review photos that are stored on the microSD card of the DxO ONE (if attached) as well as photos stored on your iPhone.
-
Page 85: Video Review
1.Tap the gallery button at the top of the toolbar on your iPhone display to open image view. 2. Open the video and press the play button displayed on the center of the video. DxO ONE - User Guide - Copyright © DxO Labs 1999-2015 - All rights reserved... - Page 86 Videos are recorded to the microSD card of the DxO ONE. They need to temporarily transfer from the Videos are recorded to the microSD card of the DxO ONE. They need to temporarily transfer from the card to the iPhone for review. A progress bar indicates when the transfer is complete.
-
Page 87: Deleting Photos In Single Image View
To delete a photo: 1. Tap the trash button. 2. You will be prompted to allow DxO ONE to delete the photos. 3. Tap Delete to confirm. DxO ONE - User Guide - Copyright © DxO Labs 1999-2015 - All rights reserved... - Page 88 If you have iCloud Photo Library enabled, you will be warned that deleting the photo will delete it from all your devices. all your devices. DxO ONE - User Guide - Copyright © DxO Labs 1999-2015 - All rights reserved...
-
Page 89: Favorite Photos
Tap the Heart icon on the lower right hand side of the photo to add the photo to your favorites in your iOS Photos library. Photos stored only on the DxO ONE microSD card cannot be flagged as favorites. Video clips also Photos stored only on the DxO ONE microSD card cannot be flagged as favorites. Video clips also cannot be flagged as favorites. -
Page 90: Gallery View
1. Tap the gallery button at the top of the toolbar on your iPhone display to open image view. 2. Tap the gallery grid button at the bottom of the toolbar. DxO ONE - User Guide - Copyright © DxO Labs 1999-2015 - All rights reserved... - Page 91 When scrolling, the location of the photos in the top row is displayed on the screen header. 4. Tap the camera icon to return to capture mode, or simply depress the shutter button halfway. DxO ONE - User Guide - Copyright © DxO Labs 1999-2015 - All rights reserved...
- Page 92 Filtering your photo gallery A drop down menu allows you to filter your photo gallery: ‘All Photos’ displays all of the photo and video files on the microSD card and the DxO album on your iPhone. 'Favorites' are those photos that you’ve marked as favorite by using the heart symbol.
-
Page 93: Using Multi-Selection Mode
2. To select photos or videos from gallery view, tap the photo thumbnail. 3. A check mark will appear on the top right corner of each selected photo. DxO ONE - User Guide - Copyright © DxO Labs 1999-2015 - All rights reserved... - Page 94 4. Tap the share button to share the selected photos 5. Tap the trash button to delete the selected photos. DxO ONE - User Guide - Copyright © DxO Labs 1999-2015 - All rights reserved...
- Page 95 6. To return to the gallery view, tap the back button, or simply depress the shutter button halfway. DxO ONE - User Guide - Copyright © DxO Labs 1999-2015 - All rights reserved...
-
Page 96: Sharing Your Photos
1. When in Still capture Mode, tap the gallery button to open image view. 2. In single image view mode, tap the Share icon to open the native iOS Sharing panel. DxO ONE - User Guide - Copyright © DxO Labs 1999-2015 - All rights reserved... - Page 97 3. You can choose to share photos by Message, Mail or any other sharing service supported by Apple iOS. Multi-section mode To share your photos in multi-section mode: 1. Tap the Select button. DxO ONE - User Guide - Copyright © DxO Labs 1999-2015 - All rights reserved...
- Page 98 2. Tap to select the photos you want to share. DxO ONE - User Guide - Copyright © DxO Labs 1999-2015 - All rights reserved...
- Page 99 3. You can choose to share photos by Message, Mail or any other service supported by Apple iOS. DxO ONE - User Guide - Copyright © DxO Labs 1999-2015 - All rights reserved...
-
Page 100: Saving Images Stored On The Microsd Card To Your Iphone
Video files never transfer automatically to your iPhone. Follow these steps to save video files to your iPhone. 1. Tap the gallery button to open image view. DxO ONE - User Guide - Copyright © DxO Labs 1999-2015 - All rights reserved... - Page 101 2. In single image view mode, tap the Share/Save icon to open the native iOS Sharing panel. 3. Tap the Save Image button to copy your image to your iOS Photos library. DxO ONE - User Guide - Copyright © DxO Labs 1999-2015 - All rights reserved...
-
Page 102: Printing Your Photos
1. Tap the Share icon to open the native iOS Sharing panel. 2. At the bottom of the share panel, you have the options to print from an AirPrint compatible printer. DxO ONE - User Guide - Copyright © DxO Labs 1999-2015 - All rights reserved... -
Page 103: Manage Settings
1. Tap the capture mode button at the bottom of the screen to open the capture mode display. 2. Then tap the gear icon to open the settings menu. DxO ONE - User Guide - Copyright © DxO Labs 1999-2015 - All rights reserved... - Page 104 2 seconds: Photo will be displayed for 2 seconds after capture before viewfinder returns to preview. Hold: Photo will be displayed until the display is touched or shutter button depressed. Never: Photos will only be displayed in the gallery. DxO ONE - User Guide - Copyright © DxO Labs 1999-2015 - All rights reserved...
- Page 105 Store Photos On microSD card and iPhone: Saves a full resolution JPEG file to your iPhone for all photos taken when the DxO ONE is connected to your iPhone. Photos taken in stand-alone mode are not added to your iPhonestorage.
- Page 106 3. Tap Format to confirm. All existing data on the microSD card will be lost All existing data on the microSD card will be lost DxO ONE - User Guide - Copyright © DxO Labs 1999-2015 - All rights reserved...
-
Page 107: Application Settings
Accessing the DxO ONE settings menu To access the DxO ONE settings menu: 1. Tap capture modes. 2. Tap the gear button to open the app settings. DxO ONE - User Guide - Copyright © DxO Labs 1999-2015 - All rights reserved... - Page 108 You will be able to view the FAQs, tutorial videos, and during working hours, contact customer support via Chat. User Guide Tapping User Guide will take you out of the ONE app and into iOS Safari, to the DxO ONE user guide. You’ll be able to access the DxO ONE online manual from this section. About 1.
-
Page 109: Index And Assistance
64GB microSD Memory Card for DxO ONE camera 64 GB MEMORY CARD SKU: ACC03-00 Universal USB AC Power Adapter for DxO ONE camera UNIVERSAL POWER ADAPTER SKU: ACC01-00 DxO ONE - User Guide - Copyright © DxO Labs 1999-2015 - All rights reserved... -
Page 110: Firmware Updates
The firmware is the software that is installed on the device itself. Keeping the firmware up-to-date ensures that you are getting the best experience and best image quality from the DxO ONE. It’s important that the firmware be updated for the latest version of the iOS app. -
Page 111: Error Messages
3. A progress bar will be displayed while the download occurs. You will not be able to use the DxO ONE while the firmware update is occurring. 4. Your DxO ONE will automatically reboot when the installation is complete. Do not disconnect the camera from your iPhone or close the app during the update. If you disconnect Do not disconnect the camera from your iPhone or close the app during the update. - Page 112 Firmware upload failed because of a timeout Firmware upload timed out. Please try again Firmware upload failed because of a SD card issue Unexpected error with microSD card DxO ONE - User Guide - Copyright © DxO Labs 1999-2015 - All rights reserved...
-
Page 113: Dxo One Warranty Card
Contract (General Purchase Terms and Conditions) with DxO. If your DxO ONE is or becomes faulty through no fault of your own then you may be entitled to a refund, repair or replacement of your DxO ONE but only in accordance with the express terms of this Warranty Card. - Page 114 DxO ONE that have not been supplied by DxO or a DxO authorized distributor; or (d) customer or users of the DxO ONE do not follow the guidelines to use the DxO ONE as set in the DxO ONE documentation or general purchasing conditions.
- Page 115 DxO ONE for the unexpired balance of the warranty period. The customer shall not return DxO ONE to DxO without the DxO’s written consent and DxO shall not be under any liability whatsoever for the DxO ONE returned by the customer without such consent.
Need help?
Do you have a question about the One and is the answer not in the manual?
Questions and answers