Table of Contents
Advertisement
Advertisement
Table of Contents

Summary of Contents for Entone Amulet 500 Series
- Page 1 Amulet Hybrid mediA Hub 500/550 Series Quick Start Guide ®...
-
Page 2: Table Of Contents
While rea- sonable efforts have been made in the preparation of this document to assure its accuracy, entone, inc. assumes no liability resulting from the use of the information contained herein. entone, inc. reserves the right to make changes in the product design without reservation and without notification to its users. -
Page 3: Important Safety Instructions
important Safety instructions important Safety instructions (continued) • WarNiNG: to reduce the risk of fire or electric shock, do not expose this ap- • to help prevent electric shock, plug the power cable into properly grounded paratus to rain or moisture. sources. -
Page 4: What's Included
What’s included ir extender receiver (Optional) composite audio/Video cable amulet Hybrid media Hub ethernet cable (Optional) Hdmi cable (Optional) ir remote control* 2 batteries for remote control ac Power adapter* additional items that may be required (not included): • ethernet cable • component Video cable • Hdmi cable • rF coaxial cable... -
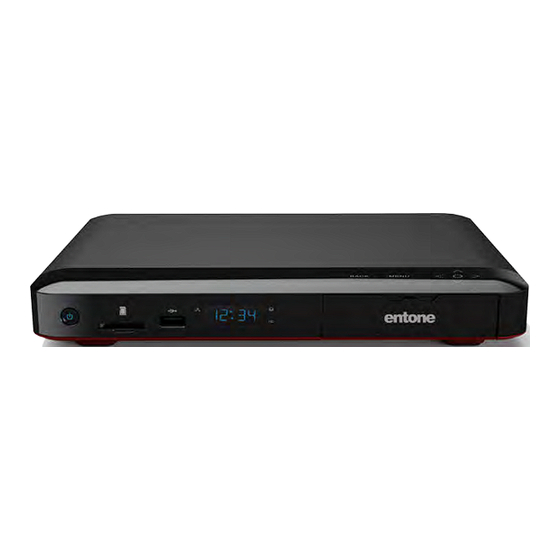
Page 5: Front Panel
amulet — Front Panel amulet — top and Side Panel Name Description Name Description Power Solid blue indicates the unit is on. Smart card Port For use with Sim format Smart card only. Solid red indicates the unit is in standby mode. (this is an optional item) Flashing blue indicates the unit is booting up. -
Page 6: Rear Panel
amulet — rear Panel SteP 1: cONNectiNG VideO amulet provides up to four video options for connecting to your tV: Hdmi, component Video, composite Video and coaxial. Select a video option then proceed to”connecting audio” on page 13. make sure your tV is turned on and the correct video input is selected. - Page 7 Option 2: component Video Option 3: composite Video Component Video Composite Video use a component cable (not provid- use the composite cable provided delivers excellent picture delivers good picture quality ed) and connect the red/blue/green and connect the yellow cable to the quality cables to the cOmPONeNt VideO iN yellow VideO iN port on your tV.
-
Page 8: Connecting Audio
SteP 2: cONNectiNG audiO Option 4: coaxial (Optional) Coaxial Cable use a coaxial cable (not provided) amulet has two audio options: Stereo or Surround Sound. delivers good picture quality and connect the cable to the aN- Select an audio option and proceed accordingly. teNNa iN port on your tV. -
Page 9: Surround Sound
SteP 3: cONNectiNG tV SOurce (OPtiONal) Option 2: Surround Sound if your tV is connected to an a/V receiver that supports dolby you can connect an rF coaxial cable (sold separately) from digital 5.1 Surround Sound, use a digital audio cable (sold amulet to either a cable tV or antenna source. -
Page 10: Connecting Network
SteP 5: cONNectiNG NetWOrk installing cablecard (Optional) cablecard is a Pcmcia card that allows access to premium Select from one of the following networking options. digital cable programming. cablecards are available from your local cable service provider. it is an optional feature for Option 1: Wireless amulet. -
Page 11: Powering Up
SteP 6: POWeriNG uP installing uSm drive amulet provides an integrated universal Storage module Setting up remote control (uSm) port for dVr applications. you can easily install, upgrade or replace a compatible uSm drive. 1. Open the battery cover by pressing down on the battery cover latch and sliding it off. -
Page 12: Installing/Uninstalling Usm Drive
uninstalling uSm drive connecting to Power Source 1. Push the handle at the bottom of the amulet to eject the 1. connect the power cord to the POWer port on the back of uSm drive. the amulet. 2. Plug the ac power adapter to a power outlet. 3. -
Page 13: Declaration Of Conformity
declaration of conformity declaration of conformity (continued) to ensure proper use of this product, please read this manual carefully and retain it for fu- to prevent fire or shock hazard, do not expose this product to rain or moisture. to reduce ture reference. - Page 14 Notes...
- Page 15 any...
Need help?
Do you have a question about the Amulet 500 Series and is the answer not in the manual?
Questions and answers