Table of Contents
Advertisement
Advertisement
Table of Contents

Summary of Contents for Prestige PRT14IDW-U
- Page 1 PRT14IDW-U...
- Page 2 ELECTRICAL CONNECTION (UK ONLY) For your safety please read the following information Warning: This appliance must be earthed. The appliance must be connected to a 230 volts 50 cycle AC supply by means of a three pin socket, suitably earthed and should be protected by a 13 amp fuse in the plug.
-
Page 3: Control Pan El
For detailed operating method read the corresponding content on the instruction manual. Switch on the appliance Press the On/Off button to switch on the appliance, Open the door. With each wash cycle. Compartment Fill the detergent dispenser For programmes with pre-wash only. (Follow the user instructions!) Check the rinse aid level Electric indicator on control panel (if provided). -
Page 4: Table Of Contents
Dear Customer, Please carefully read this manual bef ore using the dishwasher, it will help you to use and maintain the Control Pan el...........3 dishwasher properly. Dishwasher Fe atures........3 Keep these instructions for future use. 、 A Water Softener.........4 This manual contains sections on safety Instructions, 、... - Page 5 This appliance must be earthed. Improper connec tion of the grounding conductor can resu lt in the risk of an electric sho ck. Check with a qualified electrician or service representative if you are in d oubt whethe r the applian ce is properly grounded. Do not modify the plu g provided with the a ppliance;...
- Page 6 We apologis e for any inc onvenience caused by minor inconsistencies in these instructions, which may occur as a result of product improvement and de velopment. KESA U.K HU1 3AU 08 / 12 / 2009 Prestige is a registered trademark of Meyer Intellectual Properties Limited and is sold pursuant to a license.
-
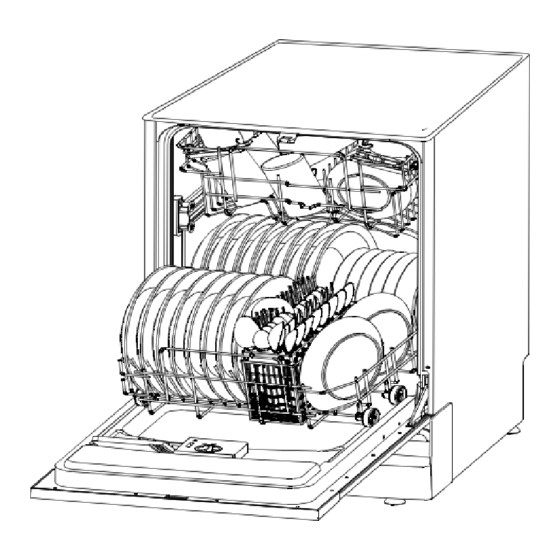
Page 7: Cutlery Basket
To get the best performance from your dishwasher, read all operating instructions before using it for the first time. 2 3 4 Display window: Program remaining time, delay time, running indicator, Program indicator, Salt and rinse aid indicator, Error codes, etc. Dela yed Start Bu tton: To preset the wash timer and delay the starting time up to 24 hours. -
Page 8: Adjusting Salt Consumption
Before using your dishwasher for the first time: Set the water softener Pour 1 litre of water inside the salt container and then fill with dishwasher s alt Fill the rinse aid dispenser Fill in detergent The water softener must be set manually, using the water hardness dial. The water softener is designed to remove minerals and salts from the water, which would have a detrimental or adverse effect on the operation of the appliance. -
Page 9: Rinse Aid Dispenser
The salt contain er is located beneath the lower basket and should be fill ed as explained in t he foll owing: Attention! Only use salt spe cif ically desi gne d for t he use i n dishwashers! Every other type of salt not speci fically de sig ned fo r the u se in a d ishwasher, espe cially table salt, will damage the w ater sof tener. -
Page 10: Adjusting Rinse Aid Dispenser
When to Refill the Rinse Aid Dispenser If there is no rinse-aid warning light in the control panel, you can estimate the amount from the colour " " of the optical level indicator C located next to the cap. When th e rinse-aid container is full, the whole indicator will be dark .As the rinse -aid diminishes, the size of the dark dot decreases. -
Page 11: Concentrated Detergent
Normally new pulverised detergent is with out phosphate. Thus the water softener function of phosphate is not present. In this case we recommend to fill the salt container even when th e hardness of water is only ° 6 dH. If detergents without phosphate are used in the case of hard wate r wh ite spots appear on dishes and glasses. -
Page 12: Fill In Detergent
Fill in Detergent Fill the detergent dispenser with detergent. The marking indicate s the dosing levels , as illustrate d on the righ t: The place of main wash cycle deterg ent placed , “ ” MIN me ans approximately 20g of detergent. The place of pre-wash cycle deterge nt placed , approximately 5g o f detergent Plea se o bserve the manufacturers dosing and storage... - Page 13 Consider buying utensils which are identified as dishwasher-proof. Use a mild detergent that is described as 'kind to dishes'. If necessary, seek further information from the detergent manufacturers. For particular items, select a program with as low a temperature as possible. To prevent damage, do not take gla ss a nd c utlery out of the dishwasher immediately after the programme h as ended.
-
Page 14: Silverware Basket
The upper basket is designed to hold more delicate and lighter dishware such as glasses, coffee and tea cups and sau cers, as well as plates, small bowls and shallow pans (as long as th ey a re not too dirty). Position the dishes and cookware so that they will not get moved by the spray o f water. -
Page 15: Adjusting The Upper Basket
Adjusting the Upper Basket The height of the upper basket can be adjusted in order to create more space for large utensils on both the upper/ lower basket. The he ight of the upper basket can be adjusted by placing the wheels on different height of the rails. Long items, serving cutlery, salad servers and knives should be placed on the shelf so that they do not obstruct the rotation of the spray arms.The shelf can be folded back or be removed when not required for use.Press the tab on the end of the runner clips and pull the clip out of the end of the left and right runners.Remove the basket and replace... - Page 16 Means: need to fill rinse into the Rinse-Aid Dispenser. ℃ Pre-wash(50 ) For the heaviest soiled Pre-wash loads, such as pots, pans, ℃ Wash (65 casserole dishes and dishes 5/25g Intensive Rinse that have been sitting with 3in1 Rinse dried food on them for a ℃...
-
Page 17: Unloading The Dishwasher
Draw out the lower and up per b asket, load the dishes and push them back. It is commended to lo ad the lower bask et first, then the upper one (s ee the sectio n entitled “ ” Loading the Dishwasher ). “... -
Page 18: Wash Cycle Table
The filter prevents larger remnants of food or other objects getting inside the pump. The residues may block the filter, in this case they must be removed. The filter system consists of a coarse filter,a flat (Main filter) And a microfilter(Fine filter). Main filter Fo od and soil particles trap ped in this filter are pulverized by a specia l jet on the lower spray arm and washed down the drain. -
Page 19: Cleaning The Filter
The entire filter assembly should be cleaned once a week. Cleaning the Filter To clean the coarse filter and the fine filter, use a c leaning b rush. Reassemb le the filter p arts as shown in the figures on the last page and reinsert the entire assembly in the dis hwa sher, positio ning it in its seat and pressing downwards. When cleaning the filters, avoid mechanical impact, Otherwise, the filters could become warped and the performance of the dishwasher could be effected. -
Page 20: Installation Preparation
After Every Wash When not in Use for a LongTime It is recommend that you run a was h cy cle with the After every wash, turn off the water supply to the dishwasher empty an d the n remove the plug from the appliance and leave the door slightly open so that socket, turn off the wa ter supply and leave the door of moisture and odours are not trapped inside. - Page 21 【 】 Figure1 90 ° 90 ° Cabinet dimensions Less than 5mm between the top 820mm of dishwasher and 600mm Electrical, drain and cabinet and the water supply line entrances outer door aligned to cabinet. Space between cabinet bottom and floor 600 mm 【...
- Page 22 2 Install the hook on the cosmetic wooden panel and put the hook into the slot of the outer door of dishwasher(see figure 4a). After positioning of the panel , fix the panel onto the outer door with the screws and bolts(See figure 4b) . Hop hook 【...
-
Page 23: Tension Adjustment Of The Door Spring
● Tension adjustment of the door spring The door springs are set at the factory to the proper tension for the outer door. If a cosmetic wooden panel is installed, you will have to adjust the door spring tension. Rotate the adjusting screw to increase the tension or reduce it (see figure 5). Door spring tension is correct when the door remains horizontal in the ,... -
Page 24: Installation
● Installation The dishwasher should be Installed in a place away from heat sources such as ovens, heaters,radiators and away from direct sunlight.The back of the dishwasher should rest against the wall with its sides against adjacent cabinets or walls.The water supply and drain hose can exit to the Left or Right to facilitate correct installation.The dishwasher should be fixed to the adjacent sides using the brackets and screws provided. - Page 25 Dishwasher must be level for proper dish rack operation and wash performance. Place level on door and level the dishwasher as shown. level the dishwasher by adjusting the four leveling legs individually. Check 【 】 Figure 8 Level Front to Back Illustration of feet adjustment NOTE: The maximum adjustment...
-
Page 26: Water Outlet
Connect the cold water supply hose to a threaded 3/4(inch) connector and make sure that it is fastened tightly in place. Connect using new hose sets,never re-use old hoses. let the water run to make sure that the water is clear. This precaution is needed to avoid the risk of the water inlet being blocked damaging the appliance. - Page 27 Fuse blown, or the Replace fuse or reset circuit breaker. Remove any other circuit breaker acted appliances sharing the same circuit with the dishwasher Power supply is not Make sure the dishwasher is turned on and the door is turned on closed securely.
- Page 28 The dishes were not See notes in " Loading the Dishwasher Baskets ". loaded correctly. The programme was Select a more intensive programme. not powerful enough. See" Wash Cycle Table . " Not enough detergent Use more detergent, or change your detergent. was dispensed.
-
Page 29: Hot Water Connectio N
Height : 820mm(adjustable+60mm) Width : 595mm Depth : 560mm Voltage connected Load : see rating label Water pressure: 0.04-1.0MPa max 60 ℃ Aot water connection: Power supply: see rating label Capacity: 14 Place settings...
Need help?
Do you have a question about the PRT14IDW-U and is the answer not in the manual?
Questions and answers