Table of Contents
Advertisement
Quick Links
Advertisement
Table of Contents

Subscribe to Our Youtube Channel
Related Manuals for Entone kamai 4


Summary of Contents for Entone kamai 4
- Page 1 Kamai 4 media ReceiveR Quick Start Guide...
-
Page 2: Table Of Contents
While rea- declaration of conformity sonable efforts have been made in the preparation of this document to assure its accuracy, entone, inc. assumes no liability resulting from the use of the information contained herein. entone, inc. reserves the right to make changes in the product design without reservation and without notification to its users. -
Page 3: Safety Instructions
important Safety instructions important Safety instructions (continued) • WarNiNG: to reduce the risk of fire or electric shock, do not expose this ap- • to help prevent electric shock, plug the power cable into properly grounded paratus to rain or moisture. sources. -
Page 4: What's Included
What’s included ir extender receiver diN-to-rcax6 cable kamai media receiver ethernet cable (Optional) Hdmi cable (Optional) ir remote control* 2 Batteries for remote control ac Power adapter* additional items that may be required (not included): • ethernet cable • Hdmi cable • rF coaxial cable • digital audio cable • Network router... -
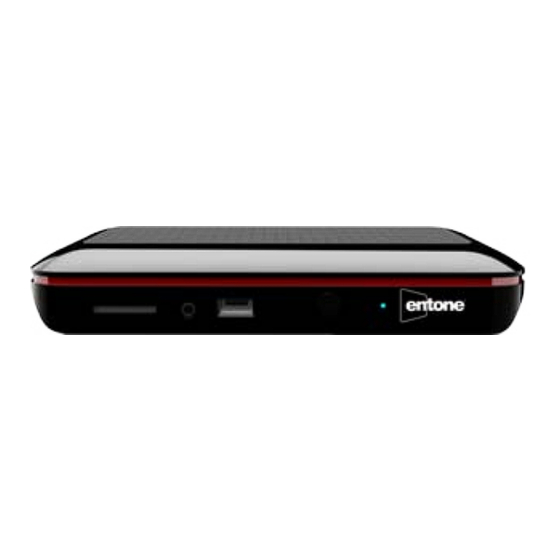
Page 5: Front Panel
kamai — Front Panel kamai — rear Panel Name Description Name Description Sd card reader Sd memory card reader tv Out coaxial connection to tv for loop-through reset (at bottom) reset the device factory settings with a thin metal aNt iN Port for connecting to cable or antenna source probe (tuner is optional) or moca network... -
Page 6: Connecting Video
SteP 1: cONNectiNG videO Option 2: component video Component Video use the diN-to-rcax6 cable pro- kamai provides two video options for connecting to your tv: delivers excellent picture vided and connect the component Hdmi and composite video. quality cable to the cOmPONeNt iN port on Select a video option then proceed to Step 2. -
Page 7: Connecting Audio
SteP 2: cONNectiNG audiO Option 3: composite video Composite Video use the diN-to-rcax6 cable provid- kamai has two audio options: Stereo or Surround Sound. Se- delivers good picture quality ed and connect the yellow cable to lect an audio option and proceed accordingly. the yellow videO iN port on your tv. -
Page 8: Surround Sound
SteP 3: cONNectiNG tv SOurce (OPtiONaL) Option 2: Surround Sound if your tv is connected to an a/v receiver that supports dolby You can connect an rF coaxial cable (sold separately) from digital 5.1 Surround Sound, use a digital audio cable (sold kamai to either a cable tv or antenna source. -
Page 9: Connecting Network
SteP 4: cONNectiNG NetWOrk Option 2 connect your kamai to a moca Network. Select from one of the following networking options. NOTE: the cable tv / antenna signals from the aNt iN port is Option 1 loop-through to tv Out port. connect an ethernet cable (sold separately) from kamai to a NOTE: contact your service provider for more details and cable/dSL modem or Network router. -
Page 10: Powering Up
SteP 5: POWeriNG uP the signals from the aNt iN port is loop-through to tv Out Setting up remote control port. if your kamai does not have tuner option and you se- lected moca for networking, you can use a coaxial cable (not 1. -
Page 11: Connecting To Power Source
declaration of conformity connecting to Power Source 1. connect the power cord to the POWer port on the back of to ensure proper use of this product, please read this manual carefully and retain it for fu- the kamai. ture reference. Should the unit require maintenance, contact an authorized service location. 2. - Page 12 declaration of conformity (continued) Notes to prevent fire or shock hazard, do not expose this product to rain or moisture. to reduce the risk of electric shock, dO NOt remove the cover or back. No user serviceable parts are inside. For servicing refer to qualified personnel. declaration of conformity (united States Only) this device complies with Part 15 of the Fcc rules.
- Page 13 any...
Need help?
Do you have a question about the kamai 4 and is the answer not in the manual?
Questions and answers