Table of Contents
Advertisement
To Customers
Thank you very much for using our VHF/UHF transceiver. This radio of modern design
is reasonable structure with stable functions. It is designed to meet customer's needs
for the high quality with easy operation and perfect capability.
We believe you are pleased with the finished shape and the reasonable price.
Advertisement
Table of Contents

Subscribe to Our Youtube Channel
Related Manuals for Firstcom FC-136

Summary of Contents for Firstcom FC-136
- Page 1 To Customers Thank you very much for using our VHF/UHF transceiver. This radio of modern design is reasonable structure with stable functions. It is designed to meet customer’s needs for the high quality with easy operation and perfect capability. We believe you are pleased with the finished shape and the reasonable price.
-
Page 2: Table Of Contents
Contents CAUTIONS MENU SETTING 17-37 Channel Name Edit 23-24 CHECKING EQUIPMENT What is Menu? OFFSET BATTERY PACK How To Use the Menu? Open Message Display Mode CHARGING MENU LIST 18-19 Open Password MAINTENANCE MENU OPERATION GUIDE 20-37 Open Password Protection INSTALLING ACCESSORIES Automatically Power Off Warning Tone When End of... -
Page 3: Cautions
Cautions Before use this transceiver may need get local government authorization. DO NOT operate the transceiver without a proper antenna attached, as this may damage the transceiver and may also exceed exposure limits Refer service to qualified technicians only. Turn off the transceiver while taking on fuel or while parked in a gasoline service station. Do not expose the transceiver to long periods of direct sunlight, nor place it close to heating appliances. -
Page 4: Battery Pack
Battery Pack CHARGING THE BATTERY PACK The battery pack is not charged at the factory; charge it before use. Initially charging the battery pack after purchase or extended storage will not bring the battery pack to its normal operating capacity. After repeating the charge/discharge cycle two or three times, the capacity will increase to best status. -
Page 5: Installing Accessories
CAUTION: It is abnormal in case of the charger glisteningly before sliding the battery pack into the charger. Don’t replace the battery pack until the indicator light is stable. Make sure contact well, LED indicates red when it is charging, if LED always blinking the battery pack is damaged or over the environment temperature. - Page 6 INSTALLING/REMOVING THE ANTENNA Screw the antenna into the connector on the top Turning or spiraling the antenna countercloc- of the transceiver by holding the antenna at its kwise to remove the antenna. base and turning it clockwise until secure. 3 6 /4 3 6 /4 F C -1 F C -1...
-
Page 7: Getting Acquainted
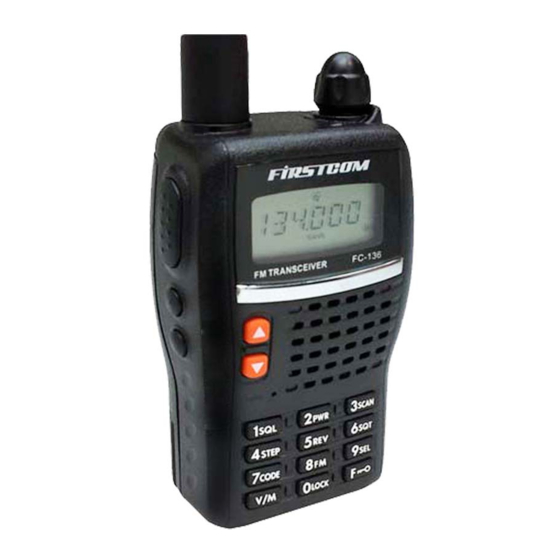
INSTALLING THE WRIST STRAP You can install a wrist strap to the back of the transceiver. Getting Acquainted INTRODUCTION POWER SWITCH / VOLUME CONTROL Turn clockwise to switch ON the ANTENNA transceiver. To switch OFF the transceiver, turn counterclockwise A rubber antenna used to until a click sounds. -
Page 8: Basic Mode
PTT (Push-To-Talk) SWITCH Press PTT then speak into the microphone to call and lights red. SPEAKER/ Release PTT to receive MICROPHONE signal and lights green. JACK If you need to use speaker, microphone LAMP KEY or programming cable, Press to active the LCD connect them with backlight and keypad this socket. -
Page 9: Lcd Display
LCD DISPLAY You can see various icons displaying on the screen while transceiver is working. The following table can help you identification the icon which display on LCD. Shows the working frequency, channel numbers and menu etc. Shows the memory channel numbers or menu numbers. Shows the transmit/received signal strength. -
Page 10: Basic Operation
Basic Operation Turn on/off power 1). Rotate Power/Volume knob by clockwise until beep sound is heard to turn on. 2). Turn Power/Volume knob in counterclockwise rotation until beep sound is heard to turn off. Adjust volume level After turning on the power, turn Power/Volume knob to increase the volume in clockwise rotation and decrease the volume in counterclockwise rotation. -
Page 11: Menu Setting
Menu Setting What is Menu? MENU includes the various setting of the transceiver. You can change some settings in the menu to meet your require. How To Use the Menu? 1. Press [ ] key until “ ” is blinking, then press [ ] to enter the Menu mode. -
Page 12: Menu Operation Guide
MENU ITEM DISPLAY SETTING OPNMSG (open message display modes) OFF/DC/MSG PSWD (open password ) ON/OFF PSWD W(password setting) Programmable ROGER(warning tone when end of transmit) ON/OFF SCN MD (scan mode) TO/CO STE(side tone eliminate) ON/OFF TOT (time-out timer) OFF, 1-7 minutes TXSTOP (transmitting inhibit) ON/OFF ON/OFF... -
Page 13: Battery Save Function
NO.97-NO.112 channels display BANK7, NO.113-NO.128 channels display BANK8, 2. NO BANK: Close this BANK function; it shows NO.1 to NO.128 channels normally. Battery Save Function (BATSAV) This function make the transceiver save power in case of no signal and to extend the use time. This function canceled when open the squelch or press the buttons. -
Page 14: Offset
Open Message Edit (MSGSET) You can edit the desired message while power ON. There are five alphanumeric at most. 1. Pressing [ ], “ ” is blinking on the LCD, then press [ ] to enter the menu 12. 2. Press [ ] to edit the content. -
Page 15: Open Password Protection
Open Password (PSWD) Enter the menu 15 to open/close the password protection function. You should set four digts on the menu 16 before use this function. Open Password Protection (PSWD W) Enter the menu 16 to set four digits as password. The menu 15 function will be opened in default when finish the password setting. -
Page 16: Wide/Narrow Band
automatically once you stop speaking. Enter the menu 22 to open/close this function. VOX icon shows on LCD when the function is activated. When you use a external headset You must adjust the VOX gain before use the VOX function otherwise background noise may trig VOX or your voice is not sensitive enough to trig VOX. - Page 17 a. OFF: No CTCSS/DCS with transmitting and receiving frequency. b. TONE: CTCSS with transmitting frequency only c. CTCSS : both with transmitting and receiving frequency d. D CODE : DCS with transmitting frequency only e. DCS: both with transmitting and receiving frequency f.
- Page 18 Delete Memory Channels 1. Select a memory channel to delete. 2. Turn OFF the transceiver. 3. Press and hold down [ ] key, rotate the power knob simultaneity to turn ON the transceiver. 4. Press [ ] / [ ] to enter MEMCLR menu, then press [ ] and RESET to confirm, the memory channel will be deleted.
- Page 19 1. Press [ ], and rotate simultaneously the power knob to turn ON the transceiver. 2. Press [ ] / [ ] key to select the SETRST menu, then press [ ] key twice to finish the setting. All Reset To initialize all setting.
- Page 20 Keypad Lock The keypad lock function prevents accidental frequency changes and function activation. 1. Press [ ] key (two seconds) to open or close this function. The lock icon will appear on LCD when this function is activated. Memory Channel Number Input 1.
- Page 21 CTCSS-DCS...
Need help?
Do you have a question about the FC-136 and is the answer not in the manual?
Questions and answers