Table of Contents
Advertisement
Advertisement
Table of Contents

Related Manuals for Zonerich ab-320m


Summary of Contents for Zonerich ab-320m
- Page 1 Mobile Printer USER'S MANUAL MANUAL REVISION EN 1.1...
- Page 2 NOTICE Make sure the printer power is off before Do not plug or unplug with your hands plug or unplug the cable. wet. You may be electrocuted. Please don`t place the printer in Keep magnetic objects away from humidity or dusty space, excessive the printer.
-
Page 3: Table Of Contents
INTRODUCTION Table of Contents Table of Contents ..............The mobile printer with excellent performance. It is integrated with Serial, USB and Bluetooth interfaces. It can be easily used for forms or receipts Chapter 1 Setting up the Printer ..........printing cooperated with portable equipments, such as PDA, Laptop, Data Chapter 2 Specification ............ -
Page 4: Chapter 1 Setting Up The Printer
Chapter 1 Setting up the Printer Chapter 2 Specification Your printer box should include these items. Item Discription Printing Method thermal line printing Printing Speed 60 mm/sec 203 DPI Resolution easy paper loading Paper Supply Mode Language user language supported Interface serial/usb/bluetooth auto 1/2/3 track(option) -
Page 5: Chapter 3 Product Overview
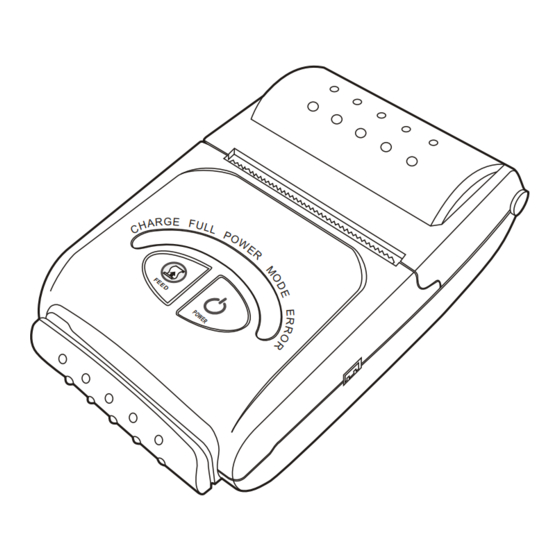
Chapter 3 Product Overview Chapter 4 Operations 4.1 Connect the cables 3.1 Printer Parts 4.1.1 Connect the AC recharger to the printer to recharge the battery Shell Full(Green light) Charge(Red light) Power(Red light) Feed Button Mode(Blue light) Power Button Error(Yellow light) USB Interface NOTE:To remove the DC cable connector, make sure that the power supply s power cord is unplugged;... -
Page 6: Using The Printer
4.2 Using the Printer 4.3 Installing or Replacing the Roll Paper 1. Make sure that the printer is not receiving data; otherwise, data may be BUTTON lost. FEED 2. Grasp the two sides of the paper cabin cover and pull till the cover open. Press the FEED button once to advance paper one line. -
Page 7: Battery Installation
4.4 Battery installation 4.5 Self test The mobile printer is battery power supplied. Battery should be Self test checks whether the printer can perform normally or not, except to fully recharged and properly installed in the printer before using. functions of communication and recharging. Follow the picture steps as below: Follow the steps to initial a self test: 1. -
Page 8: Power On/Off
4.7 Power on/off Press on the POWER button and hold on for more than 3 seconds. The printer will be powered on if the pre-statue is off; and the printer will be powered off if the pre-statue is on. Press FEED button three times to Set baudrate to 9600BPS Be sure the printer is powered on before printing. -
Page 9: Cleaning The Print Head
4.11 Cleaning the Print Head 4.12 Interfaces This mobile printer model has three interfaces: RS232, USB and Bluetooth. Below are the specifications. Turn off the printer, open the paper roll cover, and clean the thermal elements of the print head with a cotton swab moistened with an alcohol solvent 4.12.1 RS-232C Cable Connection (ethanol, methanol, or IPA). -
Page 10: Usb Connection
4.12.2 USB Connection 4.13 Using and recharging battery The mobile printer is power supplied by rechargeable Lithium-Ion battery. As the battery can be easily damaged, the usage of battery affects the battery's life span. Please use the battery properly under below instructions. 1.
Need help?
Do you have a question about the ab-320m and is the answer not in the manual?
Questions and answers