Table of Contents
Advertisement
ONchannel 510
EN
CONTENTS
1
PRECAUTIONS FOR USE ................................................................................................................2
2
DESCRIPTION ...................................................................................................................................3
3
INSTALLATION ..................................................................................................................................4
3.1 Installing the Battery ...................................................................................................................... 4
3.2 Installing / removing the belt clip .................................................................................................. 4
3.3 Charging the batteries .................................................................................................................... 4
4
OPERATION ......................................................................................................................................6
4.1 Transmission range ........................................................................................................................ 6
4.2 Turning the unit On/Off................................................................................................................... 6
4.3 Adjusting the speaker volume ....................................................................................................... 6
4.4 Changing Channels ........................................................................................................................ 6
4.5 Transmitting (sending a speech) ................................................................................................... 7
4.6 Monitor ............................................................................................................................................. 7
4.7 Setting the VOX (Voice Activated Sensitivity) .............................................................................. 8
4.8 Activating the Auto channel scan ................................................................................................. 8
5
CALL-RING TONE .............................................................................................................................9
5.1 Selecting a Call-ring tone ............................................................................................................... 9
5.2 Setting the Roger beep .................................................................................................................. 9
5.3 Setting the key tone On or Off ....................................................................................................... 9
5.4 Setting the Dual Watch Mode ........................................................................................................ 9
6
AUXILIARY FEATURES ..................................................................................................................10
6.1 Key lock ......................................................................................................................................... 10
6.2 LCD screen back light .................................................................................................................. 10
6.3 Microphone/Earphone/Charge jack ............................................................................................ 10
7
ACCESSORIES ...............................................................................................................................11
7.1 Using the earpiece kit ................................................................................................................... 11
7.2 Installing the elastic strap ............................................................................................................ 11
8
TECHNICAL CHARACTERISTICS .................................................................................................11
8.1 Specifications ............................................................................................................................... 11
8.2 Channel frequency table .............................................................................................................. 11
9
CE DECLARATION OF CONFORMITY ..........................................................................................11
10 WARRANTY .....................................................................................................................................12
11 RECYCLING ....................................................................................................................................12
12 CONTACT US ..................................................................................................................................12
Advertisement
Table of Contents

Related Manuals for GEONAUTE ONchannel 510

Summary of Contents for GEONAUTE ONchannel 510
-
Page 1: Table Of Contents
ONchannel 510 CONTENTS PRECAUTIONS FOR USE ........................2 DESCRIPTION ...........................3 INSTALLATION ..........................4 3.1 Installing the Battery ........................4 3.2 Installing / removing the belt clip ....................4 3.3 Charging the batteries ........................4 OPERATION ............................6 4.1 Transmission range ........................6 4.2 Turning the unit On/Off........................6 4.3 Adjusting the speaker volume ....................... -
Page 3: Precautions For Use
1 PRECAUTIONS FOR USE • Please read the owner's manual carefully before use. Please keep the owner's manual for the entire life of the product. • To reduce radio frequency exposure when using the device, keep it at least 5 cm away from your face. • Do not allow babies or young children to get near the devices. • Never use a walkie-talkie with a damaged antenna. If the antenna is in contact with the skin, mild burns may result. • When using the device in a vehicle, do not leave it in the area above an airbag or in the airbag deployment area because it can be propelled with great force and cause serious injury to the vehicle occupants if the airbag is deployed. • The devices are designed to be used in temperatures ranging from -10°C to +50°C inclusive. • If the devices are used in low temperatures, you must use batteries capable of standing up well to low temperatures. Preferably use lithium or NiMH rechargeable batteries as alkaline and zinc batteries perform very badly in low temperatures. • Do not use the devices or change the batteries in an explosive atmosphere. The antenna or batteries can produce micro-sparks or static electricity which can set off explosions causing serious injury and even death. • Never use the device outside during a storm. • Do not use the device in the rain. • If the device gets wet, switch it off and remove the battery. Dry the battery compartment and leave the cover open for a few hours. Do not use the device until it is completely dry. -
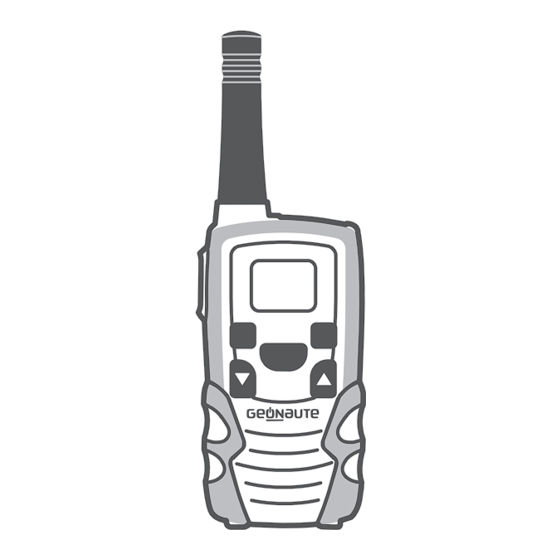
Page 4: Description
2 DESCRIPTION Antenna Ear / Mic / Charge jack LCD screen (Push To Talk) button Call button Power ON Up/Down MENU button buttons (Microphone) Speaker LCD screen CTCSS Channel number. Changes from 1 to 8 as selected by the user. CTCSS code. -
Page 5: Installation
3 INSTALLATION 3.1 Installing the Battery If the belt clip is installed, remove it. Observe the proper battery polarity orientation when installing batteries. Incorrect positioning can damage both the batteries and the unit. 3.2 Installing / removing the belt clip Installing the Belt clip Removing the Belt clip INSERTING REMOVING Slide the belt clip into... - Page 6 Plug the mains adaptor into a 240 VAC, 50 Hz main socket with the switch on the socket set to Î Î Off. Switch On the main socket. Î Î • The ONchannel 510 must be charged using the mains adaptor provided. • Using any other adaptor will result in non-compliance with EN60950-1 and will invalidate any approvals & warranty. Place the ONchannel 510 units in the charge cradle in an upright position. Î Î The charge LED indicators will light up. main socket It takes about 10 hours to fully recharge the batteries if they are Î Î completely run down. New batteries take up to 14 hours to fully charge. Important: A lways t urn o ff t he P MR u nits w hen c harging. T his w ill s horten t he charging time.
-
Page 7: Operation
4 OPERATION 4.1 Transmission range 7 KM 1.5 KM 500 M Important safety warning: To reduce radio frequency exposure when you are using your ONchannel 510, hold the ■ ■ unit at least 5 cm (2 inches) away from your face. Never use your ONchannel 510 outdoors during a thunderstorm. ■ ■ Don’t use the ONchannel 510 in the rain. ■ ■ If your ONchannel 510 gets wet, turn it off and remove the battery. Dry the battery ■ ■ compartment and leave the cover off for a few hours. Don’t use the unit until it is completely dry. Keep the ONchannel 510 out of reach babies and young children. ■ ■ 4.2 Turning the unit On/Off To Turn On; Press and hold Power button until the LCD screen turns On and display the current Î... -
Page 8: Transmitting (Sending A Speech)
• Refer to the «Channel Table» section of this Owner’s manual for detailed frequency listing. 4.4.1 Setting the CTCSS sub-channel Each channel also has 38 sub-channels to let you set up group of users within the same channel for more private communication. If you have set the sub-channel, you can only communicate with other PMR users tuned to the same channel and sub-channel. To turn the sub-channel function off: simply set the sub-channel to 0 (zero). You can communicate with any ONchannel 510 user set to the same channel who also turns off the sub-channel operation (or whose have unit does not have the feature). Press the Menu button twice, the current CTCSS sub-channel number flashing on Î Î the LCD screen. Press the Up or Down button to select one of the 38 CTCSS sub-channels. Î Î Press the PTT button to confirm the setting. Î Î 4.4.2 Setting the DCS (Advanced Digital Code). Each channel also has 83 digital codes to let you set up group of users for more secured private communication. Press the Menu button 3 times. DCS code is blinking on the LCD screen. Î Î Press the Up or Down button to select the desired DCS code. Î Î Press the PTT button to confirm the DCS channel setting. Î Î Transmitting and Receiving The ONchannel 510 transmission is «one way-at-a-time.» While you are speaking, you can not ■... -
Page 9: Setting The Vox (Voice Activated Sensitivity)
Press and hold the Menu and Down button. Î Î The "RX" icon will be displayed on the LCD screen. Your ONchannel 510 will pick up signals on the current channel, including background noise. Press the Menu button again to stop the channel monitoring. Î Î 4.7 Setting the VOX (Voice Activated Sensitivity) In «VOX» mode, the ONchannel 510 will transmit a signal only when it is activated by your voice or other sounds around you. The unit will transmit further for 2 seconds even if you stop talking. The level of «VOX» sensitivity is shown by a number on the LCD screen. At the highest level, the units will pickup softer noise (including background noise), at the lowest level, it will pick up only quite loud noise. Press the Menu button 4 times, "VOX" icon will be displayed and "OFF" flashing on Î Î the LCD screen. Press the Up button to set the VOX sensitivity into maximum level (the maximum Î Î level is "3"). To deactivate the VOX function, press the Down button until "OFF" appears on the Î Î LCD screen. Press the PTT button to confirm your setting. "VOX" will steadily appear on the LCD Î Î screen as along as the VOX feature is activated. • VOX operation is not recommended if the ONchannel 510 will be used in a noisy or windy environment. 4.8 Activating the Auto channel scan Channel scan perform searches for active signals in an endless loop for all 8 channels, 38 CTCSS codes and all 83 DCS codes. -
Page 10: Call-Ring Tone
5 CALL-RING TONE You can send a Call-ring tone to other PMR users to give an alert that you want to communicate with them. Press the Call button Î Î You will hear a ring tone for about two seconds. «TX» icon appears on the LCD screen. Any other units within the transmitting range and tuned to the same channel and sub-channel (if applicable) will hear the Call-ring tone. 5.1 Selecting a Call-ring tone The ONchannel 510 is equipped with 15 different types of Call ring tones. Press the Menu button 8 times, the "C01" icon will display and flashing on the LCD Î Î screen. Press the Up or Down button to select the desired call ring tone. Î Î A respective call ring tone sound will be played when changing from one tone to another. Press the PTT button to confirm your setting. Î Î 5.2 Setting the Roger beep The Roger beep is a tone which is automatically transmitted whenever the PTT button is released. This alerts the receiving party to inform that you have intentionally ended the transmission, and you are now in receive mode. Press the Menu button 9 times, the «ON» icon is blinking on the LCD screen. Î Î Press the Up or Down button to select the Roger beep On/Off. Î... -
Page 11: Auxiliary Features
Press the Menu button 11 times, "DCM" icon will be displayed while "OFF" flashing Î Î on the LCD screen. Press the Up or Down button to select the Dual Watch channel (1-8, except the Î Î current channel). Continue pressing the Menu button to change the CTCSS code. Î Î Press the Up or Down button to select the desired CTCSS code (1-38) Î Î Continue pressing the Menu button to change the DCS code. Î Î Press the Up or Down button to select the desired DCS code (1-83) Î Î Press the PTT button to confirm your setting. Î Î 6 AUXILIARY FEATURES 6.1 Key lock The key lock feature allows user to disable the Up, Down and Menu buttons so that the ONchannel 510 settings could not be changed accidentally. To activate the key lock feature, press and hold the Menu button until key lock « » Î Î icon appears on the LCD screen. To deactivate the key lock feature, press and hold the Menu button until key lock « Î Î » icon disappears on the LCD screen. • The PTT, and CALL buttons will remain functional even if the key lock feature is activated. -
Page 12: Accessories
7 ACCESSORIES 7.1 Using the earpiece kit Press and hold • When the earphone kit is installed, the microphone and loudspeaker are deactivated. 7.2 Installing the elastic strap 8 TECHNICAL CHARACTERISTICS 8.1 Specifications Channels Available 8 channels. CTCSS sub-channel 38 for each channel. DCS sub-channel 83 for each channel. TX 5%, RX 5%, Standby 90% 11 hours. Output power (TX) 0.5 W. -
Page 13: Ce Declaration Of Conformity
9 CE DECLARATION OF CONFORMITY • DECATHLON hereby declares that the ONchannel 510 device complies with the essential requirements and other relevant provisions of Directive 1999/5/CE • DECATHLON hereby declares that the ONchannel 510 device complies with the essential requirements and other relevant provisions of Directive 2006/95/CE. Compliance with these required conditions is expressed by the marking: The CE declaration of conformity is available via the following link: https://www.geonaute.com/en/ ec-declaration-conformity 10 WARRANTY DECATHLON guarantees to the initial purchaser of this product that it is free from material or manufacturing defects. This product is guaranteed for two years from the date of purchase. Please ensure that you keep the invoice as proof of purchase. The guarantee does not cover: • Damage resulting from misuse, from a failure to respect the precautions for use, from accidents, from improper maintenance or from commercial use of the product. • Damage resulting from repairs carried out by persons not authorised by DECATHLON. • Batteries or casings which are cracked or broken or which show signs of impacts. • The elastic strap, which is subject to wear and tear. During the warranty period, the item will either be repaired free of charge by an authorised repair service or replaced free of charge (depending on the distributor). 11 RECYCLING The «crossed-out bin» symbol means that this product and the batteries it contains must not be thrown away with general household waste. They are subject to a specific type of sorting. Please take the batteries and your unusable electronic product to an authorised collection point for recycling. This treatment of your electronic waste will protect the environment and your health. Dispose of your batteries in a place where they will be recycled. 12 CONTACT US We would like to hear your views on the quality, features and use of our products at: www.support.geonaute.com We will reply as soon as possible.
Need help?
Do you have a question about the ONchannel 510 and is the answer not in the manual?
Questions and answers