Table of Contents
Advertisement
Quick Links
SAFETY PRECAUTION
CAUTION:
The lightening flash with
arrowhead symbol, within an
equilateral triangle, is intended
to alert the user to "dangerous
voltage" and to prevent from a
risk of electric shock.
WARNING: The apparatus shall not be exposed to dripping or splashing and that no objects filled
with liquids, such as vases, shall not be placed on the apparatus.
WARNING: Do not place naked flame sources, such as lighted candles on the apparatus;
otherwise, there is the danger of fire.
WARNING: The unit should be connected to a power supply only of the type descry bed in the
operating instructions or as marked on the unit. If you are not sure of the type of power supply (for
example: 120 or 230V) to your home, consult your local dealer or local power company.
WARNING: Do not open the cabinet or touch any parts in the inner mechanism. Consult your local
dealer for technical service if the opening is required.
WARNING: The mains plug is used as the disconnect device, the disconnect device shall remain
readily operable.
WARNING: Take attention to the environmental aspects of battery disposal. The battery of remote
control should not be exposed excessive heat such as sunshine, fire or the like.
WARNING: Maintenance man must use the appointed screw in the rear plate.
WARNING: Ensure a minimum distance of 5 cm around the apparatus for sufficient ventilation.
WARNING: Ensure that the ventilation is not impeded by covering the ventilation openings with
items such as newspapers, table-cloths, curtains, etc.
WARNING: Use the apparatus only in moderate climates (not in tropical climates).
Note: Do not open the cabinet to avoid the unit direct exposure to radiation.
Warning:
To reduce the risk of electric
shock, don't open the cabinet.
Refer servicing to qualified
personnel only.
The exclamation point within an
equilateral triangle is intended to
alert the user to important
operating and maintenance
(servicing).
Advertisement
Table of Contents

Summary of Contents for starsat SR-x1010hd
- Page 1 SAFETY PRECAUTION CAUTION: The lightening flash with Warning: The exclamation point within an arrowhead symbol, within an To reduce the risk of electric equilateral triangle is intended to equilateral triangle, is intended shock, don't open the cabinet. alert the user to important to alert the user to "dangerous Refer servicing to qualified operating and maintenance...
- Page 2 Unit Cleaning: After the unit power is turned off, you can clean the cabinet, panel and remote control with a soft cloth lightly moistened with a mild detergent solution. Attachments: Never add any attachments and/or equipment without the manufacturer consent; as such additions may result in the risk of fire, electric shock or other personal injury.
-
Page 3: Table Of Contents
Contents Contents 1 Remote Control & Panel Description ..................3 1.1 Front Panel Description ......................3 1.2 Rear Panel Description......................4 1.3 Remote Control Description .....................5 2. Basic Operations.......................... 7 2.1 Switch on STB ..........................7 2.2 Standby Mode...........................7 2.3 Mute ............................7 2.4 TV/Radio ...........................8 2.5 Format ............................8 2.6 V.OUT ............................8 2.7 Audio ............................8... - Page 4 Contents 2.43 ►I◄ ............................18 2.44 I◄◄/►►I ..........................18 2.45 FAV ............................18 2.46 LNB Short..........................19 3 Menu Operations ......................... 20 3.1 Easy Installation........................21 3.2 Satellite Install.........................22 3.2.1 Antenna Setting ......................22 3.2.2 Positioner Setting ......................23 3.2.3 Multi Satellite Search ....................23 3.2.4 Manual Search ......................24 3.2.5 Edit Satellite........................25 3.2.6 Unicable Configuration....................26 3.3 Settings ...........................26...
-
Page 5: Remote Control & Panel Description
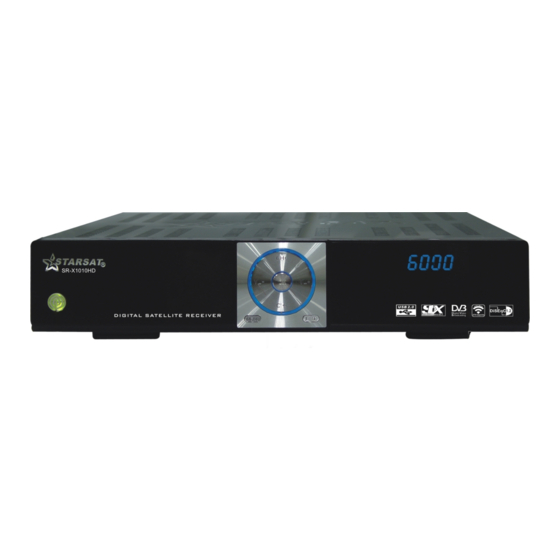
Remote Control & Panel Description 1 Remote Control & Panel Description 1.1 Front Panel Description POWER: Is used to switch between the working mode and the standby mode. MENU: To enter into the main menu and exit all menus. VOL+/-: To change volume to move cursor, change numbers in the menu or to change the choice. -
Page 6: Rear Panel Description
Remote Control & Panel Description 1.2 Rear Panel Description IF IN: Satellite input. IF OUT: Satellite output for cascading to other devices Note: The operation of another receiver at the same time is only possible with limited channel selection. S/PDIF: Coaxial output for digital audio (AC3) VIDEO: CVBS video output for TV AV in. -
Page 7: Remote Control Description
Remote Control & Panel Description 1.3 Remote Control Description... - Page 8 Remote Control & Panel Description Power: The power key turns the receiver on and off. Mute: This key switches the sound on and off. TV/R: Selects TV or Radio channels. Format: Switch the display mode. V.OUT: Switch the video output. Audio: Open the Audio Mode window.
-
Page 9: Basic Operations
Basic Operations 2. Basic Operations 2.1 Switch on STB Switch the [Device’s Main Power] switch on. When the STB is first used it will display “Quick Setup” window. you will set Language, First Audio, Second Audio, LNB Power, Antenna Setup and Multi Search. Frequently Asked Question The power of my STB is on and it is running in TV mode but the TV screen shows nothing:... -
Page 10: Tv/Radio
Basic Operations 2.4 TV/Radio In TV mode, press [TV/Radio] to switch to Radio mode. In Radio mode press [TV/Radio] again to switch back to TV mode. 2.5 Format In TV mode, press [FORMAT] button to display Mode is used to switch the display mode. 2.6 V.OUT In TV mode, press [V.OUT] button to display Mode is used to switch the video output. -
Page 11: Pause
Basic Operations 2.10 Pause In playing mode, press [PAUSE], the picture will be paused, but the sound of the channel will still continues. Press [PAUSE] again, the screen’s picture will skip over to the current playing picture, and the sound of the channel will corresponding playing. 2.11 Zoom In TV mode, press [Zoom] to enter the “MULTI”... -
Page 12: Sleep
Basic Operations 2.12 Sleep Press [Sleep] button in TV mode to set the sleep timer. You will see “Sleep TIME OFF / Sleep TIME 10 ~ Sleep TIME 120”. If you set a sleep time, the system will change to standby mode after the chosen time period. 2.13 SAT In TV mode, press [SAT] button to open satellite list and select there, then press [OK] to open “TV Channel List”... -
Page 13: Lock
Basic Operations Frequently Asked Question Why the screen displays “No favorite program!” after pressing the [Favorite] button? No channels have been assigned to a Favorite Group yet. You can do this in the channel menu. 2.15 Lock Press [Lock], then current keys on RCU are locking; Press [Lock] key again, then RCU keys will be unlocked. -
Page 14: Recall ( )
Basic Operations Press the [Red] button in the EPG menu to program a timer with the actual events data. Press the [Green / Yellow] to select date. To close the EPG menu press [Exit / Menu]. 2.17 Recall ( ) Pressing the [Recall] button allows you to toggle between the actual and the last selected channel. - Page 15 Basic Operations 2.19 CH▲/▼ In TV/Radio mode press [CH▲/▼] to change channel. 2.20 V◄/► In TV/Radio mode, press [Vol◄/►] to adjust volume. 2.21 OK In TV mode press [OK] button to open the Channel List window. Press [CH▲/▼] to switch channel and confirm it with [OK] to switch to it. The color buttons offer further functions to manage the channel list.
- Page 16 Basic Operations Ø Press [Red] to open the sort window. Press [CH▲/▼] to select and [OK] to confirm your choice. The ways of sorting are: ² Default: Sort channel factory default. ² FTA/CAS: Sort channel by free and scrambled sequence. Free channels will be listed first and scrambled channels behind in the channel list.
-
Page 17: Menu
Basic Operations 2.22 MENU Press [Menu] button to enter or exit the current menu. 2.23 EXIT Press [Exit] button to exit the current menu. 2.24 PGUP / PGDN In menu list, Press [PGUP / PGDN] on the RCU to jump between the list by pages. 2.25 HOME ( ) Used to display the main menu. -
Page 18: Usb
Basic Operations 2.29 USB In TV mode, press [USB] button to access directly to the “Media Management” menu. 2.30 MP3 In TV mode, press [MP3] button to access directly to the “Partition” menu. Press [CH▲/▼] to select the wanted item partition, press [OK] to confirm it. 2.31 JPEG In TV mode, press [JPEG] button to access directly to the “Partition”... -
Page 19: Goto
Basic Operations 2.37 T.S. In TV mode, press [T.S.] button if you want to time shift. 2.38 GOTO When you play the recorded channels, press [Goto] button, the “Jump to” message box will pop up, input the Time and press [OK], then the receiver will back to the input time point and play the program from that point continually. -
Page 20: I◄◄/►►I
Basic Operations 2.40 ● ● ● In TV mode, press [ ] button you want to record, press [ ] to confirm it. 2.41 ◄◄/►► When you play a recorded channel, press [◄◄] button to back the program fast and Press [►►] to fast forward the program. -
Page 21: Lnb Short
Basic Operations In the Favorite Group window you can select the desired favorite channel with [CH▲/▼] and confirm it with [OK] to switch to it. In bigger groups you can navigate with [PGUP/ PGDN]. With [VOL◄/►]. You can select different Favorite Groups. Press [Exit] to close the Favorite Group window. -
Page 22: Menu Operations
Menu Operations 3 Menu Operations Turn on you TV and receiver. The pop-up menu for language selection will appears. Select one language and press the [OK] button to proceed. Press the [MENU / ] button to display the main menu. And menu is a field of text shown on the TV screen, the selected item is generally become blue background. -
Page 23: Easy Installation
Menu Operations 3.1 Easy Installation After selecting the easy installation menu you can see the window like below. In “easy Installation” menu; Press [CH▲/▼] to select menu items among Satellite, DiSEqC1.0 4Port and Search, Press [OK] to enter the selected item Ø... -
Page 24: Satellite Install
Menu Operations 3.2 Satellite Install After selecting the Satellite Install menu you can see the window like. In “Satellite Install” menu; Press [CH▲/▼] to select menu items among Antenna Setting, Positioner Setting, Multi Satellite Search, Manual Search, Edit Satellite,Unicable Configuration. Press [OK] to enter the selected item. -
Page 25: Positioner Setting
Menu Operations In the “22K” item press [OK] to select the “ON” & “Off” to select directly with [CH▲/▼], press [OK] to confirm it. The 22KHz signal is used in KU universal LNBs to change between low band and high band. In the “DiSEqC1.0”... -
Page 26: Manual Search
Menu Operations 3.2.4 Manual Search In the “Satellite” item press [OK] to select the “satellite list” to select directly with [CH▲/▼], press [OK] to confirm it. In the “TP Index” item press [OK] to select the “TP Index” to select directly with [CH▲/▼], press [OK] to confirm it. -
Page 27: Edit Satellite
Menu Operations 3.2.5 Edit Satellite After selecting the Edit Satellite menu you can see the window like. Press [Vol◄/►] to switch between “Satellite List” and “TP List”. Satellite List Press [Red] button to enter edit satellite menu. You can edit the satellite’s name and its longitude. -
Page 28: Unicable Configuration
Menu Operations Press [Green] button to open the “Add TP” window. After pressing [Yellow] button you will be asked “Are you sure to delete?”. Select “OK” to delete the marked TP. Select “No” to cancel the operation. After press [Blue] button you will be asked “Are you sure to delete?”. Select “OK” to delete the all TP. -
Page 29: System Setting
Menu Operations Press [CH▲/▼] to select menu items among System Setting, Parental Control, Local Time Setting, Power Setting, Factory Default, Software Upgrade, Information and CAS. Press [OK] to enter the selected item. Press [Vol►] to enter the selected item. 3.3.1 System Setting In “System Setting”... -
Page 30: Parental Control
Menu Operations OSD Transparency: With this parameter you can set the transparency of the menus. Press [OK] to select directly with [CH▲/▼] select the value between 10%, 20%, 30%, 40% and “Off” (means no transparency function). Text Transparency: With this parameter you can set the transparency of the teletext list. Press [OK] to select directly with [CH▲/▼] select the value between 10%, 20%, 30% and “Off”... -
Page 31: Local Time Setting
Menu Operations Satellite Lock: If set to “On” then you need to enter the password before you can see those channels which have been marked as locked Satellite in the Satellite menu. If set to “Off” then even those channels can be selected without entering the password first. Scramble Lock: If set to “On”... -
Page 32: Power Setting
Menu Operations 3.3.4 Power Setting In “Power Setting” menu; Automatic Standby: Press [OK] to select directly with [CH▲/▼] to select “Off” and “On”. The “Time” item is only available when “Automatic Standby” is set to “On”. Press [OK] to select directly with [CH▲/▼] to select “1hr” ~ “8hr”. LNB Power: If your receiver is connected to the LNB directly then you need to set the LNB Power to “On”. -
Page 33: Software Upgrade
Menu Operations A dialogue box will occur where you need to enter the password. After you input the correct password a warning message will be displayed like the one beside. If you select “Yes” then all changes you made will be reset to default values. Make sure you really want to do this! Press [Exit] in both steps will close the window without resetting the receiver. - Page 34 Menu Operations Upgrade Mode: the mode of the upgrade to be chosen, Press [OK] to select directly with [CH▲/▼] to select Software, CAS and Ch.List & Setting. In the “Software” item press [OK] to open the “USB list” to select directly with [CH▲/▼], and press [OK] to finish the selection.
- Page 35 Menu Operations 3.3.6.3 Backup To USB This function allows you Dump Software and Ch.List & Setting from the receiver to external hard drives. Press [OK] to select directly with [CH▲/▼] to change the backup mode. Backup mode include: Dump Software and Ch.List & Setting. Mark “Start”...
-
Page 36: Information
Menu Operations Time: The “Time” item is only available when “Auto OTA Config” is set to “Auto” and “Confirm”. Press [OK] to set the “Time” menu. Start: Select the Software, User Interface and Default DB, Then select “Start” and press [Enter] to begin the download of the upgrade. -
Page 37: Calendar
Menu Operations In this option, you can find information about the conditional access system. If there is no card or it is placed incorrectly, information about “No card” &“Unknown” will be showed on the screen. With a FELEC-CAS card, information about the card will be showed. Note: Card must be inserted with chip in upper side. - Page 38 Menu Operations Timer Press [Red] to Select the Calendar and Timer. To add more, press the [Green] button. Ø Timer Mode: Select how often the timer is running: Once, Daily, Weekly, Monthly and Yearly. Ø Timer Service: Select between Play TV, Play Radio and Auto OTA Config. Ø...
-
Page 39: Usb
Menu Operations 3.5 USB After selecting the USB menu you can see the window like. In “USB” menu; Press [Vol◄/►] keys select the All, Pictures, Movies, MP3, Software and Stream. Press [CH▲/▼] to select the wanted item partition. Press [Red] button to open the “Rename” window like showed. Press [CH▲/▼ / VOL◄/►] keys to select the leading character of the partition name and press [OK] to confirm it. - Page 40 Menu Operations Disk Information When you select the “Disk Information” menu you will see a screen like beside. The screen displays data about the current HDD. Edit All, Pictures, Movies, MP3, Stream, Basically the operation of is same as. Press [Vol◄/►] keys select the All, Pictures, Movies, MP3, Software and Stream. Press [CH▲/▼] to select the selected item.
- Page 41 Menu Operations Delete Press [Green] button to mark a “mp3 / image / video” for deleting. Marked “mp3 / image / video” will be deleted after you confirm to save the changes when you leave this menu. Move Press [Yellow] button to show a moving icon behind the “mp3 / image / video / folder” name. Move the “mp3 / image / video / folder”...
-
Page 42: Record
Menu Operations Folder Press [Blue] button to open the “New Folder” window like showed beside. Press [CH▲/▼] / [Vol◄/►] keys to select the leading character of the folder name and press [OK] to confirm it. After entering the character(s) highlight “OK” in the window and press [OK] on the RCU. Press [Exit] button to close the find window and brings you back to the all list. - Page 43 Menu Operations [Rename] Press [Red] button to open the “Rename” window like showed beside. Press [CH▲/▼] / [Vol◄/►] to select the leading character of the channel name and press [OK] to confirm it. After entering the character(s) highlight “OK” in the window and press [OK] on the RCU. Press [Exit] button to close the find window and brings you back to the Record list.
-
Page 44: Photo
Menu Operations [Lock] In channel Record menu, press [Blue] button to place a lock icon behind the name of the highlighted Record. Then the marked record will be locked and will be displayed again after password has been entered, before you leave existing menu please confirm if you want to save the changes 3.7 Photo After selecting the Photo menu you can see the access directly to the "Photo"... -
Page 45: Troubleshooting
Troubleshooting 4 Troubleshooting There may be various reasons behind receiver problems. Check the receiver according to the procedures described below. If you can’t solve your problem even after following the troubleshooting procedures, please contact the dealer, Do not open the receiver cover, it may cause a dangerous situation. -
Page 46: Technical Specification
Technical Specification 5 Technical Specification VIDEO Decoding MPEG-4 & MPEG-2 & MEPG-1 compatible Bit rate Max 15Mbps Output PAL/NTSC Aspect ratio 4:3, 16:9, Auto Active pixel SD: 720x480 @ 30fps; 720x576 @ 25fps HD: 480p, 576p, 720i, 720p, 1080i Output connector RCA, SCART, HDMI, YPbPr AUDIO Decoding...
Need help?
Do you have a question about the SR-x1010hd and is the answer not in the manual?
Questions and answers