Table of Contents
Advertisement
Available languages
Available languages
Quick Links
Advertisement
Table of Contents

Related Manuals for Fagor tedi 5000 HD

Summary of Contents for Fagor tedi 5000 HD
- Page 1 Tedi 5000 HD • Receptor Digital Terrestre: Definición Estándar y Alta Definición • Digital Terrestrial Receiver: Standard Definition & High Definition • Récepteur Numérique Terrestre: Définition Standard et Haute Définition...
- Page 2 Fagor Electrónica S.Coop. declara bajo su responsabilidad la conformidad del producto TEDI 5000 HD respecto a las Directivas del Parlamento Europeo: 2004/108/EC, 2006/95/EC, 2011/65/EC y 2009/125/EC. Para su evaluación,...
-
Page 3: Instrucciones De Seguridad
1.- INSTRUCCIONES DE SEGURIDAD No cubrir las aberturas de ventilación con objetos como perió- dicos, manteles, cortinas, etc .; Lea primero estas instrucciones antes de operar esta unidad. Guarde el Manual para futuras consultas. No se deben colocar sobre el aparato fuente de llamas, como velas encendidas,;... - Page 4 Procesador MSD 7T01 Tensión de alimentación DC5V2A Memoría flash 32MB Consumo 10W MAX 512M Transpondedor DVB-T2 Decodificador de video Estandard ISO/IEC 13818-1; ARIB Idioma OSD Multi-Idioma STB-B10 MP@ML,MPEG-2AV- C(MP L4.1) , Decodificador de audio sí Salida de video 4:3,16:9 Teletexto, lista de TV y Radio sí...
-
Page 5: Mando A Distancia
2.- MANDO A DISTANCIA 1. STANDBY: Conmuta el Receptor a ON (funcionamiento) o Standby(espera). 2. SUB-T: Selecciona Idioma o Subtítulos. Todas las funciones del Receptor pueden ser controladas con el 3. TTX: Presenta contenidos del Teletexto. mando a distancia. 4. MUTE: Anula sonido. 5. - Page 6 3.- COLOCACIÓN DE LAS BATERIAS Notas: • No utilice baterías recargables (Ni-Cd). Insertar 2 baterias tipo UM-4 (AAA) observado el correcto • No intente recargar las baterías, cortocircuitarlas o tirarlas posicionamiento según su polaridad y tal y como se indica en al fuego. la siguiente figura: •...
-
Page 7: Instalación Del Receptor
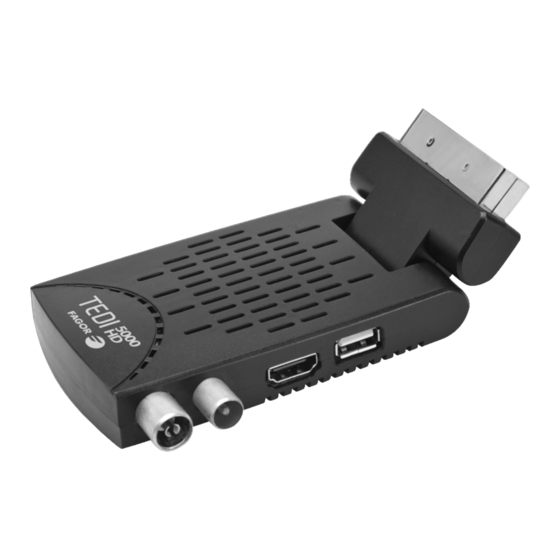
4.- INSTALACIÓN DEL RECEPTOR DC: Conector de alimentación VDC. IR: Conector del receptor de infrarojos. RF IN: Entrada de las señales de antena RF OUT: Salida de las señales de antena. HDMI : Salida HDMI para TV. USB: Conector USB para memorias externas. SCART: Salida de audio y video analógico. SCART HDMI... -
Page 8: Guía De Instalación
5.-GUÍA DE INSTALACIÓN 6.-PROGRAMACIÓN Para acceder al menú, pulse el botón de menú y seleccione Después de realziar todas las conexiones correctamente, en- [Programa]. Utilizando las teclas DERECHA / IZQUIERDA se cienda el televisor y asegúrese de que la unidad está conec- puede navegar por el menú. - Page 9 Deshabilitar Programas favoritos o Canal de radio: Cambio de programas de TV o Radio. Seleccione el canal favorito y pulse el botón favorito en el man- 1. Seleccione el canal preferido a continuación, pulse el botón do a distancia para cancelar. ROJO. Aparecerá un símbolo de movimiento. 2. Pulse ARRIBA / ABAJO para mover el canal. Ver canales favoritos: 3.
- Page 10 EPG < Guía de Programación> para salir del menú. La EPG es una guía de televisión en pantalla que muestra los Resolución programas hasta con siete días de antelación para cada canal sintonizado. Con esta función puede cambiar la resolución de la imagen. Pulse el botón EPG en el mando a distancia para acceder a [480P]: Para Sistemas NTSC la guía.
-
Page 11: Búsqueda De Canales
8.- BÚSQUEDA DE CANALES 9.- HORA Búsqueda automática Pulse el botón ▲ / ▼ para navegar por el Menú. Esta opción buscará automáticamente los canales y los memo- 1. - [Compensación horaria]: Pulse el botón ◄ / ► para rizará, borrándose todos los canales previamente guardados. seleccionar la compensación automática o manual. - Page 12 10.-OPTION 5. - [Software update]: Puede seleccionar OAD (Por aire) o Pulsando ▲/▼ podrá seleccionar: USB para actualizar el SW interno 1. - [OSD Language]: Pulsando ◄/► podrá seleccionar el idioma de los mensajes en pantalla. 12.- USB 2. - [Idioma de subtítulos]: Pulsando ◄/► seleccionará el Pulse ▲/▼...
- Page 13 7. [■]: Pulse el botón STOP para detener la reproducción de dad se puede aumentar hasta -2X, -4X, -8X, -16x, -32x. música. 5. [>>]: Pulse el botón F.FWD para ir hacia adelante. Su velo- 8. [|| ]: Pulse el botón PAUSE para hacer una pausa en la mú- cidad puede ser incrementada hasta 2X, 4X, 8X, 16X, 32X.
-
Page 14: Funcionamiento Básico
6. [| ►]: Pulse el botón STEP para reproducir películas con el 2. [Subtitulos BG]: Pulse ◄/► para cambiar el fondo de los paso controlado. subtítulos: <Gray><YellowGreen><Transparent><White> 7. [■]: Pulse el botón STOP para detener la reproducción de 3. [Fuente color de subtítulo]: Pulse ◄/► para cambiar la la película. - Page 15 3. [0 ~ 9]: Pulse la tecla numérica y seleccionará directamente el programa de televisión. 4. [REC]: Graba el programa actual cuando haya insertado el dispositivo de almacenamiento USB 5. [SUB-T]: Seleccione subtítulos de televisión. 6. [AUDIO]: Seleccione el idioma del programa de TV. 7.
- Page 16 This product should not be mixed with other commercial wastes for disposal. Fagor Electrónica S.Coop. declare under our own responsability the conformity of product TEDI 5000 HD according to the specifications of directives of the European Parliament: 2004/108/EC, 2006/95/EC, 2011/65/EC y 2009/125/ EC.
-
Page 17: Important Safety Instructions
1.- IMPORTANT SAFETY INSTRUCTIONS The ventilation should not be impeded by covering the venti- lation openings with items, such as newspapers, table-cloths, curtains, etc.; To inform users of possible dangers on the apparatus or on its components, the above symbols can be applied. No naked flame sources, such as lighted candles, should be To reduce the risk of fire and electric shock, do not expose this placed on the apparatus;... - Page 18 Main Processor MSD 7T01 Power Voltage DC5V2A Flash memory 32MB Power Consumption 10W MAX 512M Transponder DVB-T2 Video decoder Standard ISO/IEC 13818-1; ARIB OSD language Multi-Language STB-B10 MP@ML,MPEG-2AV- C(MP L4.1) , Audio decoder Video output ratio 4:3,16:9 Teletext, TV and Radio list handling Input frequency VHF:173.5MHz-230MHz Favorite list editing for both radio and TV...
-
Page 19: Remote Control
2.- REMOTE CONTROL 1. STANDBY: Switch the product to on or standby. 2. SUB-T: Select Subtitles / Language. All receiver features can be controlled with the remote 3. TTX: Display Teletext contents. controller. 4. MUTE: Mute or Restore Audio Output. 5. EPG: (Electronic Program Guide) Call up the EPF. 6. -
Page 20: Battery Installation
3.- BATTERY INSTALLATION Notes: • Do not use rechargeable (Ni-Cd) batteries. Insert 2 pieces batteries while observing the correct (+) and (-) • Do not attempts to recharge, short circuit, disassemble or polarities as illustrated below: throw the batteries into the fire. •... -
Page 21: Product Installation
4.- PRODUCT INSTALLATION DC: power adapter connection IR: remote control receiver. RF IN: Connect the antenna . RF OUT: Loop Out is an output port of the TDT IN signal. HDMI : Connect the TV HDMI IN. USB: Data input from USB storage devices. SCART: Transmitting the composite video signal SCART HDMI... -
Page 22: Program Edit
5.-INSTALLATION GUIDE AND OPERATION 6.-PROGRAM To access the Menu, press the MENU button and Select [Pro- After all connections have been made properly, switch on your gram]. Using the RIGHT/LEFT keys you can navigate through TV and make sure the unit is connected to the Main Power. the menu. - Page 23 Disable Favorite TV or Radio Channel: Move a TV or Radio Program Select the Favorite channel and press Favorite button on the 1. Select the preferred channel then press the RED button. A remote control to cancel. move symbol will appear. 2. Press UP/DOWN to move the channel. View Favorite Channel 3. Press OK to confirm 1.
-
Page 24: Picture Setting
EPG < Program Guide> 7.- PICTURE SETTING The EPG is an on-screen TV guide that shows scheduled pro- This Menu provides options to adjust the video settings. Press grams seven days in advance for every tuned channel. UP/DOWN to select an option and press RIGHT/LEFT to adjust Press the EPG button on the Remote Control to access the that setting. -
Page 25: Channel Search
8.- CHANNEL SEARCH 3. - Press OK to start searching channels. If a channel is found, it is saved. To access the menu, press MENU and select [Search Channel] using the RIGHT/LEFT keys. This Menu provides options to Antenna Power adjust the Search Channel settings. You can get 5 VDC from RF input to supply one external an- Press UP/DOWN to select an option and press RIGHT/LEFT to tenna. - Page 26 <Enable>: You could set the power off time. <Input Password>: Default 000000 3.4. - [Power Off Time]: Press number key to input time. 2. - [Set Password]: Press the OK button to input new password. 10.-OPTION 3. - [Restore Factory Default]: Press the OK button to restore factory default.
- Page 27 3. [ >>| ]: Press the SKIP+ button to play next music file. be increased up to 2X, 4X, 8X, 16X, 32X. 4. [ << ]: Press the F.RWD button to play backward. Its speed 6. [ |► ]: Press the STEP button to play movie with step speed. 7.
- Page 28 2. - Photo Configure. a) [Disk]: Press the ◄/► button to select record device. b) [Timeshift Size]: Press the ◄/► button to change timeshift 1. [Slide Time]: Press the ◄/► button to change the slide size. time. 2. [Format]: Press the OK button into format window. 2.
- Page 30 Ou leurs autorités locales pour savoir comment et où ils peuvent faire le recyclage approprié. Fagor Electrónica S.Coop. déclare sous sa seule responsabilité la conformité du produit : TEDI 5000 HD conformé- ment aux exigences des directives du Parlement européen : 2004/108/EC, 2006/95/EC, 2011/65/EC et 2009/125/...
-
Page 31: Consignes De Securite Importantes
1.- CONSIGNES DE SECURITE IMPORTANTES Veillez à ce que la ventilation ne soit pas entravée par des éléments recouvrant les ouvertures de ventilation (journaux, nappes, rideaux, etc.) Lisez ces instructions avant d’utiliser cet équipement, Conser- vez ces instructions pour des consultations ultérieures. Ne posez pas de source de flamme nue (bougies allumées, par exemple) sur l’appareil. - Page 32 Processeur principal MSD 7T01 Tension d’alimentation DC5V2A Mémoire flash 32MB Consommation 10W MAX 512M Transpondeur DVB-T2 Décodeur vidéo Standard ISO/IEC 13818-1; ARIB Langue de l’OSD Multi-Language STB-B10 MP@ML,MPEG-2AV- C(MP L4.1) , Décodeur audio Rapport de sortie vidéo 4:3,16:9 Réglage Télétexte, liste TV et Radio Fréquence d’entrée VHF:173.5MHz-230MHz Édition de la liste des favoris pour la...
- Page 33 2.- TÉLÉCOMMANDE 1. STANDBY: Bascule entre le mode Opération et le mode standby. 2. SUB-T: Affiche les informations des sous-titres. 3. TTX: Visualise les informations du Télétexte de la chaîne en cours. 4. MUTE: Cup le son. 5. EPG: (Guide électronique des programmes) Affiche la diffusion du guide des programmes TV/Radio par le fournisseur TV.
-
Page 34: Installation Des Piles
3.- INSTALLATION DES PILES • Si la télécommande ne fonctionne pas, même à proximité du Insérer 2 piles de type UM-4 (AAA) en les plaçant de façon récepteur, veuillez remplacer ses piles. à respecter leur polarité et selon les indications de la figure •... -
Page 35: Installation Du Produit
4.- INSTALLATION DU PRODUIT DC: Connecteur au chargeur de VDC. IR: Connecteur au capteur IR. RF IN: Entrée du signal d’antenne. RF OUT: Sortie du signal d’antenne vers un autre récepteur. HDMI Sortie HDMI vers la TV. USB: Connecteur pour des Périphériques de stockage externe USB. SCART: Sortie audio et vidéo analogiques SCART HDMI... - Page 36 5.-GUIDE D’INSTALLATION ET DE FONCTIONNEMENT 2. Une fois la recherche de chaînes est terminée, vous pouvez commencer à regarder les programmes de télévision différents. Après toutes les connexions ont été effectuées correctement, program. passer à la télévision et assurez-vous que l’appareil est con- 6.-PROGRAMME necté...
- Page 37 2. Répétez l’étape précédente pour sélectionner plusieurs chaî- 2. Répétez l’étape précédente pour ignorer plusieurs chaînes nes préférées. 3.Pour sauver votre réglage et quitter ce menu, appuyez sur 3. Pour confirmer et quitter le menu, appuyez sur EXIT la touche EXIT. Supprimer les chaînes favorites: Sélectionnez la chaîne pré- Désactiver la fonction sauter une chaîne: Sélectionnez la férée et appuyez sur le bouton FAV de la télécommande pour...
-
Page 38: Reglage Image
3. Pour confirmer et quitter le menu, appuyez sur le bouton EXIT. 1. [Arrêt]: Désactive le tri par LCN. 4. Appuyez sur le bouton JAUNE pour désactiver le verroui- 2. [Sur]: Active le tri par LCN. llage de chaîne 5. Pour afficher les chaînes verrouillées, vous êtes invité à en- 7.- REGLAGE IMAGE trer le mot de passe par défaut ‘000000’... -
Page 39: Recherche Automatique
8.- RECHERCHE DE CHAINES 9.- HEURE Recherche automatique Appuyez sur le bouton ▲/ ▼ pour naviguer dans le menu. Cette option recherche automatiquement les chaînes et les 1. - [Décalage GMT]: Appuyez sur ◄ / ► pour sélectionner la enregistre, en effaçant tous les chaînes enregistrées précé- compensation automatique ou manuelle. - Page 40 10.-OPTION 4. - [Informations]: Appuyez sur le bouton OK pour afficher les informations sur le modèle et la version la version SW et Appuyez sur le bouton ▲ / ▼ pour sélectionner un élément: 1. - [Langue Affichage Écran]: Appuyez sur the◄ / ► pour 5.- [Mise à...
- Page 41 5. [>>]: Appuyez sur le bouton F.FWD pour jouer vers l’avant. 3. [>> | ]: Appuyez sur la touche SKIP+ pour jouer le film sui- La vitesse peut être augmenté jusqu’à 2X, 4X, 8X, 16X, 32X. vant. 6. [| ►]: Appuyez sur le bouton STEP pour jouer de la musique 4.
- Page 42 5. [>>]: Appuyez sur le bouton F.FWD pour jouer vers l’avant. 3. - Configuration du film. La vitesse peut être augmenté jusqu’à 2X, 4X, 8X, 16X, 32X. 6. [| ►]: Appuyez sur le bouton STEP pour jouer des films à 1.
-
Page 43: Manipulation De Base
13.- MANIPULATION DE BASE Dans le mode de visualisation TV, vous pouvez faire ce qui suit: 1. [CH▲ / CH▼]: Pour modifier les programmes TV en cours. 2. [VOL◄ /VOL►]: Pour régler le volume du téléviseur. 3. [0 ~ 9]: Appuyez sur le nombre pour la sélection de program- mes de télévision. - Page 44 Fagor Electrónica, S.Coop. San Andrés, s/n. E-20500 Mondragón (Spain) Tel.: +34 943 71 25 26 Fax: +34 943 71 28 93 E-mail: rf.sales@fagorelectronica.es www.fagorelectronica.com...
Need help?
Do you have a question about the tedi 5000 HD and is the answer not in the manual?
Questions and answers