Advertisement
Table of Contents
Advertisement
Table of Contents

Related Manuals for LogiLink ua0079

Summary of Contents for LogiLink ua0079
- Page 1 UA0079 USB2.0 Network Server, 4-Port User Manual...
-
Page 2: Safety Instructions
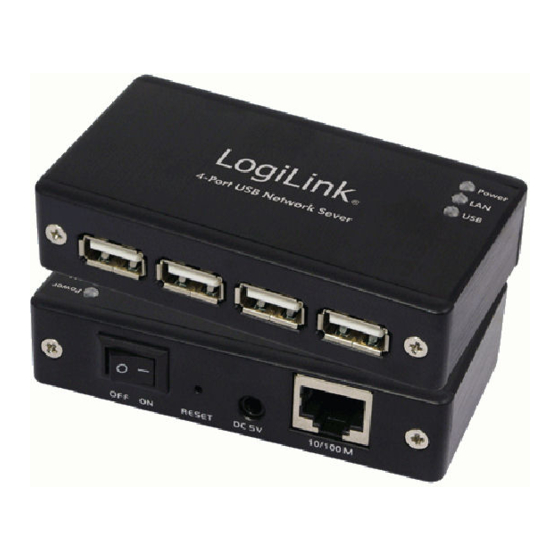
Sink. Avoid the direct Contact with Water. Don’t try to open the Device. Congratulations to the Purchase of UA0079! Please read the Manual and Safety Instructions before using the product for the first time. Otherwise damage can be the result. - Page 3 Most solutions allow printer-only peripheral devices. However, USB Server UA0079 allows you to use a multifunction combo device, such as a printer-scanner or printer-fax all-in-one! Another added benefit is that you can connect multiple printers/scanners/faxes to the USB Server through a USB Hub.
-
Page 4: Specification
2.1 Specification • Installation free for Windows XP, Windows Vista, and Mac OS X • Manages printing jobs by printer name instead of IP address • Embedded USB 2.0 host controller and transceiver, totally compliant with USB1.1/USB2.0 (Hi-speed) specification • Embedded Ethernet 802.3/3u transceiver, compliant with 100BASETX and 10BASE-T PMD level standards •... -
Page 5: Hardware Installation
3.0 Installation 3.1 Hardware Installation 1. Connect UA0079 USB Server to available LAN port of your PC via a Network cable. 2. Plug in Power cord, and press power button to power on. 3.2 Utility Software Installation 1. Insert the CD into CD-ROM drive and double click “D:\install.exe (where D: is the path of your CD-ROM drive). - Page 6 2. Please follow the instructions of the wizard to complete the installation process. 3. Please reboot the system as requested by the installer when the process ends, otherwise the software might not work properly. - 5 -...
-
Page 7: Running Program
4.0 Running Program 1. To start the USB Server program, please double click the shortcut icon of the USB Server on the Desktop. 2. The main dialog box of USB Server is shown above. 3. Windows Security will detect it automatically and please click “Unlock”... - Page 8 This is what you would see at program start up. It is consisted of a Control Menu (File, Options, View and Help), a tree view, a Search button to get the current status of all USB Servers and devices on the network, and a button that toggles between Open Web Page and Connect Device depending on the node you select on the tree view.
- Page 9 5.0 Usage 5.1 File Contains the program Quit function. 5.2 Options 5.2.1 Language You can change the utility’s languages with this option. The default language would be the same as your system’s language. - 8 -...
- Page 10 5.2.2 Setting Server Allow you to configure the server via the configuration of USB Server. Click Setting Server on control Menu. Or, to bring up the configuration dialog, please Right-Click on the server icon to bring up the following menu and select Setting Server. You might be prompted to enter password if a password has been set.
- Page 11 1. Server Name: Allows you to change the Server Name whatever you want. 2. USE DHCP: When this field is checked, your Server acquires IP address automatically. Uncheck it and you can enter IP address automatically. Note: You can apply this function to a server under different network segment.
- Page 12 Regarding Configuration with Web-based UI, please refer to Chapter 6.0. 5.2.5 Device Settings When you right click on a device icon, you see these options instead. Connect Device: Connects this Device. This option is enabled only when the device is free. If you select a connected device on the UI you can see that the Connect Device button is changed to Disconnect Device.
- Page 13 Disconnect Device: Clicking on this button release the selected device for other users. Once you see the icon turns back, the device has been disconnected and other users will then be able to connect to it. Request Disconnect Device: When you want to use a device occupied by other user, you can highlight that device and use this function.
- Page 14 5.2.6 Device Property Clicking on the Device Property option brings up this dialog: This dialog box displays information of the USB device. If the device is occupied, it also displays the occupying PC name and the IP of the PC occupying it. This dialog box provides a quite useful function.
- Page 15 5.3 VIEW The tree view in the main dialog has two display modes: “Servers and Devices” Mode and “Devices Only” mode. The default setting is “Devices Only” mode. You an toggle between these two display modes with the View option on the control menu: Servers and Device view Device Only view...
- Page 16 5.4 Search When you are in need of knowing the status of all the servers and devices immediately, use the Search button. Clicking on the Search button triggers the program to immediately poll the network for the status of all the servers and devices.
- Page 17 5.5 Help -> About About option brings up a dialog box with legal and other relative information displayed: - 16 -...
-
Page 18: Configuration With Web-Based Ui
6.0 Configuration with Web-based UI Your default web browser will pop up and take you into the web-based configuration UI of the server. (Refer to 5.2.4) This is the main page of the configuration UI. You can see the important information about USB Server and the device(s) connected to it. - Page 19 Note: A Server with busy device(s) connected is prohibited to be configured to prevent interruption of any on-going tasks. - 18 -...
-
Page 20: Reset Device
6.2 Reset Device Clicking on this link takes you the page show below: With the “Restart Server” button (refer to 5.2.2) you can reboot the server. However, if there is a password, you must enter it for this function to work. Password is by default blank. So, unless a password is explicitly set, you do not have to enter anything for the reset function to work. -
Page 21: Factory Default
6.3 Factory Default Clicking on this link takes you the page where you can restore the server’s settings back to default: Again, the password is not necessary if no password is set. Just leave the field empty and click on the “Factory Default” button to restore the factory default settings. -
Page 22: Password Change
6.5 Password Change Clicking on this link takes you to the password update page below: To change the password, you must enter current password, input new password and re-input the password for confirmation and then click on “Submit”. If you are setting the password for the first time, you don’t have to provide the current password. -
Page 23: Status Of Usb Servers And Devices
7.0 Status of USB Servers and Devices The tree view also tells you the status of all the USB Servers and devices that are accessible to you. An USB Server is either accessible or inaccessible. An inaccessible server is either disconnected from the network, powered off or suffers other technical difficulties that prevent it from being accessed by your PC. - Page 24 Once connected, you can use the USB device as if it is connected to your PC directly with a USB cable. Occupied by Other User: see the figure below This status icon indicates the device is occupied by another user and you can not connect to that device at the moment.
- Page 25 Request Disconnect Device: as below Double Click the device and click “Request Disconnect Device”. It will send the message to ask the current user to disconnect and just click “OK” on it. - 24 -...
- Page 26 7.1 Network Printer Wizard Installation 1. Connect USB printer to UA0079 USB Server. 2. The USB Server will dedect it automatcally and show as Device free as above figure. If not, please click “Search” button to detect it. 3. Access the device by clicking “Connect Device” button or double clicking on the device.
- Page 27 6. Install Printer Driver from the list on the Wizard or from CD-ROM. 7. After driver is installed, click “Finish” button to complete the installation. - 26 -...
- Page 28 8. Then, please check the connected printer on the Printers and Faxes. 9. By double-clicking on connected Printer, you can see functions “Disconnect Device”, “Device Property”, “Auto connect this printer when getting print job!” and “Create scanner shortcut” available as below. - 27 -...
- Page 29 10. Auto connect this printer when getting print job!” – Auto connects this device 15 seconds after application starts up. 11. You can click Device Property as below. The CE mark confirmed that this product meets the main requirements of the Directive 2004/108/EC and 2006/95/EC of the European Parliament and the Council of Europe concerning telecommunications and terminals regarding the Safety and health of...
Need help?
Do you have a question about the ua0079 and is the answer not in the manual?
Questions and answers