
Related Manuals for Homemaker XQB50-808GF

Summary of Contents for Homemaker XQB50-808GF
- Page 1 FULLY AUTOMATIC WASHING MACHINE Model: XQB50-808GF READ ALL OF THE INSTRUCTIONS BEFORE USING THE WASHING MACHINE AND KEEP THE INSTRUCTION MANUAL IN A SAFE PLACE FOR FUTURE REFERENCE.
- Page 2 Compliance Plate found on back of unit...
-
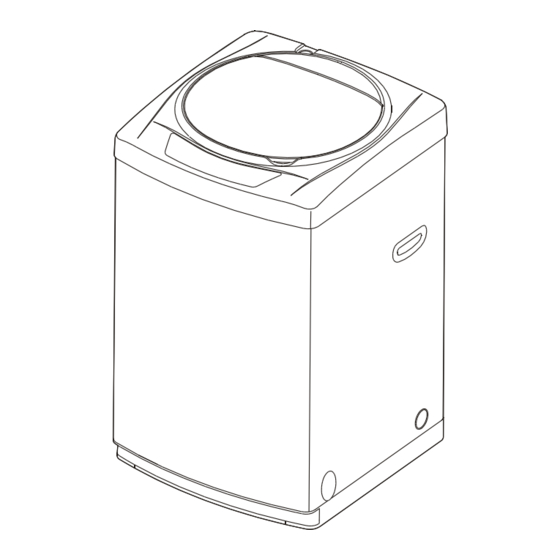
Page 3: Parts And Components
Parts and components Inlet hose (Please close the tab after using) Detergent case Softener dispenser Lint filter Inner tub Pulsator Power cord Control panel Base Drain hose (Hang up the drain hose when washer works) Level adjustment knob Noise and mice-proof plate (It is inserted into the base to reduce... -
Page 4: Control Panel
Control panel Wash temperature select button Digital indicator Press the button to select wash temperture. Displays the preset time, and trouble code .Shows the remaining time of each wash cycle when the machine is working. Wash temperature indicator Water level select button Indicate the wash temperature you choose. -
Page 5: Installation Instructions
Installation instructions Insert the noise-proof plate into the washing machine base 2.The entrance is in front of the 1.Take out the noise-proof plate. bottom part. 4.Lay down the washing 3.Insert the noise-proof plate machine on the back, fix the into the base. plate with two screws. -
Page 6: Water Temperature
Installation instructions Connection of the drain hose Change the direction of the drain hose Unfasten the fixed screw of Lead out the drain hose from Fasten up the screw to fix the drain hose joint. the opening to the other side. the drain hose. - Page 7 Installation instructions Connection of the inlet hose Note: The washing machine is to be connected to the water mains using new hose-sets supplied with the appliance are to be used and old hose-sets should not be re-used. Refer to Section on Water Supply Requirements before connecting water inlet hoses.
- Page 8 1.5mm No movements of hose Inlet connecting nut must be tighten to a point where there is only approximately 1.5mm gape of the thread showing. In addition, the hose should not be loose when moved from left to right.
-
Page 9: Connection Of The Power Cord
Installation instructions 2. If you have both cold and hot water supplied, connect the inlet hose by cold to cold and hot to hot. WATER INLET HOSE CONNECTING NUT Unscrew the lid of hot water connector in water mixing valve, and then connect the other end of water inlet hoses to the COLD WATER HOT WATER... -
Page 10: Wiring Diagram
Wiring Diagram Microcomputer Programmer safety switch water level switch pump plug y/gr b-blue bl-black br-brown g-gray gr-green o-orange p-purple r-red w-white y-yellow C-capacitance L-inductance IV-inlet valve Ms-drain water motor assembly Operation instructions Preparation 1.Connect the water inlet hose 2.Plug in the power cord. 3.Insert the end of the drain hose into the hook shelf, and hang the to the water faucet. - Page 11 Operation instructions Step one: S witch on the power supply. Press the POWER button and the digital indicator will show It means that the washing machine will select the fuzzy program, if you press down "START/PAUSE" button, the washing machine will automatically running and then select the exact water level, wash time, spin time and water current according to the quantity and quality of the wash laundry itself.
- Page 12 Operation instructions Step six: Start the washing machine Press "START/PAUSE" button, the washing machine will buzz and run automatically. Please close the wash lid completely (otherwise, the machine will stop running when it go to the spin program and give alarm.) Note: If you want to change the program when the washing machine is running, you must press the...
- Page 13 Operation instructions dosage of detergent Draw out the detergent case. Put detergent into the detergent case and extent it evenly. Close the case, the detergent will be automatically dissolved into water when the washing machine begins to run. Normal dosage of detergent dosage of detergent(g) Water level Slight dirty...
-
Page 14: Safety Instructions
Safety instructions Never use the plug as shown. Do not only hold the cord Do not let children to play while pulling out the plug. with the machine. Do not put hands into the Do not clean the body of washer Keep the washing machine rotating tub. -
Page 15: Maintenance Instructions
Maintenance instructions Clean the filter in the inlet valve Clean the filter in the inlet valve regularly in order to prevent it from clogging 1.Unplug the power cord first. 2.Take off the inlet hose and clean the filter with a brush. Clean the lint filter 2.Clean and rinse it thoroughly. -
Page 16: Troubleshooting
Troubleshooting Troubles Checklist Fail to drain Is drain hose placed properly from 0.7m to 1.2m above floor level? Drain time passed 10 min. Is the drain frozen or blocked? Washing machine will buzz and display "E1". Spin malfunction Please call the technician to check if the safety switch is damaged or Spin doesn't start after drain, not. - Page 17 CAUTION: If this appliance is supplied with a cord extension set or and electrical portable outlet device, the cord extension set or electrical portable device must be positioned so that it is not subject to splashing or ingress or moisture. The appliance is not intended for use by young children or infirm persons without supervision.
Need help?
Do you have a question about the XQB50-808GF and is the answer not in the manual?
Questions and answers