
Subscribe to Our Youtube Channel
Summary of Contents for EchoLab MVS3
- Page 1 MVS3 Operator's Manual Revision 1 This manual is intended for use with ECHOlab's model MVS3 broadcast television switcher, with software version 4.x and higher. Last manual revision: 08-30-96...
-
Page 2: Table Of Contents
TABLE OF CONTENTS INTRODUCTION ...................... 4 INSTALLATION......................5 Rack mounting....................5 Battery Backup....................5 Power......................5 Sync ........................ 5 Video Inputs ....................6 Video Outputs ....................6 Control Panel connections................6 Keys ........................ 7 Key Delay......................7 Common installation questions................. 8 1. - Page 3 Ramp generators .................. 39 Rotary wipes ..................40 Calibration registers................41 Post-production ....................42 PROGRAMMING ...................... 43 Setups......................43 INTRODUCTION page 3...
-
Page 4: Introduction
(Commands) with an alphanumeric display for ease of use. A SMPTE-protocol serial link is available for edit controllers. The MVS3 is built on two 12 x 14" printed circuit cards. Computer, sync and key generation circuits are on the lower card; the upper card(s) holds all video circuits. A small daughterboard holds the genlock sync card;... -
Page 5: Installation
INSTALLATION Rack mounting The MVS3 is packaged in a 5 1/4" H x 14" (13.5 x 35 cm) deep rack mount chassis and a 8 3/4" (22.25 cm) control panel. The chassis is equipped with rear supports which should be used to support the weight of interconnection cables: The control panel may be installed in 8 3/4"... -
Page 6: Video Inputs
Sync modes - Command 6 MODE OPERATION Subcarrier Horizontal and vertical sync are locked to the external genlock input. Subcarrier is free-running, generated from the internal crystal oscillator. Internal Color burst and sync generated internally. Genlock Burst and sync are locked to an external NTSC (or PAL) signal connected to the GENLOCK input. -
Page 7: Keys
The Effects keyer and the DSK keyer will accept 1v standard monochrome key signals. Two different types of key signals are accepted by the MVS3, high-gain and linear keys. HIGH-GAIN This is the conventional key signal, which has been in use for many years. -
Page 8: Common Installation Questions
When in calibration mode with a cal. command called up the display will show the current value for that command. For the MVS3 the cal. value(s) can be modified with the appropriate SYMM, BORDER, and CLIP knobs. Alternately the selected cal. -
Page 9: Where Should I Connect My Key Cuts And Fills
The MVS must have a valid terminated composite source connected to its genlock input and a valid test signal (preferably color bars) coming into an input from the same reference source (sync generator).Verify that the MVS sync source command #6 is set to genlock (this is it's factory default). Select the reference source (color bars) that you are going to time the MVS to on all busses. -
Page 10: What About Signal Formats
(on revision D and later) providing you have a sufficient number of video boards in the MVS (one for composite, two for Y/C, and three for component). Please note that you should consult ECHOlab prior to making any upgrades or reconfiguration of your system to verify board compatibility and discuss specifics of areas of... -
Page 11: How About Options
SMPTE editing interface, rotary wipe package, memory expansion, etc.,and can be added by entering a code supplied by ECHOlab. Others, such as Chromakeyer are plug in option cards. Now for some troubleshooting questions. 6. My control panel shows "DISCONNECTED"... -
Page 12: How Do The Gpi's Work
• Make sure you are connected to the MVS edit port. • If all this fails contact ECHOlab or the edit manufacturer for further assistance. 8. How do the GPI's work ? There are four GPI inputs on the MVS. Three are dedicated and one is command selectable. -
Page 13: How Do I Adjust Subcarrier Frequency
9. How do I adjust subcarrier frequency ? If an MVS, operating in genlock, fails to subcarrier lock or falls out of lock after warming up, the internal subcarrier frequency may need to be adjusted to match the genlock reference source’ s frequency. For optimum adjustment, the following procedure should be performed after the MVS chassis and the genlock reference source have been allowed to reach normal operating temperature. -
Page 14: Tally Connector
Tally Connector Tally connections for camera's 1 through 8 are brought out on the nine-pin D connector marked TALLY. The pinout for this connector is shown below. Also shown is a typical wiring topology for using the MVS open-collector tally outputs. The tally connections function by providing an open collector output that provides a short to ground when selected (1/2 amp, 30V max.). -
Page 15: Gpio Connector
GPIO Connector Connections for GPI's 1 through 4, GPO's 1 and 2, as well as tally connections for cameras 9 and 10 are brought out on the nine-pin D connector marked GPIO. The pinout for this connector is shown below. The GPO and tally connections function by providing an open collector output that provides a short to ground when selected (1/2 amp, 30V max.). -
Page 16: Error Lights And Messages
Error lights and messages Four LED lights can be seen at the CPU card edge by lowering the chassis front panel. These monitor, from left to right: ERROR 1. +5v LIGHTS 2. unused 3. unused 4. diagnostic, flashes Also, several system malfunctions are reported in the control panel display: DISPLAY MESSAGE MEANING * WARNING * The original... -
Page 17: Options
Software options not installed by the factory can be added in the field. Have your dealer call ECHOlab with the ID number of your MVS3 and a purchase order number. Command 24 displays your unique ID number. ECHOlab will then give you a nine digit number that will install your desired option...key this number into the display... -
Page 18: Production
PRODUCTION Video Functional Diagram PRODUCTION page 18... -
Page 19: Overview
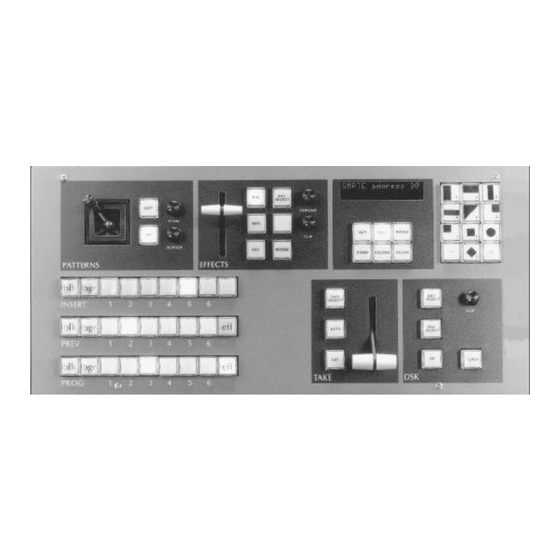
As the EFFECTS lever is moved, source 2 will wipe into the preview picture. In normal use, the MVS3 control panel will display all operations on its display. Refer to this display for setting functions such as TAKE SELECT, and to check the value of a transition rate or pattern number. -
Page 20: Dsk
The downstream keyer can be used to fade the output picture to black, or to add titles. Press BLACK to fade the to and from black. Press DSK to fade the downstream key. To add a key to the program picture with the DSK, first select an active SELECT key signal using the KEY SELECT button. - Page 21 FILL Press the FILL SELECT button to cycle through: SELECT DskFil Blk Black DskFil Bgr Background color DskFil Cam1 Camera 1 DskFil Cam2 Camera 2 DskFil Cam3 Camera 3 DskFil Cam4 Camera 4 DskFil Cam5 Camera 5 DskFil Cam6 Camera 6 DskFil Cam7 Camera 7 DskFil Cam8...
- Page 22 Press the RATE button twice to see the rate at which the DSK key will be RATE faded on and off the screen. The display is normally in seconds and frames: Dsk 01:00 The rate can be changed when in the display by use of the + and - buttons. Or, key in a new rate in seconds and frames using the numeric keypad and press the RATE button again.
-
Page 23: Take
Take The take controls perform a transition between the picture currently on the program monitor and the picture on the preview monitor. A variety of transitions can be used. AUTO With the DSK turned off, press the AUTO button to perform a one-second take to the preview picture. - Page 24 BORDER Use command 39 to add a border to the take. The default border color used is border color, but either of the other two colorizers can be selected for use with Command 32. See details in the Commands section of the manual.
-
Page 25: Busses
Busses PROGRAM Pressing any PROGRAM bus button (except EFF) places that source on air and illuminates its button. PREVIEW The preview bus selects the "background" picture for the preview monitor. This can be either black, the "BGR" color background generator, or a video source. Pressing any of these buttons selects that source, and illuminates the bus button. -
Page 26: Patterns
Patterns The pattern controls specify the shape and position of wipe patterns and the border color and width. The SYMM and BORDER knob are also use along with the CLIP knob in the effects section to adjust colorizers when the COLORS button is illuminated. BORDER To change the color used for borders, press the COLOR button in the COLOR... - Page 27 + & - buttons. A lower number will make a softer wipe. The MVS3 has a unique feature to minimize wipe deadband. Other switchers will exhibit wipe lever deadbands of up to 50% with some types of wipes such as repositioned square and circle wipes.
-
Page 28: Effects
Effects The effects generator controls the way the insert bus is combined with the preview or program bus picture. The three basic ways that the pictures can be combined are mix, wipe, and key. Also, combinations of these effects are possible. To mix to the insert picture, press MIX to illuminate it and use the lever as a mix control lever. - Page 29 REVERSE The REVERSE button is used to select the direction of the wipe pattern: NORMAL (N) : Patterns will start in the center of the screen and wipe to the edges REVERSE(R) : Patterns will start at the edges of the screen and wipe into the center N/R: Wipe patterns will alternate between the two styles Press the REVERSE button to cycle between the three styles.
-
Page 30: Buttons Under The Display
Buttons under the display PATT Press the PATT button to display the currently selected pattern number used for the effects pattern. Or alternately, to change the currently selected pattern, key in a new pattern number (1-60) into the display and press the PATT button. -
Page 31: Commands
Commands Commands are performed by entering the command number into the numeric keypad, and pressing COMM. Enter the command number on the numeric keypad, then press COMM, then + or - to make selection. System Reset ........clears sequences and setups and do Comm 1 Command Reset............ - Page 32 A more detailed explanation follows: Comm # Command name Command description System reset Erases setups, sequences, and do command 1 (for protection, CLEAR must also be held down) Command reset Reset commands to boldface and underlined Time display mode Rates can optionally be displayed in frames. Two and a half seconds would appear as 2:15 if displayed as SSFF/FFFF seconds and frames, or as 75 if displayed as frames...
- Page 33 Set video mode This command determines how the switcher will generate its internal sources for distribution to the video board(s). Choices are composite, Y/C, and component. Make sure this selection matches the video format you are working with. Set sync proc on/off This command determines whether the switcher re- inserts blanking and sync onto its outputs.
- Page 34 Set GPO1 mode There are two general purpose output triggers on the MVS3 Each output trigger can be programmed to be on, off, or pulsed on (approx. 150 ms pulse.) This command sets the desired mode for the 1st output trigger.
- Page 35 Try adjusting this command for supersoft take transitions. Take border fill The MVS3 can use any of its three color generators for TAKE border fill. This command is normally left set to the border color, but background or DSK color can be alternatively selected.
- Page 36 Take border size Use this command to add border to a take transition. Note that the desired border color source is set using command 32. DSK preview Turn this command on to preview a DSK key on the DSK monitor. This will allow a DSK key to be adjusted for clip and gain even if the DSK keyer is off on the program monitor.
-
Page 37: Calibration Commands
Calibration commands The MVS3 has about 40 computer-generated voltages which substitute for conventional trimmers. The commands below can be used to recalibrate the unit from the front panel. There are four sets of calibration registers. The current set is permanently changed when a calibration command is adjusted, and can be saved in the user set with Command 401. -
Page 38: Colorizers
A more detailed explanation follows: Colorizers BGR color Null R-Y Null B-Y BDR color Null R-Y Null B-Y DSK color Null R-Y Null B-Y Zero phase Luminance Saturation The three color generators can be very accurately set to provide precise colors. -
Page 39: System Timing
System timing Burst Amplitude PAL phase NTSC phase Horzizontal Phase Blank width Command 107 sets the phase and amplitude of the internally generated black burst which is used for sync re-insertion. The burst can be coarsely calibrated by eye, but for accurate results a vectorscope should be used on the preview output with a colorbar test signal selected on the preview bus. -
Page 40: Rotary Wipes
Rotary wipes Rotary wipes pivot/closure H charge Pat 57 (H) Pat 57 (V) Pat 59 V charge Pat 58 (H) Pat 58 (V) Pat 60 Command 117 is used to calibrate all rotary patterns. Command 117 stores one calibration value for each pattern; the value is set in the steps below. Commands 119 and 120 store four additional small adjustments for all patterns. -
Page 41: Calibration Registers
f) Select Command 117 and adjust SYMM so points just close. g) Retest 3b and 3f and adjust if needed. 3. Adjust remaining offsets: a) Select pattern 59 and set wipe lever to 50. Select Command 119. Adjust SYMM to center pattern (horizontal start offset) b) Select pattern 60 and set wipe lever to 50. -
Page 42: Post-Production
5. Check device address used by edit controller and use Command 18 to reset MVS3 address if necessary. 6. Use Command 20 to check that MVS3 cycles through Idle to Active and Selected. This checks out the data path from edit controller to MVS3, and the device address. -
Page 43: Programming
PROGRAMMING The MVS3 has a non-volatile memory system that allows the user to save and recall all the controls on the panel. The panel memory saves are known as Setups. Setups Nine full panel setups can be saved by the MVS3. The memory expansion option raises this number to 99. - Page 44 EDITING Recall the setup to be edited by pressing # and RECALL SETUPS PANEL, where # is the setup number, make the changes desired, and resave the setup. SETUP Save and recall panel setup 1 and 2 as a square and a circle: EXAMPLE 1.
Need help?
Do you have a question about the MVS3 and is the answer not in the manual?
Questions and answers