Table of Contents
Advertisement
Advertisement
Table of Contents

Summary of Contents for Jands StageCL
-
Page 1: Quick Start
Made for LEDs Quick Start Version 1.3 Software... - Page 2 Information contained in this manual is subject to change without notice and does not represent a commitment on the part of the vendor. Jands Pty Limited shall not be liable for any loss or damage whatsoever arising from the use of information or any error contained in this manual. It is recommended that all service and repairs on this product be carried out by Jands Pty Limited or its authorised service agents.
-
Page 3: Table Of Contents
Appendix 1: Specifications ............. 14 1. Welcome to the Stage CL Welcome to the Quickstart Guide for the Jands Stage CL lighting console. This guide is intended to give you the minimum information you need to get your Stage CL up and running as quickly as possible. The full User Manual available on the Jands website at www.jands.com. -
Page 4: Getting Started
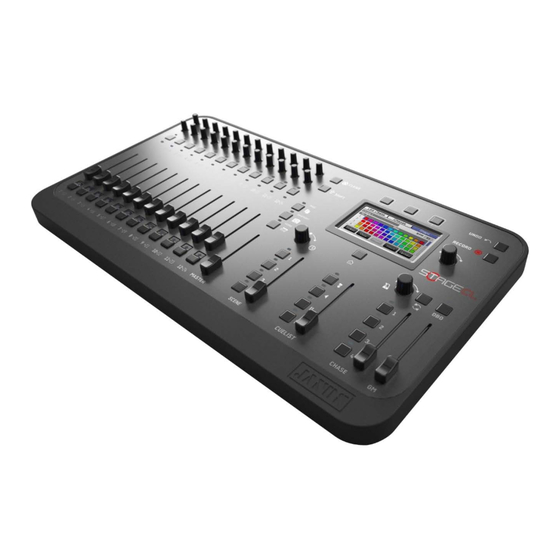
2. Getting started Setting up the console Cable Restraint Power Switch DMX Port Power LED Ethernet Port Microphone Power Input Kensington Lock Point USB Ports Power Connect the Stage CL’s external power supply unit to any mains supply between 100 and 240VAC. Connect the power supply’s DC connector to the Stage CL. Feed the cable into the slot in the cable restraint. -
Page 5: Switching On
Switching on When you switch the console power on the Stage CL starts up and displays the opening splash screen while it loads the program. Once it finishes loading, Stage CL displays the Home screen. If this is the first time you’ve started Stage CL not all the buttons will be available. -
Page 6: Patching Your Lights
Home Button The Home button is located underneath the touch screen. Press this button at any time to return to the Home window. 3. Patching your lights Once you've connected and powered up your Stage CL system you can patch up to 24 fixtures (or groups of fixtures). - Page 7 Adding to the Fixture Library If you can’t find the fixture you want to use in the Stage CL patch window you can create your own. To do this: Select the Library tab in the Patch window. Stage CL opens the Fixture Library window.
- Page 8 Repeat these steps for the other fixture channels. When you are finished press the Save button at the top of the window. Stage CL saves the new fixture in the ‘My Fixtures’ folder. The ‘Other’ feature is used for fixture channels that need to be set to a static value for the fixture to operate correctly, like macro and mode channels.
-
Page 9: The Console Controls
4. The console controls Console layout Stage CL consoles provide all the faders, encoders, switches and displays you’ll need to control your lighting rig. Fixture controls Encoder Touch screen Master controls The Stage CL is divided into three main sections: •... -
Page 10: Using The Fixture Controls
Adjusts the saturation (whiteness) of the fixture. For example if you had set a Red colour you can use the saturation control to adjust from a pure red through a pale red to white. Can also be used for other parameters. Adjusts the Hue (colour) of the fixture. -
Page 11: Scene And Chase Controls
Saturation controls Pressing the Saturation encoder toggles the selected fixtures from full saturation (full colour) to zero saturation (white). Select buttons If you want to adjust the colour of more than one fixture, press the select button on all the fixtures you want to change. Then adjust the Hue and Saturation controls on any of the selected fixtures. -
Page 12: Cuelist Controls
The LED above each button will be off if nothing is stored there, blue if something’s stored there but is not active, or will flash blue slowly if the scene or chase is active. They'll also flash red when record has been pressed and they’re empty. -
Page 13: Other Controls
Other controls Snapshot Press this button to take a ‘snapshot’ of the console output. The console will hold that output until the button is pressed again. Only the Grand Master and DBO controls have an effect on the Snapshot output. This means you can take a snapshot, then adjust any other controls, including the fixture controls, without affecting the look on stage. -
Page 14: Recording
5. Recording Recording data for playback generally involves the following steps: Set up a look on your lights. Press the Record button. The LEDs associated with the empty record locations will start flashing red. If necessary change the fixtures that will be recorded by pressing the channel select buttons on each fixture page. -
Page 15: Playback
The wrong type of fixture is patched – go into the patch and check the • fixtures that are patched match those that are connected to the StageCL. • The DMX addresses don’t match the addresses of the patched fixtures –... -
Page 16: Appendix 1: Specifications
Appendix 1: Specifications Inputs & Outputs Description Type Pin Outs Function DMX 512 5 pin Female AXR Shield Data – Data + 4, 5 Unused Ethernet RJ-45 Transmit + (100BaseT) Transmit – Receive + 4, 5 Unused Receive – 7, 8 Unused USB (2 x) Type A...
Need help?
Do you have a question about the StageCL and is the answer not in the manual?
Questions and answers