McIntosh MPC1500 Owner's Manual
Power controller
Hide thumbs
Also See for MPC1500:
- Owner's manual (32 pages) ,
- Service manual (18 pages) ,
- Service manual (18 pages)
Table of Contents
Advertisement
Quick Links
Download this manual
See also:
Owner's Manual
Advertisement
Table of Contents

Related Manuals for McIntosh MPC1500


Summary of Contents for McIntosh MPC1500
- Page 1 Power Controller MPC1500 Owner’s Manual Torus Power Technology under license from Plitron Manufacturing Inc. McIntosh Laboratory, Inc. 2 Chambers Street Binghamton, New York 13903-2699 Phone: 607-723-3512 FAX: 607-724-0549...
-
Page 2: Safety Instructions
The lightning flash with arrowhead, The exclamation point within an within an equilateral triangle, is equilateral triangle is intended to intended to alert the user to the alert the user to the presence of im- presence of uninsulated “danger- portant operating and maintenance ous voltage”... -
Page 3: Table Of Contents
MPC1500 Power Controller. If at any time you have questions about your McIntosh 2. The Main AC Power going to the MPC1500 and any product, contact your McIntosh Dealer who is familiar other McIntosh Component(s) should not be applied with your McIntosh equipment and any other brands that until all the system components are connected together. -
Page 4: Connector And Cable Information
Turn-On/Off of the McIntosh MPC1500 with your McIn- the incoming AC Line for the components connected to it. tosh System. The MPC1500 helps to assure the sound and video repro- duction from your McIntosh System is the best it can be, • Extruded Side Panels totally transparent and absolutely accurate. -
Page 5: Dimensions
Dimensions Dimensions The following dimensions can assist in determining the best location for your MPC1500. There is additional information on the next page pertaining to installing the MPC1500 into cabinets. " 44.45cm Front View of the MPC1500 " " 19.37cm 18.10cm... -
Page 6: Installation
Installation Installation The MPC1500 can be placed upright on a table or shelf, below the bottom and 1 inch (2.54cm) on each side of the standing on its four feet. It also can be custom installed in Power Controller, so that airflow is not obstructed. Allow a piece of furniture or cabinet of your choice. -
Page 7: Rear Panel Connections
OUTLETS OUTLETS Connect the MPC1500 power cord to a live AC outlet. Refer to informa- tion on the back panel of your MPC1500 to deter- mine the correct voltage for your unit SWITCHED AC SWITCHED AC SWITCHED AC SWITCHED AC... -
Page 8: How To Connect In A Two Channel System
Information” on page 3 and “Connector and Cable Infor- plied AC Cord, mation” on page 4. connect the 1. Connect a Control Cable from the MPC1500 GLOBAL MPC1500 di- POWER CONTROL IN Jack to the Power Control Main rectly to an AC Out Jack on the Preamplifier. -
Page 9: How To Connect In A Multi Channel System
In the following example two of the four SWITCHED AC ACC Power Control Out Jack. OUTLETS on the MPC1500 will operate differently from 4. Connect a Control Cable from the MPC1500 GLOBAL the default settings. For additional information refer to POWER CONTROL OUT Jack to the Power Control In “How to Operate”... -
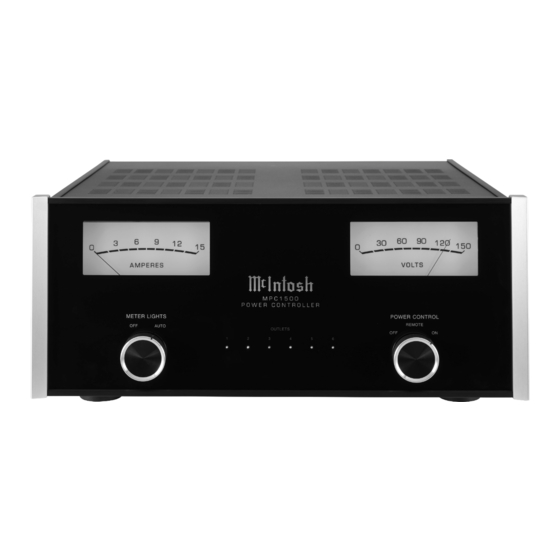
Page 10: Front Panel Displays And Controls
Front Panel Displays and Controls Meter indicates the total Meter indicates the outgo- current consumed by the ing AC Line Voltage components connected to the MPC1500 OUTLETS OUTLETS LEDs indicate the active AC Outlet(s) METER LIGHTS Switch POWER CONTROL selects Meter Illumination... -
Page 11: How To Operate The Mpc1500
Audio, Video or Audio/Video System. There are two examples of connecting and using the MPC1500 on pages 8 and 9 of this Owner’s Manual. By becoming familiar with the “How to Operate” section of this Owner’s Manual many additional connection and operation possibilities will become apparent. - Page 12 How to Operate the MPC1500, con’t How to Operate, con’t OUTLETS OUTLETS OUTLETS OUTLETS OUTLETS OUTLETS OUTLETS OUTLETS Figure 5 Figure 6 Figure 7 Rear Panel Switch in the LCL Position. Refer to figure 6. The last option is to have the AC Outlets number 3 thru 6 On all the time by placing the Rear Panel Switch in the ON Position.
- Page 13 Notes...
-
Page 14: Specifications
Specifications Specifications Output Voltage 120 Volts AC Nominal Load Regulation ± 2.5 % Power Requirement 120 Volts, 60Hz 12.0 Amps, maximum current 1440 Watts, maximum power Overall Dimensions Width is 17-1/2 inches (44.45cm) Height is 7-5/8 inches (19.37cm) including feet Depth is 22 inches (55.88cm) including the Front Panel, Knobs and Cables Weight... -
Page 15: Packing Instructions
#10 x 2-1/2 inch wood screw carton or any of the interior part(s) are needed, please 404033 #10 flat washer 1-3/4 inch call or write Customer Service Department of McIntosh Laboratory. Refer to page 3. Please see the Part List for the 017937 Plastic foot correct part numbers. - Page 16 McIntosh Laboratory, Inc. 2 Chambers Street Binghamton, NY 13903 The continuous improvement of its products is the policy of McIntosh Laboratory Incorporated who reserve the right to improve design without notice. Printed in the U.S.A. McIntosh Part No. 04109200...
Need help?
Do you have a question about the MPC1500 and is the answer not in the manual?
Questions and answers