Advertisement
Quick Links
Thank you for purchasing the new generation of professional weather station. Designed and engineered with the
state-of-art technology and components, this instrument will provide accurate and reliable measurement of wind
speed & direction, wind chill, daily/weekly/monthly/accumulated rainfall, barometric pressure, weather forecast,
indoor/outdoor humidity, temperature, heat index & dew point as well as radio-controlled alarm clock. Read this
manual carefully to fully explore the features and functions of the new product.
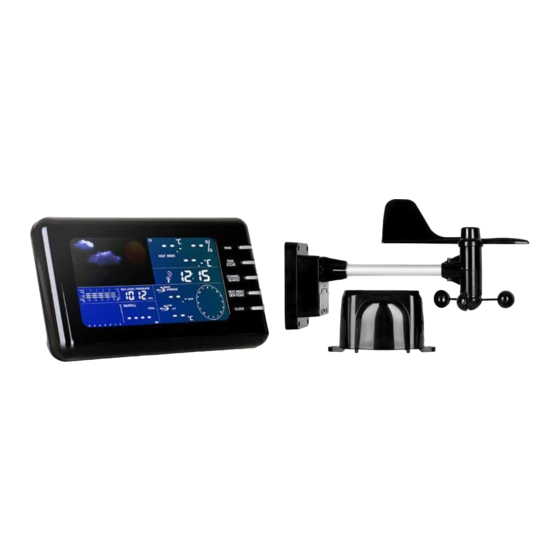
In this package you will find:
- 1 monitor (Receiver)
- 1 anemometer (Transmitter – transmit wind & outdoor Channel-1 temperature/humidity data)
- 1 rain gauge (Transmitter – transmit rainfall data)
- Mounting hardware for rain gauge (2 sets of screws & plastic screw plugs)
- Mounting hardware for anemometer (2 pieces of U-shape metal plate, 4 sets of Hex screws & nuts)
- 1 owner's' manual
- 3 pieces AAA batteries for monitor (included)
- 2 x 2 pieces AA for anemometer + rain gauge (included)
- 1 6.0V adapter (included)
Additional tools needed for installation:
- Small screwdriver
- Hexagonal Key
- Electric drill
- Pencil
- Level
- Mast, 1 – 1.25 inch (2.54 – 3.18 cm) in diameter (to mount the anemometer)
1/ INSTALLATION
The weather station operates at 433MHz and does not require wire installation among the component parts. To
ensure successful installation and the best performance, we recommend you follow the installation instructions in
the order they appear in this manual.
1. Battery & adapter installation for the monitor (receiver)
Main Power source: Plug in the adapter jack into the back side of the unit for basic operation and continuous
backlight.
Backup Power: Open the battery door and insert 3 pieces of AAA batteries according to the polarity indicated,
close the battery cover.
Sea level pressure setting
After battery/adapter installation, the monitor will enter sea level pressure setting mode directly and the pressure
reading will flash. Press "▲" or "▼" to set the sea level pressure value. Press "PRESSURE" to confirm the setting
and exit. This allows the unit to provide a more accurate weather forecast & pressure reading.
You can also set the sea level pressure any time after the installation is completed. For more information, see
"WEATHER FORECAST & BAROMETRIC PRESSURE" section.
Note: you may obtain the current sea level pressure from the weather web site for your locate area.
PROFESSIONAL WEATHER STATION
Ref.: SM55PRO
- Owner's Manual -
ENGLISH
Advertisement

Related Manuals for Inovalley SM55PRO


Summary of Contents for Inovalley SM55PRO
- Page 1 ENGLISH PROFESSIONAL WEATHER STATION Ref.: SM55PRO - Owner’s Manual - Thank you for purchasing the new generation of professional weather station. Designed and engineered with the state-of-art technology and components, this instrument will provide accurate and reliable measurement of wind speed &...
- Page 2 2. Selecting a location for the anemometer Select a mounting location for the anemometer that is: - Outdoors, not blocked on top or sides, so wind can freely reach the anemometer - Within 50 meter (164 feet) open area from the monitor. Reduce distance if obstacles is between the anemometer &...
- Page 3 4. Calibrating the anemometer & installing batteries After mounting the anemometer, follow these steps to calibrate the wind direction so that the anemometer properly measures the wind direction and transmit to the monitor. Be sure battery has been removed from the anemometer before the calibration.
- Page 4 5. Selecting a location for the rain gauge Select a mounting location for the rain gauge that is: - a flat, level surface and look for a location where the rain gauge can be placed 1 meter or more above ground level.
- Page 5 3. Drill a hole in the center of each marked location and insert the supplied plastic screw plugs 4. Hold the rain gauge against the mounting surface so the holes on the base are aligned with the plugs, then thread the supplied washer head screws into each hole and use a screwdriver to tighten them. 8.
- Page 6 Search for Radio-Controlled time ZONE Toggle RC time & Zone time / Zone time setting 3/ CONNECTING WITH REMOTE SENSORS The weather station uses 433MHz radio signals to send and receive weather data between the monitors and remote sensors. After battery/adapter installation, the monitor will automatically search for remote sensors. You can also enforce a searching mode by holding “CHANNEL/SEARCH”...
- Page 7 As weather conditions cannot be 100% correctly forecasted, we cannot be responsible for any loss caused by an incorrect forecast. SUNNY PARTLY CLOUDY CLOUDY RAINY STORMY To obtain an accurate weather forecast & barometric pressure reading, you need to input your current local sea level pressure.
- Page 8 Press “RAIN” to select daily, weekly or monthly rainfall display mode. Press “RAIN HISTORY” repeatedly to scroll through the current & last 6 days/weeks/months data corresponding to your selected rainfall mode. On the bar chart display, the “0” represents the current period. –1, –2, etc indicate the prior periods. The precise rainfall reading of the selected period will be shown on the display.
- Page 9 64 & 13.7 & Air filled with foam; sea completely white with 45 & over Hurricane over over driving spray; visibility greatly reduced (Reference table based on observations of the effects of the wind) 12/ WIND CHILL Wind chill is the apparent temperature felt on exposed skin due to the combination of air temperature and wind speed.
- Page 10 icon flashes. If reception continues to fail, try other locations later. Place the unit away from source of interference such as mobile phones, appliances, TV etc. To disable the radio-controlled time reception and stop the daily synchronization, continue pressing until the antenna icon disappears.
- Page 11 Never mix zinc batteries with alkaline batteries or rechargeable batteries - The batteries must be removed from the device - Also, remove the batteries from your device if you do not use it for a long time, if the batteries may leak and cause damage.
Need help?
Do you have a question about the SM55PRO and is the answer not in the manual?
Questions and answers