
Related Manuals for Polyaire Zonemaster Airtouch

Summary of Contents for Polyaire Zonemaster Airtouch
- Page 1 AIRTOUCH ZONE CONTROL SYSTEM User Manual www.polyaire.com.au ©2013 Polyaire Pty Ltd...
-
Page 3: Table Of Contents
Liability Please read the instructions before installing this Zonemaster Zoning Control System. Polyaire Pty Ltd does not accept any responsibility for loss or damage that may occur as a result of the incorrect installation of this Zonemaster Control System. ZONEMASTER AIRTOUCH ZONE CONTROL SYSTEM - User Manual... -
Page 4: Features
Turbo function will give the selected group a full-opening while all other groups’ (dampers) opening positions are reduced by 50% of their open percentage value. This will bring a large volume of extra air into the designated area and cool or heat the area quicker. ZONEMASTER AIRTOUCH ZONE CONTROL SYSTEM - User Manual... -
Page 5: Wall Controller Layout (Touch Screen)
• Clean the touch screen, use a dry, soft cloth and very gently wipe the screen. If necessary, dampen the cloth with distilled water or with an equal ratio of distilled water to white vinegar. ZONEMASTER AIRTOUCH ZONE CONTROL SYSTEM - User Manual... -
Page 6: Manual Ac/Group Control
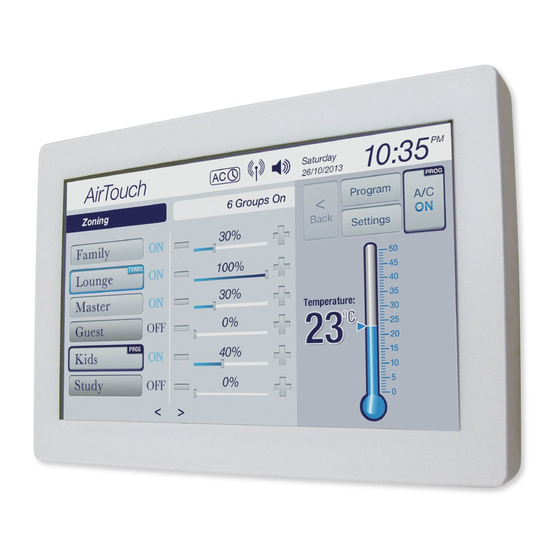
“supply Air Safety High & Low Limits” in the installation manual. 3.2 Group On/Off/Turbo a) On the home screen, touch a group button (Figure 2) to change the on/off group status and the dampers of the group will open or close accordingly. Figure 2 b) The group status can be set to ‘TURBO’ active when the group is specified as a turbo group (refer to 5.4) and the grey turbo indicator will turn blue to indicate the TURBO function is active. Figure 3 shows the group status sequence alternated by touching the group button. Figure 3 c) Up to 6 group buttons are shown in one screen and touch < or > to bring up previous or next page. ZONEMASTER AIRTOUCH ZONE CONTROL SYSTEM - User Manual... -
Page 7: Adjusting Airflow For A Group
Monday to Friday 6.30AM 8.00AM 5.30PM 10.00PM Saturday 7.30AM 12.30PM 6.00PM 11.30PM Sunday 7.30AM 12.30PM 6.00PM 11.30PM NOTE: The Turbo function cannot be programmed. It is activated manually from the touch screen as needed. ZONEMASTER AIRTOUCH ZONE CONTROL SYSTEM - User Manual... -
Page 8: Set Program
Touch a day option radio button to select Monday-Friday, Saturday or Sunday program to modify. Touch the time switch radio button on the right to enable/disable ON/OFF time. c) Touch the hour, minute or AM/PM field on the screen to highlight it, and then the buttons will appear on the screen (Figure 6). Touch or buttons to adjust the time. NOTE: After an edit field is Figure 6. highlighted, touching that area again will quit from the editable status and will disappear. ZONEMASTER AIRTOUCH ZONE CONTROL SYSTEM - User Manual... -
Page 9: Select Program For A Group Or Ac
After selection the program indicator will appear on the group or AC button (Figure 10) if any of the four events in the program is enabled. NOTE: Programs cannot be assigned to a group with turbo status. Record programs and groups to ‘Table 5: Programs’ on Page 17 Figure 9. Figure 10. ZONEMASTER AIRTOUCH ZONE CONTROL SYSTEM - User Manual... -
Page 10: Ac Timer
AC timer function is different from the program function, the enabled timer will act once and will not repeat. If you want the action repeated at the same time, you may look at programs. ZONEMASTER AIRTOUCH ZONE CONTROL SYSTEM - User Manual... -
Page 11: User Settings
Figure 14. name, Turbo group, temperature display and touch tone. WiFi Setup The instructions in this section demonstrate how to connect AirTouch to a home router, which will enable the operation of AC unit and zoning via Wi-Fi and internet. When selecting a position for the AirTouch main module Figure 15. to be installed, please make sure it is within the effective cover range of the home WiFi router which the AirTouch will be connected to. This will ensure reasonable WiFi signal strength and provide a reliable connection between AirTouch and the home router. It is highly recommended to undertake this setup by placing the AirTouch main module as close as practical to the router, ideally about 1.5 to 2 metres, before installing the main module. ZONEMASTER AIRTOUCH ZONE CONTROL SYSTEM - User Manual... - Page 12 Touch to start scanning for available Wi-Fi networks/routers Figure 18. (Figure 19). NOTE: The system will scan and display two WiFi network SSIDs each time, so it will be more efficient if the correct SSID is input before scanning. Figure 19. ZONEMASTER AIRTOUCH ZONE CONTROL SYSTEM - User Manual...
- Page 13 On completion of the scan, up to two found routers with their SSIDs starting with the input characters will be displayed (Figure 20). Touch the desired router’s name and then go to next step. If the desired router is not in the list, go back to b). e) Touch the password edit field Figure 20. (Figure 21) to enter the password of the Wi-Fi network. Touch to confirm the password input. f) Touch (Figure 23) to connect the desired WiFi network. ‘Connecting’ will appear on the screen (Figure 24). Figure 21. Figure 22. Figure 23. Figure 24. ZONEMASTER AIRTOUCH ZONE CONTROL SYSTEM - User Manual...
- Page 14 The Wi-Fi logo will appear on the status bar after connecting Figure 25. to the WiFi network (Figure 27). The connection will stay permanent till the setting changes on the home router such as SSID, password, security levels, filters and others. The connection will automatically resume after power off and on cycle. Now you can run AirTouch Figure 26. applications on your smart devices to control AC or zoning. Figure 27. ZONEMASTER AIRTOUCH ZONE CONTROL SYSTEM - User Manual...
-
Page 15: Time/Date Setup
Setting page. Owner’s Name Figure 29. Owner’s name is used by mobile apps to distinguish different AirTouch if more than one system installed in the same house. It will also be displayed on the web page when you access the AirTouch via internet. The maximum length of the name is 16 letters. Go to ‘User Settings’ screen (Figure 15). Touch ‘Owners Name’ to change the owner’s name by using the keyboard shown on the screen (Figure 30). Touch to switch between lower case and upper case and touch to confirm the name or Figure 30. touch to cancel the change. ZONEMASTER AIRTOUCH ZONE CONTROL SYSTEM - User Manual... -
Page 16: Turbo Group
‘turbo’ on the home screen (3.2). Temperature Display Touch the radio button of to enable or disable the temperature display on the touch screen. Below images show the enabled status (Figure 32) and disabled status (Figure 33) of temperature display. Figure 32. Figure 33. Touch Tone The touch tone feature allows to either enable or disable the tone when the screen is touched. It is disabled as default and will display a mute logo on the screen. Touch the radio button of to switch the touch tone on/off. ZONEMASTER AIRTOUCH ZONE CONTROL SYSTEM - User Manual... -
Page 17: Information Sheets
6) Information Sheets These should be filled out by the installer Table 1: System Configuration Bypass Damper Supply Air Sensor Total Groups Installed Installed Yes/No Yes/No Table 2: Grouping Group Group Name Zones Included Turbo Function ZONEMASTER AIRTOUCH ZONE CONTROL SYSTEM - User Manual... - Page 18 Zone 5 Zone 6 Zone 7 Zone 8 Zone 9 Zone A Zone B Zone C Zone D Zone E Zone F Zone G Table 4: Installer Details Installer Contact Number Date ZONEMASTER AIRTOUCH ZONE CONTROL SYSTEM - User Manual...
- Page 19 On time 1 Off time 1 On time 2 Off time 2 Monday-Friday Saturday Sunday Groups/AC PROGRAM 4 On time 1 Off time 1 On time 2 Off time 2 Monday-Friday Saturday Sunday Groups/AC ZONEMASTER AIRTOUCH ZONE CONTROL SYSTEM - User Manual...
-
Page 20: Troubleshooting Guide For Touch Screen
• *Check if the total group number and zone number are correct. • *Check if the LEDs on the main module light up for the relevant zones when the zone dampers are turned On/Off. If there is no response, there might be a faulty cable and the cable would have to be replaced. If the zone is still non-functional then there might be a faulty damper motor. ‘AC ERROR’ is • *This error is displayed due to a fault with the AC unit. The AC ON/OFF displayed on touchpad function will be disabled when this error is displayed. Please check the AC unit / AC touchpad to fix the problem. *: Some of the checks in the guide should be carried out by qualified personnel. If you have any doubt regarding the above please contact your installer. ZONEMASTER AIRTOUCH ZONE CONTROL SYSTEM - User Manual... -
Page 21: Airtouch Apps
2. Using AirTouch Apps Tap the AirTouch app (Figure 34) from the main screen and open up the app. Figure 35 shows the home page of the app. The operation is explicit and straight forward. NOTE: • All Groups/Zones can be turned ON/OFF at the same time by holding any Zone button for more than 2 seconds. • Turbo zone can be activated by tapping the respective chosen zone until active Turbo icon appears on that particular zone. • Message box will display how many groups are on for the time being in normal operation and will turn yellow to display any warning messages. Look at App Troubleshooting section for solutions for the displayed warning messages. • Temperature displayed is the temperature at the location of the touchpad • To change names of group/zone, go to System (i), then Naming page and follow the prompts. • To program groups/zones and AC unit, or set timer for AC unit, go to Program (p) and follow the prompts. ZONEMASTER AIRTOUCH ZONE CONTROL SYSTEM - User Manual... - Page 22 SERVICE DUE...” year and 2 years respectively. This message can be removed by message is displayed touching the message area.* “AC ERROR. CHECK AC This error is triggered due to a fault with the AC unit connected SYSTEM”, warning to. Please check the air-conditioning system to resolve the message is displayed issue* *: Some of the checks in the guide should be carried out by qualified personnel. If you have any doubt regarding the above please contact your installer. ZONEMASTER AIRTOUCH ZONE CONTROL SYSTEM - User Manual...
-
Page 23: Control Over Internet
The name ‘John Evans’s’ is the owner’s name which is set in AirTouch users settings. The home temperature displayed is measured from where the touchpad is installed. It will tell the user if it’s necessary to turn on or off the AC unit at home. Turn on or off the AC or groups by clicking the On/ Off buttons on the screen and press the submit button to send the request. Then the system will execute the request and respond with a message to tell the user if the request is successful. If not, the user will send the request again by pressing the submit button. If too many groups closed, the spill or bypass warning will be displayed to indicate some zones are in spill or bypass mode. When AC system is turned off, all groups will not be operational. The AC timers can be set to turn on or off the AC unit at required times. The time displayed is the system time of AirTouch. The time set in the timers will be the time of AirTouch system. The AC will turn on or off when the time in AirTouch system reaches the set time. If AC is not set up in AirTouch, the AC on/off function and the AC timers will be not available and the web page will look like the image to the right ZONEMASTER AIRTOUCH ZONE CONTROL SYSTEM - User Manual... -
Page 24: Specifications
Operating temperature: 0°C to 60°C Altitude: 0 to 2000 meters Operating relative humidity: 10% to 80% Avoid static electricity hazards Avoid electromagnetic radiation sources Avoid dust contamination Avoid highly corrosive environments Zone Output Output voltage: 24VAC, 50Hz Current: 200mA (1 damper motor) Transformer Input Voltage: 240VAC, 50Hz Output Voltage: 24VAC, 50Hz Wattage: Supply Air Sensor: NTC type, 10 kΩ at 25°C Battery: 3.6V, 3xAAAM Rechargeable for Main Module Fuse: Dimension 5x20 mm, Fast-Acting 2A, 250V ZONEMASTER AIRTOUCH ZONE CONTROL SYSTEM - User Manual... - Page 25 ZONEMASTER AIRTOUCH ZONE CONTROL SYSTEM - User Manual...
- Page 26 ZONEMASTER AIRTOUCH ZONE CONTROL SYSTEM - User Manual...
- Page 27 ZONEMASTER AIRTOUCH ZONE CONTROL SYSTEM - User Manual...
- Page 28 POLYAIRE PTY LTD 11-13 WHITE ROAD GEPPS CROSS SOUTH AUSTRALIA, 5094 TEL: (08) 8349 8466 FAX: (08) 8349 8446 www.polyaire.com.au ZMAT_UM_V1.0...
Need help?
Do you have a question about the Zonemaster Airtouch and is the answer not in the manual?
Questions and answers