Table of Contents
Advertisement
Quick Links
Quest DRY 150
Quest DEH 3000 Digital Control
Installation, Operation and Maintenance Instructions
Installation, Operation and Maintenance Instructions
– Read and Save These Instructions –
– Read and Save These Instructions –
This manual is provided to acquaint you with
the Quest DEH 3000 so that installation,
operation, and maintenance can proceed
successfully. Ultimate satisfaction depends
on the quality of installation and a thorough
understanding of this equipment.
Quest DEH 3000 Digital Control:
• Digital control of relative humidity
(Digital Set-Point)
• Fan/Filter operation
• Programmable ventilation timer
• Sleek design
• Large, easy-to-read backlit LCD display
• High temperature cut-out
• Dryout cycle timer
• Auto reboot
quest
quest
Specifications subject to change without notice.
4201 Lien Rd
Madison, WI 53704
www.QuestProtect.com
1
1-800-533-7533
sales@thermastor.com
TS-487
12/12
Advertisement
Table of Contents

Related Manuals for Quest Engineering DEH 3000

Summary of Contents for Quest Engineering DEH 3000
- Page 1 – Read and Save These Instructions – – Read and Save These Instructions – This manual is provided to acquaint you with the Quest DEH 3000 so that installation, operation, and maintenance can proceed successfully. Ultimate satisfaction depends on the quality of installation and a thorough understanding of this equipment.
-
Page 2: Table Of Contents
Quest DEH 3000 Installation, Operation and Maintenance Instructions Table of Contents 1. Specifications ..............3 2. Installation ..............3 2.1 Install Instructions ........... 3 2.2 Wiring ..............4 2.3 Auxiliary Relay Operation ........4 2.4 Dehumidifier Lockout ..........5 2.5 Location ..............6 2.6 Testing ..............6 3. Operation . -
Page 3: Specifications
Quest DEH 3000 Installation, Operation and Maintenance Instructions 1. Specifications Part # (P/N) 4027370 Model: Quest DEH 3000 Digital Control Electrical: 24 VAC Max Current – DMP,COMP,FAN: 1 Amp each ± Humidity Range: 10 – 95% RH, ± Humidity Accuracy: Output: 3 Amps 24 VAC Aux. Relay Capacity 5 Amps Temp Range/ 30°-90°F, 2% Mounting Hole Accuracy Size 4.95"L x 1.06"W x 4.19"H FOR HVAC INSTALLER ONLY: 2. Installation... -
Page 4: Auxiliary Relay Operation
Quest DEH 3000 Installation, Operation and Maintenance Instructions WARNING! THE QUEST DEH 3000 DIGITAL CONTROL OPERATES ON A LOW VOLTAGE CIRCUIT (24 VAC) AND MUST NEVER CONTACT OR BE CONNECTED TO A HIGH VOLTAGE CIRCUIT. WARNING! UNPLUG THE QUEST DEHUMIDIFIER BEFORE WIRING THE DEH 3000. - Page 5 Quest DEH 3000 Installation, Operation and Maintenance Instructions Unit Green Yellow Common uses (assuming standard thermostat wiring colors as noted): Lock-out the A/C during dehumidifier fan operation This will turn off the A/C whenever the dehumidifier fan runs. 1. W ire the Yellow thermostat terminal to the NC terminal on the Quest DEH 3000. The installer must supply the Unit Green wiring between the Quest dehumidifier and the control panel. Be sure to safely route the control wires to prevent Yellow damage during installation. Be careful not to cross the wires when connecting the Quest dehumidifier and the remote control panel or damage to the transformer may result. 2. R un the Yellow wire from the A/C unit to the COM terminal on the Quest DEH 3000. Energize the A/C central fan during dehumidifier fan...
-
Page 6: Testing
TO A/C Quest DEH 3000 Installation, Operation and Maintenance Instructions Deactivate dehumidification when the air-conditioner is running. A voltmeter is required for the next steps to ensure the correct wiring from the A/C transformer is used to set up the Lock-out dehumidifier function. 1. T he common wire from the existing A/C transformer (usually Black) must be attached to the “COM” sensor terminal between “ON-D” TO A/C and “OFF-D” on the DEH 3000. TIP: The common wire can be identified as the wire from the A/C transformer that reads 0 volts between it and the Yellow air conditioning call for cooling wire. - Page 7 Quest DEH 3000 Installation, Operation and Maintenance Instructions c. P ress and hold the “VENT” button until “CLOSED” flashes on the display. d. R elease the “VENT” button, then press it again to switch vent mode to “OPEN”. e. C onfirm that the Quest fan is ON. Ventilation damper is OPEN. QUEST compressor must be OFF. f. P ress and hold the “VENT” button until the “OPEN” flashes on the display. g. R elease the “VENT” button, then press it again to switch vent mode to “CLOSED”. Troubleshooting: If any functions are not working properly, check the wiring and connections. A voltmeter may be used across terminals to verify voltage. If there is concern about the dehumidifier not operating properly, the leads exiting the QUEST dehumidifier may be connected according to the following chart: Wire connections Operation Yellow & Blue Fan & Compressor Yellow & Green Fan Only WARNING! DO NOT MAKE ANY OTHER CONNECTIONS OR TRANSFORMER DAMAGE MAY RESULT.
-
Page 8: Operation
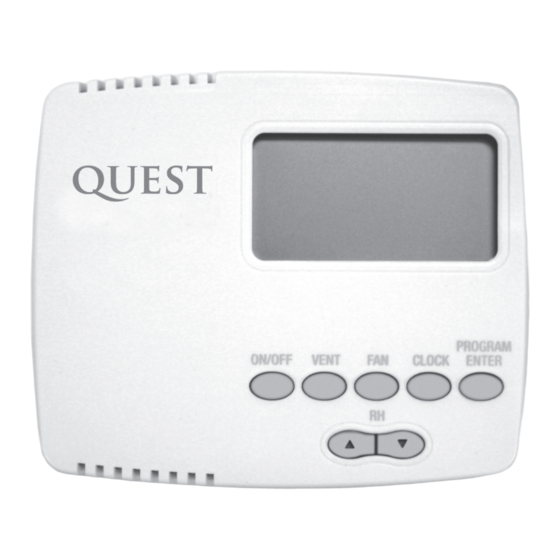
Quest DEH 3000 Installation, Operation and Maintenance Instructions FOR INSTALLER & OWNER: 3. Operation On the display screen, a solid “O” in front of any of the 3 functions (SETPOINT, VENT, FAN) indicates the function is operating. A flashing “O” indicates it is in a wait mode and not available at the moment. No “O” indicates the function is currently OFF. Solid “O” before Indicates SETPOINT Dehumidifier on VENT Fresh air ventilation cycle in progress FAN Fan on Wait mode is a factory-programmed time period meant to prevent short cycles. This extends the life of the dehumidifier. When a flashing “O” is encountered, the unit is in wait mode and IT COULD BE UP TO 10 MINUTES BEFORE OPERATION RESUMES. 3.1 Display • W henever there is power to the control, it will display the time, the day, % relative humidity, and temperature. -
Page 9: Setting Clock Time
Quest DEH 3000 Installation, Operation and Maintenance Instructions 3.4 On/Off and display items Press the “ON/OFF” button to turn the system ON or OFF. When the system is ON, the setpoint, fan status, operation mode (RUN or HOLD), and fresh air vent status is displayed. When the system is OFF, the control will display the time, day, %RH, and temperature. When the unit is shipped, it is in manual (hold) mode. 3.5 Setting Clock Time 1. P ress and hold the “CLOCK” button. The hour display will flash. Release the button. 2. U se the up/down “RH” buttons to change the value. 3. P ress the “CLOCK” button again and the minute display will flash. Use the “RH” buttons to change the value. 4. P ress the “CLOCK” button again and AM or PM will flash. Use the “RH” buttons to change the value. 5. P ress the “CLOCK” button again and the day display will flash. Use the “RH” buttons to change the value. -
Page 10: Fan Setting & Operation
Quest DEH 3000 Installation, Operation and Maintenance Instructions 3.7 Fan Setting and Operation Use the “FAN” button to change the fan operation. There are 2 choices for fan operation: “ON” or “AUTO”. The factory preset is “AUTO”. “ON” – The fan in the Quest dehumidifier will run continuously. This does not affect either the dehumidification or ventilation functions of the system. The system may or may not be ventilating or dehumidifying while the fan is running. This setting is commonly used for maximum air filtration and/or air recirculation. “AUTO” – Indicates the fan will run when the Quest DEH 3000 calls for dehumidification or ventilation. If the control has not called for dehumidification for 3 hours, the control will automatically run the dehumidifier fan for 10 minutes. After a dehumidification cycle, the fan automatically shuts off for 10 minutes. This pause allows the water to drain from the dehumidifier. A solid “O” indicates the fan is operating. A flashing “O” indicates the fan is in a wait mode. No “O” indicates the fan is OFF. To set the operation: 1. P ress and hold the “FAN” button. The current fan setting will begin to flash on the display. Release the button. 2. P ress the “FAN” button to toggle between the “ON” and “AUTO” modes. With the fan in the “AUTO” mode, the fan will operate only when needed by other functions of the system. The fan will remain OFF unless the system is dehumidifying or ventilating. The fan always runs during dehumidification and ventilation and the fan “O” icon will be lit. To completely turn the system OFF, use the “ON/OFF” button as described earlier. 3.8 Damper Operation and Ventilation, Manual (Hold) Mode The “VENT” setting controls the ventilation function of the system. It has no control over the dehumidification... - Page 11 Quest DEH 3000 Installation, Operation and Maintenance Instructions 1. P ress the “VENT” button. The current setting will begin to flash on the display. Release the button. 2. P ress the “VENT” button again to switch between “OPEN” and “CLOSED”. 3. L eave the control alone for 10 seconds and your settings will be saved. Damper Operation and Ventilation, Programmed Ventilation This example shows the system in program mode (denoted by the schedule 15 minutes on, 5 minutes off and the word RUN in the lower right corner of the display). The Quest DEH 3000 will operate fresh air ventilation according to your ventilation program. The control needs to be programmed to turn the ventilation function ON and OFF at the desired intervals. This is done by programming the ventilation timer. There are two programs available for ventilation: 1. Monday through Sunday 2. Monday through Friday & Saturday/Sunday Each block of days has a morning schedule and a night schedule. Morning is the first 12 hours of the day and night is the second 12 hours. Each schedule has: • A “START” time when the ventilation schedule begins, • A n “OPEN FOR” duration for the amount of time the damper stays open in 5 minute intervals, from 0 to 60, • A nd “CLOSED FOR” duration which closes the damper for a specified time in 5 minute intervals from 0 to 60.
- Page 12 Quest DEH 3000 Installation, Operation and Maintenance Instructions You can select from: “MON-FRI” “SAT-SUN” for separate weekday and weekend schedules, or “MON-SUN” which gives you equal weekday and weekend schedules. 3. Using the Up/Down “RH” buttons, highlight and then select one of the two choices. The example given shows how to program separate weekday and weekend schedules. The same method is used if you choose the other program. Example: menu when you select “MON-FRI” “SAT-SUN”: 1. E nter the starting time for weekdays using the up/down “RH” buttons to change the time. 2. P ress the “PROGRAM ENTER” button to switch to the “OPEN FOR” setting. Using the up/down “RH” buttons, change the duration that the damper will ventilate fresh air. 3. P ress the “PROGRAM ENTER” button to switch to the “CLOSED FOR” setting. Using the up/down “RH” buttons, change the duration that the damper will remain closed between ventilation cycles. For the example given, starting at 8:00AM in the morning, the control will ventilate fresh air for 15 minutes then stop for 15 minutes. This schedule of 15 minutes open, 15 minutes closed will continue until the start time of the night schedule. Morning schedule is available anytime from 12:00AM until 11:59AM. Night schedule is available anytime from 12:00PM until 11:59PM. 4. P ress “PROGRAM ENTER” again to go to the “MON-FRI” night schedule. Repeat the steps listed above for this and the “SAT-SUN” day and night schedules. When you have finished programming your schedule (either the 7-day version or the weekday/weekend split version), use the down “RH” button to highlight the EXIT option and then press “PROGRAM ENTER” to select it.
-
Page 13: Temperature Cutout Programming
Quest DEH 3000 Installation, Operation and Maintenance Instructions 4.0 Temperature Cutout Programming Dehumidifiers produce heat when dehumidifying and depending upon outside conditions, the ventilation function may also introduce warm air. Some conditions may introduce enough heat to drive temperatures up. The Quest DEH 3000 temperature cutout feature disables all Quest operations if temperatures reach the cutout setpoint. In most installations this feature will not need to be used (the cutout is factory set to 99°F). If a lower temperature cutout is desired, program the setpoint by pressing and holding the “PROGRAM ENTER” button until the “PROGRAM” screen appears. Press the up/down “RH” buttons until “TEMP CUTOUT” highlighted. Then press the “PROGRAM ENTER” button again to select it. Now use the “RH” up or “RH” down buttons to adjust the setpoint. Press “PROGRAM ENTER” to return to the home screen. quest quest 1-800-533-7533 www.QuestProtect.com sales@questprotect.com... - Page 14 Quest DEH 3000 Installation, Operation and Maintenance Instructions WARRANTOR: Therma-Stor LLC PO Box 8680 Madison, WI 53708 Telephone: 1-800-533-7533 WHO IS COVERED: This warranty extends only to the original residential end-user of the Quest DEH 3000 Dehumidifier & Ventilation System Controller, and may not be assigned or transferred. FIRST YEAR WARRANTY: Therma-Stor LLC warrants that, for one (1) year the Quest DEH 3000 Dehumidifier & Ventilation System Controller will operate free from any defects in materials and workmanship, or Therma-Stor LLC will, at its option, repair or replace the defective part(s), free of any charge. END-USER RESPONSIBILITIES: Warranty service must be performed by a Servicer authorized by Therma-Stor LLC. If the end-user is unable to locate or obtain warranty service from an authorized Servicer, he should call Therma-Stor LLC at the above number and ask for the Therma-Stor LLC Service Department, which will then arrange for covered warranty service. Warranty service will be...
Need help?
Do you have a question about the DEH 3000 and is the answer not in the manual?
Questions and answers