Table of Contents
Advertisement
4 VOLT PIVOTING SCREWDRIVER
Rotation:
Single speed:
Battery:
Charger input:
Charger output:
Plug-in battery charger:
Drive:
Weight:
Need Assistance?
Call us on our toll free customer support line:
1-866-349-8665
Technical questions
Replacement parts
Parts missing from package
PRODUCT SPECIFICATIONS
Clockwise or counter clockwise
220 RPM
4.0 V, 1.5 Ah
120 V AC, 60 Hz, 8 W
6 V, 300 mA
3–5 Hours
¼" (6.35 cm) hex
13 oz (0.37 kg)
241-1395
Owner's Manual
Advertisement
Table of Contents

Subscribe to Our Youtube Channel
Summary of Contents for Performax 241-1395
- Page 1 4 VOLT PIVOTING SCREWDRIVER 241-1395 Owner’s Manual PRODUCT SPECIFICATIONS Rotation: Clockwise or counter clockwise Single speed: 220 RPM Battery: 4.0 V, 1.5 Ah Charger input: 120 V AC, 60 Hz, 8 W Charger output: 6 V, 300 mA Plug-in battery charger: 3–5 Hours...
-
Page 2: Power Tool Safety
POWER TOOL SAFETY WARNING: Read all safety warnings When operating a power tool outdoors, and instructions. Failure to follow the use an extension cord suitable for warnings and instructions may result in outdoor use. Use of a cord suitable for electric shock, fire and/or serious injury. - Page 3 POWER TOOL SAFETY PERSONAL SAFETY – cont’d Do not overreach. Keep proper footing Store idle power tools out of the reach and balance at all times. This enables of children and do not allow persons better control of the power tool in unfamiliar with the power tool or these unexpected situations.
-
Page 4: Specific Safety Rules
SPECIFIC SAFETY POWER TOOL SAFETY RULES Battery tool use and care WARNING: For safety reasons, do not plug in the charger, charge the Recharge only with the charger battery or operate the tool until this specified by the manufacturer. A Owner’s Manual has been read and charger that is suitable for one type of understood. -
Page 5: Specific Safety
SPECIFIC SAFETY SPECIFIC SAFETY – cont’d Do not allow the cord to hang over the edge of a table or counter or touch hot surfaces. The charger should be placed Do not use worn or damaged away from sinks and hot surfaces. screwdriver bits. - Page 6 SYMBOLS WARNING: Some of the following symbols may appear on the screwdriver. Study these symbols and learn their meaning. Proper interpretation of these symbols will allow for more efficient and safer operation of this tool. Direct current Volts No load speed Amperes Alternating or direct current...
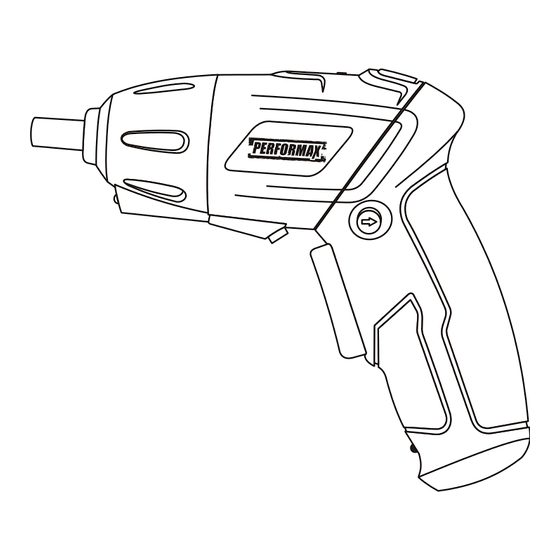
- Page 7 KNOW YOUR PIVOTING SCREWDRIVER Battery charge Battery charge indicator LED’s LED switch Pivoting handle Magnetic release button bit holder Rotation direction switch Rotating handle LED light LED light switch Trigger switch Charger Charging LED receptacle Charger plug Charger PIVOTING SCREWDRIVER COMPONENTS DESCRIPTION Cordless screwdriver...
-
Page 8: Assembly And Operation
ASSEMBLY & OPERATION CHARGING THE BATTERY Place the cordless screwdriver near a 120 V, 60 Hz electrical outlet. Insert the battery charger plug (1) into the charger receptacle (2) in the handle of the cordless screwdriver (3) (Fig. 1). Plug the battery charger (4) into a 120 V 60 Hz wall receptacle. - Page 9 ASSEMBLY & OPERATION BATTERY CHARGE INDICATOR – cont’d Red + Amber + Green (3, 4 & 5) – 2/3 to full capacity Red + Amber (3 & 4) – 1/3 to 2/3 capacity Red (3) – less than 1/3 capacity Release the battery status button to turn the LED’s OFF.
-
Page 10: Led Light
ASSEMBLY & OPERATION LED LIGHT The LED light (1) will illuminate the immediate work area (Fig 6). To turn the LED light ON, press the LED switch (2) once. To turn the LED switch OFF, press the LED switch a second time. Fig. -
Page 11: Installing Screwdriver Bits
ASSEMBLY & OPERATION PREPARING SCREW HOLES – cont’d If using a flat head screw, counter-sink the hole (4) so the head of the screw will be flush with the surface when it is fully driven into place. INSTALLING SCREWDRIVER BITS Fig. -
Page 12: Lithium-Ion Battery Performance
ASSEMBLY & OPERATION LITHIUM-ION BATTERY PERFORMANCE Lithium-ion rechargeable batteries generally provide superior performance to nickel-cadmium batteries when used in power tools. ● Faster charges ● Longer battery life ● More power ● Lighter weight Lithium-ion batteries perform best and deliver peak output power at room temperature (20°... -
Page 13: Driving Screws
ASSEMBLY & OPERATION DRIVING SCREWS When driving screws, care must be taken to use the bit that correctly fits the head of the screw being driven. Make sure to use the largest bit size that will properly fit into the head of the screw. The bit must also be in good condition and not worn so it will drive screws without slipping out of the screw head. -
Page 14: Maintenance
MAINTENANCE REPARATION FOR RECYCLING GENERAL To preserve our natural resources, please WARNING: When servicing, use recycle or dispose of batteries operated only identical original equipment parts. tools properly. Use of any other part may create a hazard or cause product damage. This product contains lithium-ion batteries. - Page 15 MAINTENANCE How to care for the lithium-ion battery Do not use the pivoting screwdriver at temperatures below –10° C (14°F). Never allow a battery to freeze. Do not charge a battery that has been stored at or below 0° C (32°F) or above 45°C (113°...
-
Page 16: Year Limited Warranty
® back to your nearest MENARDS® retail store. At its discretion, PERFORMAX agrees to have the tool or any defective part(s) repaired or replaced with the ®...
Need help?
Do you have a question about the 241-1395 and is the answer not in the manual?
Questions and answers