Advertisement
Table of Contents
- 1 Table of Contents
- 2 The Hoyer Journey Patient Lift
- 3 Introduction: about Your Lift
- 4 Assembly & Commissioning Instructions
- 5 Sling Guide
- 6 Lifting with Your Hoyer Journey
- 7 Standard Control Box & Handset
- 8 Smart Monitor & Handset
- 9 Intended Use
- 10 Operating Instructions
- 11 Safety Precautions
- 12 Charging Instructions
- 13 Maintenance Schedule & Daily Check List
- 14 Technical Specifications
- 15 Environmental Conditions
- 16 Warranty
- Download this manual
User Instruction Manual
To avoid injury, read user manual prior to use.
Manuel de l'utilisateur
Afin d'éviter tout accident, veuillez lire
attentivement la notice avant utilisation.
Manual de Instrucciones
Para evitar posibles daños, lea
previamente el manual de usuario.
Hoyer
Journey
®
Hoyer
Journey
®
Hoyer
Journey
®
Advertisement
Table of Contents

Summary of Contents for Hoyer Journey
- Page 1 User Instruction Manual Hoyer Journey ® To avoid injury, read user manual prior to use. Manuel de l’utilisateur Hoyer Journey ® Afin d’éviter tout accident, veuillez lire attentivement la notice avant utilisation. Manual de Instrucciones Hoyer Journey ® Para evitar posibles daños, lea...
-
Page 2: Table Of Contents
Hoyer ® English Journey Contents 1. The Hoyer Journey Patient Lift ..................3 2. Introduction: About Your Lift ...................4 3. Assembly & Commissioning Instructions ...............5 4. Sling Guide ........................10 5. Lifting With Your Hoyer Journey ...................12 6. Standard Control Box & Handset .................14 7. -
Page 3: The Hoyer Journey Patient Lift
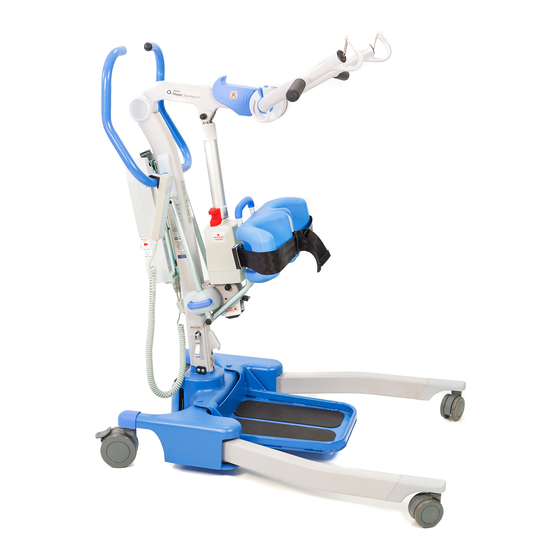
Hoyer ® English Journey 1. The Hoyer Journey Patient Lift Ready for use position Push Handle Cow Horn Position Indicator Cow Horn Mast Spreader Bar Battery/ Attachment Hook Control Pack Electric Hand Actuator Control Unit Adjustable Kneepad Kneepad Adjustment Lever... -
Page 4: Introduction: About Your Lift
The Hoyer Journey stand aid is designed to be used in conjunction with the Hoyer range of slings. The examples of slings suitable for use with this device are listed as follows: •... -
Page 5: Assembly & Commissioning Instructions
1. Remove all the parts from the carton and place on the floor, taking care to protect the finish from damage. Lift the Hoyer Journey carefully from the carton. Lie the lift flat on the floor and ensure the rear castors are securely locked. - Page 6 English Journey 2. To unfold the Hoyer Journey into its ready-to-use position, raise the mast assembly upright. This is achieved by pressing the mast release button located under the actuator (as shown). This will release the mast assembly and allow the mast to be raised. Using the top of the push handle, raise the mast to its upright position and locate the mast into the slot (1).
- Page 7 NOTE: See page 12 for cow horn position guidelines. Disassembly To disassemble and store the Hoyer Journey follow the four easy steps shown below; please note that no additional tools are required. 1. Lower the boom into its lowest possible position and adjust the cow horn to the storage/fold position (as shown).
- Page 8 “Click” (3). The “Click” indicates the mast is now in its locked position. 4. When folded, lift the Hoyer Journey upright using the legs and push handle as a guide. NOTE: If you wish to separate the mast and boom completely from the base and legs, undo the mast-locking lever fully (remove pin assembly from mast) and lift the mast and boom completely free from the base.
- Page 9 English Journey CAUTION Care should be exercised when folding/unfolding the Hoyer Journey as there is a possible danger of trapping the fingers etc. Please follow the instructions carefully and ask for assistance if you are unsure of the correct procedure.
-
Page 10: Sling Guide
• The up and down buttons on the hand control lower and raise the boom correctly. 4. Sling Guide The Hoyer Journey is suitable for patients in the SITTING position. The slings suitable for this device are listed as follows:... - Page 11 NOT use slings that are worn or damaged. WARNING HOYER RECOMMENdS THE USE OF GENUINE HOYER PARTS. Hoyer slings and lifters are not designed to be interchangeable with other manufacturer’s products. Using other manufacturer’s products on Hoyer products is potentially unsafe and could result in...
-
Page 12: Lifting With Your Hoyer Journey
Attach the loops of the sling to the grey hooks at the end of the Hoyer Journey handgrips. The patient’s hands should be placed on the handgrips (see Fig A or C). Prior to lifting make a visual check to ensure the loops of the sling are secure and in place. - Page 13 NOTE: Joerns Healthcare recommends a risk assessment be completed before carrying out your lifting operation. WARNING If using the Hoyer Journey for gait training, the foot tray should be removed and a thorough risk assessment carried out to ascertain suitability prior to lifting.
-
Page 14: Standard Control Box & Handset
Hoyer ® English Journey 6. Standard Control Box & Handset Detachable Battery Pack Raise & Lower Buttons Emergency Stop Button Emergency Raise & Lower Redundant Controls Handset Actuator Handset Actuator Information Connection Connection Screen Socket Socket Handset Connection Plug... -
Page 15: Smart Monitor & Handset
Hoyer ® English Journey 7. Smart Monitor & Handset Detachable Battery Pack Emergency Stop Button Smart Monitor Raise & Lower Buttons Emergency Raise & Lower Redundant Controls Handset Actuator Actuator Information Connection Handset Screen Socket Connection Socket Handset Connection Plug... -
Page 16: Intended Use
Journey Intended Use The Hoyer Smart Monitor is a control system for Hoyer Lifts. The Smart Monitor stores useful lift data about the lift that can be recalled when required. This lift data includes: • Number of patient lift cycles •... - Page 17 Journey LCD Display Screen The Hoyer Smart Monitor has the option to read out information via the LCD display screen. It is possible to read out total lifting cycles, total work done, overloads and number of days since last service, which can be used to quickly and easily evaluate the condition of the lift actuator.
- Page 18 Hoyer ® English Journey On-Board Redundant Controls On-board redundant controls enable the lift to be raised or lowered in the event of an emergency. Battery Information The display showing full battery means that the battery is fully charged and the lift is ready for use.
-
Page 19: Operating Instructions
8. Operating Instructions 1. Leg Adjustment The legs on the Hoyer Journey are adjustable for width. The legs can be opened to enable access around armchairs or wheelchairs. For transferring and negotiating narrow doorways/ passages, the lift legs should be in the closed position. To achieve the adjustment, the leg adjuster pedal, located at the rear of the base, is compressed right (DOWN) to open the legs outwards and left (UP) to close the legs. - Page 20 The battery, charger, hand control, control box and actuator should not to be opened by unauthorised personnel. (Contact your distributor for warranty and repairs). 8. Slings The Hoyer Journey is suitable for patients in the SITTING, position. The slings suitable for this device are listed as follows: • Hoyer Transport sling •...
- Page 21 11. Adjustable cow horn The Hoyer Journey has an adjustable cow horn. This allows the carer to position the cow horn in a comfortable position to suit the patient or environment. The cow horn has 3 positions. Position...
-
Page 22: Safety Precautions
English Journey 9. Safety Precautions Please read and follow the safety precautions listed below. The operation and use of Hoyer patient lifts is simple and straightforward. Following these few basic safety precautions will make lifting operations easy and trouble free. - Page 23 Hoyer ® English Journey • dO NOT park a loaded lift on ANY sloping surface. • dO NOT use electric lifts in a shower. • dO NOT use or store a lift in a wet or corrosive environment such as shower, bath or pool locations.
-
Page 24: Charging Instructions
Fit the power pack to the lift and make sure the latch holding the pack in place is fully engaged. “Click” in place. The charging of Hoyer electric lifts is simple and straightforward, but it is important to follow the charging instructions closely. Please pay particular attention to the following points, they will help you avoid problems with discharged batteries. - Page 25 Hoyer ® English Journey • dO NOT leave the charger switched on with the battery disconnected. • dO NOT use the lift while charging is taking place. • CHECK the lift is not charging before moving as the electrical connection may be damaged.
-
Page 26: Maintenance Schedule & Daily Check List
Journey 11. Maintenance Schedule & Daily Check List All Hoyer products are designed for minimum maintenance, however some safety checks and procedures are required. Schedules of DAILY tasks are detailed below. Daily checks and a yearly service, inspection and test will ensure a lift is kept in optimum safe working condition. A list of spare parts is available upon request. - Page 27 Hoyer ® English Journey *THESE CHECKS SHOULd INCLUdE: ü = Recommended 1. BOOM: Check the attachment of the boom to the mast. Make sure there is only minimal side movement of the boom and the boom is free to rotate ü...
-
Page 28: Technical Specifications
Hoyer ® English Journey 12. Technical Specifications Safe Working Load ................341 lbs ....155 kgs Maximum Overall Length ...............39.4 inches ....1000 mm Minimum Overall Length ..............36.8 inches ....935 mm Maximum Overall Height ..............63 inches ....1600 mm Minimum Overall Height ..............44.5 inches ....1130 mm Maximum Height to attachment point..........60.2 inches .... -
Page 29: Environmental Conditions
Hoyer ® English Journey ELECTRICAL SPECIFICATIONS: BATTERIES .............24 volt Rechargeable sealed lead acid type BATTERY CAPACITY ........3.2 Ampere hours CHARGER RATED INPUT ......100 - 240 V AC/ 50/60 Hz CHARGER RATED OUTPUT ......29.5 VDC, Max. 19 W ELECTRIC SHOCK PROTECTION CHARGER ............CLASS II (EN 60601-1) - Page 30 Hoyer ® English Journey KEY SYMBOLS: The following symbols are used on the charger, control unit and battery: Type B equipment, as per EN 60601-1 Class 2 equipment The disposal of the charging and control unit should not be mixed with general household waste The disposal of batteries should not be mixed with general household waste.
-
Page 31: Warranty
Hoyer ® English Journey 13. Warranty This warranty covers HoyerPro lifts only. Lifts not covered under this warranty include, but are not limited to Advance-H, HML400, HPL600WB, HPL600WBSC, HPL402, C-HLA (and variations). HoyerPro lifts are guaranteed for a period of two years from the date of delivery against defects in materials and workmanship under normal use and service. - Page 32 Joerns Healthcare Inc. 2100 Design Road, Suite 100 Arlington, TX 76014 USA (T) 800-826-0270 • (F) 800-457-8827 www.joerns.com • email: info@joerns.com © 2014, Joerns Healthcare • 294000.10064 Rev D • DCO 14-0021...
Need help?
Do you have a question about the Journey and is the answer not in the manual?
Questions and answers