Harman Kardon BDS 275 Owner's Manual
Hide thumbs
Also See for BDS 275:
- Owner's manual (38 pages) ,
- Quick start manual (8 pages) ,
- Quick start manual (9 pages)
Table of Contents
Advertisement
Advertisement
Table of Contents

Related Manuals for Harman Kardon BDS 275


Summary of Contents for Harman Kardon BDS 275
- Page 1 BDS 275/BDS 575/ BDS 277/BDS 577 ™ Blu-ray Disc receiver Owner’s Manual...
-
Page 2: Table Of Contents
BD/DVD Region Codes and Table of Contents INTRODUCTION Your BDS receiver is designed to be compatible with region management information that is encoded on most Blu-ray Disc recordings and DVD recordings. VERIFY LINE VOLTAGE BEFORE USING Your receiver will only play discs that contain region coding for the area where your receiver was shipped and intended for sale: UNPACKING Area Where Sold... -
Page 3: Introduction
fire hazard and may damage the unit. If you have any questions about If any of these items are missing, please contact Harman Kardon Customer Service via the voltage requirements for your specific model or about the line voltage in your area, www.harmankardon.com. -
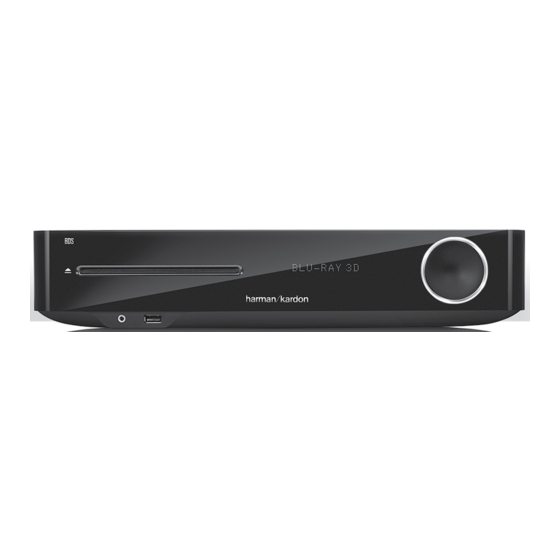
Page 4: Receiver Front-Panel Controls
Receiver Front-Panel Controls Receiver Front-Panel Controls Information On/Standby Eject Button Disc Slot Display Indicator Volume Control/ Headphone USB Port Power Button Connector... - Page 5 Receiver Front-Panel Controls Eject button (appears only when a disc has been inserted): Touch this button to eject a disc from the BDS receiver’s built-in disc player. Before touching this button, make sure no objects are blocking the disc-slot opening. NOTE: If you do not remove the ejected disc within 30 seconds, it will automatically re-load back into the disc player for protection.
-
Page 6: Receiver Rear-Panel Connections
Receiver Rear-Panel Connections Receiver Rear-Panel Connections Subwoofer Coaxial Analog Trigger Digital Input Audio Input Connector Connector Connectors Remote Subwoofer Main Speaker FM Antenna IR Input Output Power Switch Vents Connectors Connector Connector Connector AC Power Component HDMI Input Network Connector Video Input Connectors Connector... - Page 7 HDMI connectors to the BDS receiver. The HDMI connection transmits digital audio and video signals between devices, so you do not have to make any additional audio BDS 275 and BDS 277 receivers (not shown) have connections for two speakers: front left and front right.
-
Page 8: Remote Control Functions
Remote Control Functions Remote Control Functions Power Button TV Power Eject Button Button Source Buttons Pop-Up Button Display Button Channel +/– Buttons Volume +/– Buttons Mute Button Top Menu Surround Button Button Transport Control Buttons Replay Button Repeat Button Home Button Back Button OK Button Cursor Buttons... - Page 9 Remote Control Functions Power button: The BDS receiver has four different power modes: Mute button: Press this button to mute the sound from the BDS receiver’s speaker outputs. Press the button again to un-mute the sound. NOTE: The Mute button does Off (On/Standby indicator not illuminated): When the rear-panel Main Power switch not mute the HDMI audio output.
-
Page 10: Connections
AC cord is unplugged from the receiver and the AC outlet. Making speaker connections with the receiver plugged in and turned on could damage the speakers. Your BDS receiver has color-coded speaker terminals: BDS 275/BDS 277 A. Unscrew Cap B. Insert Bare Wire C. Tighten Cap... - Page 11 Connections Connecting a TV or Video Display Connecting Your Component Video Source Device Use the supplied HDMI cable to connect the BDS receiver’s HDMI output to your TV/video If you have a video source device that has a component video connector (and does not display’s HDMI input.
- Page 12 Connections Connecting Your Coaxial Digital Audio Source Device Connecting to Your Home Network If one of your non-HDMI source devices has a coaxial digital output, connect it to the Use a Cat. 5/5E Ethernet cable (not supplied) to connect the BDS receiver’s Network receiver’s Coaxial Digital Input connector.
-
Page 13: Preparing The Remote Control
The power requirement for the BDS receiver is 100V – 240V AC, 50/60Hz, 120W lights, fluorescent lights, and plasma-video displays may interfere with the function of (BDS 575/BDS 577) or 90W (BDS 275/BDS 277). Connecting to a power source other the remote. - Page 14 Preparing the Remote Control 4. Aim the remote towards the component you just turned on and enter a set-up code Programming Individual Button Codes on the Remote: number from Step 1, above. Use the Program (Red) button for the first digit; the You can program codes from other component remotes onto the BDS remote’s buttons Bookmark (Green) button for the second digital;...
-
Page 15: Setting Up The Receiver
Initial Setup Step 2/6 Cursor Left Cursor Right Button Button Play/Pause Button Welcome to the Harman Kardon BDS setup wizard. Play/Pause OK Button Button Some simple information is needed to ensure you Up Button get the best experience from your product. - Page 16 Mode or the Standby Mode after 15 minutes of inactivity. If Auto Standby is set to “On” and Standby Mode is set to “Sleep,” BDS 275 and BDS Press the OK button to save your settings and then press it again to exit the Initial Setup 575 receivers will enter the Sleep mode after 15 minutes of inactivity, and will then screens.
- Page 17 “Disabled.” System Upgrade: Select this option when you want to install a firmware upgrade for your BDS receiver that you’ve downloaded from a Harman Kardon Web site or other Harman Display Settings Kardon source. Such an upgrade can be performed via a USB thumb drive, the Internet (through the BDS receiver’s Network connection) or via a CD-ROM disc.
- Page 18 Speaker Package: This setting enables processing in the BDS receiver that will maximize your system’s audio performance. If you are using one of the listed Harman Kardon speaker packages with your BDS receiver, select its model number from the list. If you’re...
- Page 19 Setting Up the Receiver 4. Remain silent while the test noise plays through the speakers. As the test noise 2. Press the Cursor Down button to highlight Distance, and press the OK button. The circulates among the speakers the screen will show which speaker is being tested. Distance adjustment bars will appear.
-
Page 20: Using The Receiver
Using the Receiver Adjusting Individual Speaker Volumes Using the Receiver You can adjust the volumes of the system’s individual speakers while you’re listening NOTE: Before using your new BDS receiver, be sure to set the speaker distances, as to music. explained in Audio Settings: Speaker Settings, on page 18. - Page 21 Using the Receiver The audio formats available for any particular program depend on the program and on 7. Press the Back button twice to return to the speaker setup screen (the front left and front right speakers will still be highlighted). To adjust the volume of a different how you have configured your BDS receiver in the Audio Settings menu: speaker, use the cursor buttons to highlight it and press the OK button.
-
Page 22: Using The Disc Player
Using the Disc Player Supported Media Codecs Using the Disc Player The BDS receiver can play media recorded in the following audio/video codecs: Disc Handling Precautions MPEG 2 To keep the disc clean, handle the disc by its edge. Do not touch the surface. H.264 VC-1 MP3 (from CD-R/RW, DVD+R/+RW, BD-R/RE and USB) -
Page 23: Playing Streaming Media Via Your Home Network
Using the Disc Player and Playing Streaming Media via Your Home Network Display button: When playing Blu-ray Disc recordings and DVDs, pressing the Display If you have difficulty accessing the Internet while using a BD-Live disc, press the Settings button toggles the information bar on and off. button and navigate to the Network Setup menu. -
Page 24: Listening To Your Ipod/Iphone/Ipad
Streaming Media via Your Home Network, Listening to Your iPod/iPhone/iPad and Listening to FM Radio, Before you can access files located on other devices via DLNA, each device must first Listening to Your iPod/iPhone/iPad give permission to share files with the BDS receiver. To give file sharing permission on a Use your Apple cable (not supplied) to connect your iOS-compatible mobile device to PC with Windows Media Player: the BDS receiver’s front-panel USB port. -
Page 25: Listening To Audio Sources
Listening to Audio Sources, Listening to Media via AirPlay and Playing Files from USB Devices and Data Discs Listening to Audio Sources The AirPlay audio stream will break in (the OSD will display an “AirPlay activated” message) and interrupt the source that is currently playing through the BDS receiver. Press the Aux button on the remote control. - Page 26 Playing Files from USB Devices and Data Discs Viewing Photos Thumbnail (Yellow) button: Pressing this button while playing a slide show displays thumbnail images of all photos in the slide show. Use the Cursor and OK buttons to In the top directory, select “Photo.” Select a folder containing photo files and highlight highlight and select images to view.
-
Page 27: Using Playlists
Playing Files from USB Devices and Data Discs and Using Playlists If a selected MP3 file has an album cover-art ID3 tag, the art will be displayed on the Using Playlists screen. Because USB devices and CD data discs can contain large numbers of playable files, Use the remote’s Transport Control buttons to control music-file playback. -
Page 28: Troubleshooting
Troubleshooting Troubleshooting If your BDS receiver isn’t performing the way you think it should, check to see if the problem is covered in this section before calling your Harman Kardon dealer. Problem Solution The receiver won’t power up (the On/Standby indicator is not lit): Check that the receiver’s Power cord is properly plugged into the receiver’s AC... -
Page 29: Aux Component Remote-Control Code List
Aux Component Remote-Control Code List Aux Component Remote-Control Code List TV/DVR Manufacturer Code Numbers Manufacturer Code Numbers A MARK 0132 0122 1088 1105 BRUNS 1088 1023 ACER 0143 1167 BUSH 1092 1043 1040 1020 1010 ADMIRAL 0192 1105 1088 1023 BUSH(UK) 1044 ADVENT... - Page 30 1032 1023 HALL MARK 0128 ELECTROGRAPH 0064 HANNSPREE 1185 ELECTROHOME 0132 0115 HANSEATIC 1043 1022 1020 1010 ELEMENT 0048 0113 HARMAN KARDON 0201 EMERSON 0205 0162 0159 0158 0157 0139 0132 0128 0123 0045 HIFIVOX 1080 1059 1056 1024 1019...
- Page 31 Aux Component Remote-Control Code List TV/DVR Manufacturer Code Numbers Manufacturer Code Numbers INTERVISION 1121 1119 1118 1117 1116 LUXMAN 0128 1115 1114 1113 1111 LUXOR 1058 ISIS 1186 0148 0145 0077 1100 1092 1046 1040 M ELECTRONIC 1201 ITT-NOKIA 1100 1092 1058 1040...
- Page 32 Aux Component Remote-Control Code List TV/DVR Manufacturer Code Numbers Manufacturer Code Numbers NOBLEX 1204 1205 RADIOLA 1078 1060 1048 1047 1033 1025 1023 1022 NOKIA 1100 1092 1046 1040 RADIOMARELLI 1088 1083 1082 1029 1023 NORDMENDE 1094 1093 1080 1069 1059 1022 1056...
- Page 33 Aux Component Remote-Control Code List TV/DVR Manufacturer Code Numbers Manufacturer Code Numbers SONY 0212 0194 0136 0130 0117 TOTEVISION 0132 0031 0028 0060 0093 1106 TRISTAR 1099 1103 1102 1091 1065 1064 1062 1043 1038 1016 1010 TRIUMPH 1199 1044 1006 1172 1173...
- Page 34 Aux Component Remote-Control Code List CABLE BOX Manufacturer Code Numbers Manufacturer Code Numbers 3011 3001 JERROLD 3210 3188 3162 3097 3096 3073 3017 3011 3002 3001 ALLEGRO 3111 4022 4001 AMERICAST 3212 LINSAY 3118 AMINO 3015 4031 MACOM 3191 ARCHER 3112 MAGNAVOX 3068...
- Page 35 Aux Component Remote-Control Code List CABLE BOX Manufacturer Code Numbers Manufacturer Code Numbers 3122 DIRECTV 5009 5010 5014 6002 6003 6005 TIMELESS 3123 DISH NETWORK 5064 TIVO 3029 3030 4029 4030 DRAKE 5181 5113 5018 5017 5013 TOCOM 3205 3170 DX ANTENNA 5183 5079...
- Page 36 Aux Component Remote-Control Code List SATELLITE TUNERS Manufacturer Code Numbers Manufacturer Code Numbers MEMOREX 5153 SCHNEIDER 6053 METZ 6090 SIEMENS 6090 6038 MINERVA 6090 5043 5044 6006 6017 6018 MITSUBISHI 5007 6090 SKY MASTER 6133 MOTOROLA 5012 5019 SKYLAB 6121 MULTISTAR 6080 SONY...
-
Page 37: Specifications
120W maximum (BDS 575/BDS 577), 90W maximum (BDS 275/BDS 277); <0.5W standby Dimensions (H x W x D): 3-1/8" x 15-3/4" x 11-1/4" (400mm x 80mm x 285mm) Weight: BDS 275 – 7.7 lb (3.5kg); BDS 277/BDS 575/BDS 577 – 7.9 lb (3.6kg) - Page 38 © 2012 HARMAN International Industries, Incorporated. All rights reserved. Harman Kardon is a trademark of HARMAN International Industries, Incorporated, registered in the United States and/or other countries. EzSet/EQ is a trademark of HARMAN International Industries, Incorporated. Blu-ray Disc and BD-Live are trademarks of the Blu-ray Disc Association.
Need help?
Do you have a question about the BDS 275 and is the answer not in the manual?
Questions and answers