Table of Contents
Advertisement
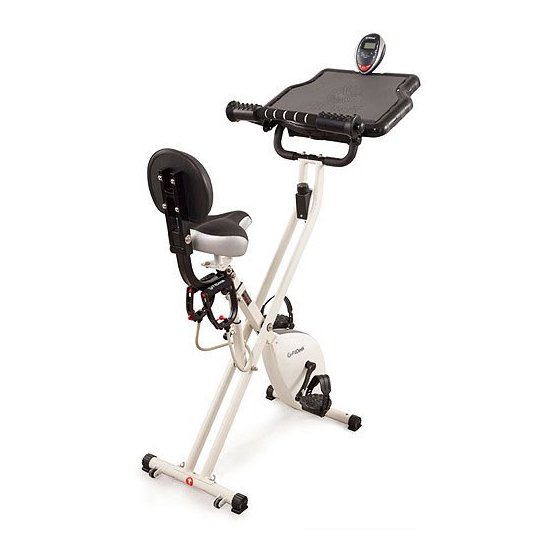
Owner's Manual:
FDX 2.0 - 003
Assembly Instructions
CAUTION!
Operations Manual
READ ALL INSTRUCTIONS.
TAKE THE TIME TO READ THE SAFETY TIPS
AND MAINTENANCE SECTIONS. NO EXERCISE
EQUIPMENT IS SAFE UNLESS YOU LEARN HOW
TO SAFELY OPERATE THE EQUIPMENT.
REGULAR
MAINTENANCE
IS
VERY
IMPORTANT!
THIS PRODUCT HAS MOVING PARTS. TAKE ALL
PRECAUTIONS WHEN CHILDREN, PETS AND
OTHER OBJECTS NEEDING CARE ARE IN THE
AREA OF THIS PRODUCT. USE RESPONSIBLY,
MACHINE CAN TIP, ITEMS CAN GET CAUGHT IN
THE PEDALS. TAKE EXTRA CARE WHEN
FOLDING, TRANSPORTING, UNFOLDING AND
MAKING ANY ADJUSTMENTS TO PRODUCT.
WHEN USING DESK AREA TO PLACE ITEMS ON
– ALWAYS USE SAFETY STRAP TO HOLD ITEM
DOWN. IF YOU DO NOT HAVE A STRAP.
CONTACT US. WE CAN HELP.
WE WANT YOU TO SAFELY USE THIS
PRODUCT. PLEASE DO NOT HESITATE TO
EMAIL, CALL OR TEXT IF YOU HAVE ANY
QUESTIONS.
EMAIL: CUSTOMERSERVICE @FITDESK.NET
PHONE: 615-669-9004
Where Productivity and Health Converge
1
Advertisement
Table of Contents

Related Manuals for FitDesk FDX 2.0 - 003

Summary of Contents for FitDesk FDX 2.0 - 003
- Page 1 Owner’s Manual: FDX 2.0 - 003 Assembly Instructions CAUTION! Operations Manual READ ALL INSTRUCTIONS. TAKE THE TIME TO READ THE SAFETY TIPS AND MAINTENANCE SECTIONS. NO EXERCISE EQUIPMENT IS SAFE UNLESS YOU LEARN HOW TO SAFELY OPERATE THE EQUIPMENT. REGULAR...
- Page 2 PLEASE CONTACT US FOR REPACKAGING INSTRUCTIONS FOR ASSEMBLY INSTRUCTIONS, MISSING PARTS, OR FOR HELP WITH A QUESTION at : Customerservice@fitdesk.net Also we have a detailed FAQ section at our website www.FitDesk.net Or call Monday to Friday 9am to 5pm CST 615-669-9004...
- Page 3 Foot Print in OPEN position = 16” wide X 26” long X 45” high T a b l e C o n t e n t s [] Precautions [] Parts and Maintenance [] Get to know your FitDesk 2.0 [] Assembly Instructions [] Meter Instructions [] Contact Information...
- Page 4 5. The frame must be in the closed and locked position prior to transport. Frame locks in closed position. 6. Read and follow the warning stickers on the FitDesk®. 7. Warm-up stretching is recommended before exercise. ALWAYS USE GOOD POSTURE 8.
- Page 5 Safety Precautions Continued P r e c a u t i o n s … P l e a s e r e a d b e f o r e a s s e m b l y o r o p e r a t i o n s 12.
- Page 6 • Check Crank Arm and Pedal tightness every 300 miles • Check Base Stabilizers for tightness every 300 miles • FitDesk® uses a low maintenance twin belt drive mechanism and rarely ever needs adjusting. However if belt slipping is noticed remove gearbox covers, loosen Idle wheel nuts (21) and tighten adjuster nuts (22) till slipping stops.
- Page 8 TIP: Make Pedals EXTRA Tight during Assembly. Use OPERATION thread lock on pedal threads during assembly This model FitDesk® uses a Quick release frame unlock design. As a safety precaution please use the technique shown here to Open and Close To Open: pull pin on frame support while placing foot on base.
- Page 9 Parts List METER SADDLE DESK STRAP METER HOLDER SADDLE DESK MAIN FRAME BACK ASSEMBLY REAR DESK FRAME FRONT STABILIZER SUPPORT SADDLE POST STABILIZER MASSAGE BAR SADDLE PEDALS RESISTANCE BANDS HEIGHT SADDLE RESISTANCE DESK DRAWER ASSEMBLY HEIGHT BAND TOOLS ADJUSTER HOLDER KNOB...
- Page 10 Get Started Assembling Your New Exercise Bike MOUNTING HARDWARE IS LOCATED PARTS THEY A s s e m b l y I n s t r u c t i o n s INSTALLED ON FOR EASY IDENTITY Step #1 Install Stabilizers Remove Main Frame (01) and all components and place on a clean durable surface.
- Page 11 • Assemble Saddle (98) to Seat Tube (66) using Nut (100) and Washer (99) • Note: FitDesk® is supplied with optional saddle height extender (71) for increased leg extension if needed. Recommended for use if taller than 5’9” / 175cm •...
- Page 12 Assembly Instructions Get to know your New Exercise Bike Continued STEP#6 Install Meter Holder to bottom of desk • Slide Meter Holder (105) and meter wire through opening in top center • Install and tighten 2 screws (91) through Meter Holder (105) •...
- Page 13 Adjust To Fit STEP#9 Adjust for comfort • Massage Bar has 3 positions for supporting arms while in use. Remove knob (85) and lift or lower to best position. Re-install and Tighten Knob • Desk and ride position can be adjusted by loosening Knobs (89) located on underside of Desk. Slide to comfortable position and Tighten Knobs.
- Page 14 Here we want you to take a look at ways you can use your FitDesk® Resistance Bands and also show you how to maintain them for maximum safety.
- Page 15 Meter Instructions P e r f o r m a n c e M o n i t o r O p e r a t i o n M a n u a l a n d T r o u b l e s h o o t i n g Button Functions: Specifications: Mode: (Select/Reset) Press BELOW THE...
- Page 16 Tell others how we are doing. Your Review pays for donations of FitDesk’s at schools across the nation. For every 10 reviews we donate 1 FitDesk to a school in USA… Please take a moment to help this cause.
Need help?
Do you have a question about the FDX 2.0 - 003 and is the answer not in the manual?
Questions and answers