Table of Contents
Advertisement
Advertisement
Table of Contents

Related Manuals for GME Electrophone TX610


Summary of Contents for GME Electrophone TX610
- Page 1 TX610 HANDHELD UHF TRANSCEIVER User Instructions...
- Page 2 Warning: Safety Information The TX610 is a radio transmitting device. - When transmitting, keep the antenna more than 25mm from any part of the head or body. - Do not transmit near electrical blasting equipment or in explosive atmospheres. - Do not allow children to operate a radio...
-
Page 3: Table Of Contents
TABLE OF CONTENTS Controls........LCD Indicators . -
Page 4: Controls
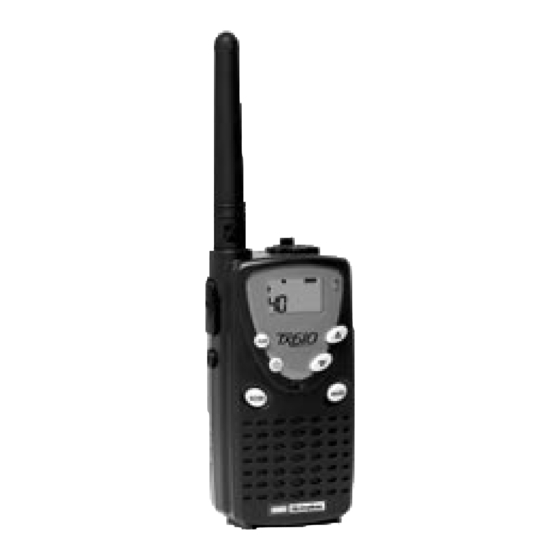
CONTROLS 1. Battery Door. 10. Socket for External 2. Monitor/Backlight Button. Speaker/Mic. 3. Detachable belt Clip. 11. TX/RX/CTCSS Indicator. 4. Antenna. 12. Liquid Crystal Display. 5. Push-To-Talk Switch. 13. Channel/Volume Up. 6. Scan/Key Lock Button. 14. Channel/Volume Down. 7. Microphone. 15. -
Page 5: Lcd Indicators
LCD INDICATORS Signal Strength Indicator Icon: Appears when a signal is being received. Also represents transmit signal power during transmission. Monitor Indicator Icon: Appears when the Monitor (M) button is pressed and the channel monitor function is activated. Key Lock Indicator Icon: Appears when the keypad is locked. - Page 6 Roger Beep Tone Icon: Appears when the Roger Beep tone is on and disappears when tone is not in use. Duplex Indicator Icon: Indicates that Duplex communication has been selected. Battery Level Indicator Icon: Indicates the battery power level. Scan Indicator Icon: Appears when SCAN is enabled and the radio is scanning.
-
Page 7: Powering The Transceiver
POWERING THE TRANSCEIVER Your TX610 transceiver operates on four AAA batteries. While you may use rechargeable batteries, alkaline batteries will provide slightly better performance. Installing the batteries Battery installation is made more convenient when the belt clip is removed. To do this, release the spring clip securing the belt clip to the radio and slide the belt clip downward and away from the radio body. - Page 8 The following guidelines will improve performance and provide longer operating times for the TX610. Do not mix old and new batteries. The use of alkaline-type batteries is recommended to provide the longest operating time.
-
Page 9: General Operation
GENERAL OPERATION NOTE: When the TX610 is not receiving signals, it will remain in the Standby mode. While in the Standby mode, the transmit/receive indicator will flash once every 5 seconds as the unit checks for signals. CONTROLS Power On/Off Button (8) Press and hold the power on/off button (8) for at least 2 seconds. -
Page 10: Push To Talk (Ptt) Button (5
Backlight Function: Press the monitor button momentarily to turn on the LCD backlight. The LCD backlight will turn off automatically after about 5 seconds, or when the monitor button is pressed momentarily once again. Push To Talk (PTT) Button (5) Press and hold the PTT button to speak. -
Page 11: Up Channel/Volume Button
Mode Button (15) The Mode Button is used to set the various feature settings of the TX610. The operation of the Mode button is descibed later in this manual. SIM/DUP Button (9) Duplex operation allows the TX610 to transmit on a different frequency to that which it receives. -
Page 12: Speaker/Microphone Jack
Channel Selected 1 Receive Channel Transmit Channel 31 32 33 34 35 36 37 38 Briefly press the DUP button to switch between Simplex and Duplex mode. When Duplex mode is selected, DUP appears on the display. External Speaker (SPK)/Microphone (MIC) Sockets (10) These sockets allow the connection of a remote speaker microphone setup. - Page 13 To cancel the Key Lock, press and hold the SCAN button again for at least 2 seconds; the icon disappears from the display. Channel Scan Operation Scanning allows you to monitor all channels automatically for valid signals. NOTE: While the scan function is active, the MODE button will be inoperative.
-
Page 14: Operating Modes
7. Call Alarm Selection Channel Selection In order to communicate with another radio, both radios must be on the same frequency. The TX610 is fitted with 40 UHF CB channels (1-40) indicated by the large digits on the LCD display. -
Page 15: Ctcss Code Selection
38 low frequency tones to open and close the squelch on the radio. The TX610 allows you to utilise a coded squelch tone on any channel so you can communicate with another party on the same channel using the same code. (This filters out unwanted transmissions that don’t have the same coded... - Page 16 6. Press the PTT button momentarily to confirm your selection. The TX610 should now display the selected channel number and the CTCSS code you have set. If the CTCSS code was turned Off, only the channel number will be displayed.
-
Page 17: Vox Settings
The CTCSS subcodes do not prevent others from hearing your transmission. They simply provide you with a quieter channel by preventing you from hearing transmissions that are not using the same code as you and are therefore not directed at you. VOX Settings The VOX feature lets you have hands-free conversations. - Page 18 and a dual watch channel. If a signal is received on another channel, the radio will pause on that channel, then resume scanning the two channels 5 seconds after the last transmission ceases. If you wish to talk on the busy channel, press the PTT button while the radio is locked onto that channel, then talk in the usual way.
-
Page 19: Roger Beep Tone
Roger Beep Tone Settings The Roger Beep is a tone which is automatically transmitted whenever the PTT button is released. This tone alerts the receiving party that the transmission has been terminated intentionally. To enable and disable the Roger Beep tone: 1. -
Page 20: Call Alarm Selection
Call Alarm Selection The TX610 provides 5 user-selectable call alarm melodies to alert other users to your incoming call. To select your favorite call alarm melody: 1. Press the MODE button repeatedly until... -
Page 21: Technical Specifications
TECHNICAL SPECIFICATIONS General Frequency Range: 476.425 - 477.400 MHz Channel Spacing: 25 KHz Privacy Codes: 38 for each main channel Dimensions (W x H x D): 53.4mm x 98 mm x 28 mm (Without Antenna) Power Supply Power Source: Alkaline Batteries - 6 VDC (4 x AAA). -
Page 22: Channel Frequency Chart
FREQUENCY CHART Carrier frequency MHz Half-duplex Simplex 477,175 476.425 476.425 476.425 477.200 476.450 476.450 476.450 477.225 476.475 476.475 476.475 477.250 476.500 475.500 475.500 477.275 476.525 476.525 476.525 477.300 476.550 476.550 476.550 477.325 476.575 476.575 476.575 477.350 476,600 476.600 476.600 476.625 476.625 476.650 476.650... -
Page 23: Ctcss Tone Selection Chart
477.225 477.225 477.250 477.250 477.275 477.275 477.300 477.300 477.325 477.325 477.350 477.350 477.375 477.375 477.400 477.400 Continuous Tone Coded Squelch System Tone Frequencies (in Hz) CTCSS TONE FREQUENCIES CTCSS Freq. Hz CTCSS Freq. Hz 67.0 131.8 71.9 136.5 74.4 141.3 77.0 146.2 79.7... -
Page 24: Warranty
GME ELECTROPHONE limit this warranty to the original purchaser of the equipment. GME warrant the TX610 to be free from defects in material and workmanship for a period of twelve (12) months from the date of purchase from their authorised dealer.
Need help?
Do you have a question about the TX610 and is the answer not in the manual?
Questions and answers