Advertisement
www.radioshack.com
OWNER'S MANUAL —
Please read before using this equipment.
Thank you for purchasing a RadioShack Digital Soldering
Station. Your soldering station displays the soldering tip's current
temperature so you can avoid overheating sensitive PCBs
(printed circuit boards).
This soldering station is not intended for commercial use.
Built-in Temperature
Sensor — lets you set
the temperature from
350°F (200°C) to a
maximum of
840°F (450°C)
If an icon appears at the end of a paragraph, go to the box on that page with the
corresponding icon for pertinent information.
Rý Rý Rý Rý
— Warning
©
™
#
"+/2146#06"
#
— Important
2002 RadioShack Corporation. All Rights Reserved.
RadioShack and RadioShack.com are trademarks
used by RadioShack Corporation.
&KIKVCN"5QNFGTKPI
Removable Sponge
#
. . . .
— Caution
5VCVKQP
64-2185
Detachable Stand
° ° ° °
± ± ± ±
— Hint
— Note
Advertisement

Related Manuals for Radio Shack 64-2185


Summary of Contents for Radio Shack 64-2185
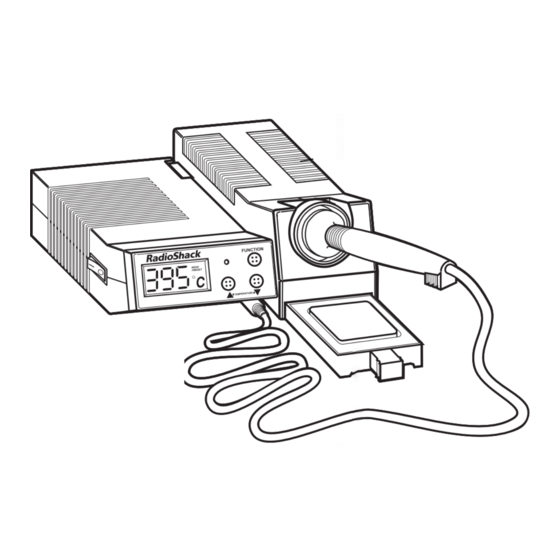
- Page 1 &KIKVCN"5QNFGTKPI ™ www.radioshack.com 5VCVKQP OWNER’S MANUAL — 64-2185 Please read before using this equipment. Thank you for purchasing a RadioShack Digital Soldering Station. Your soldering station displays the soldering tip’s current temperature so you can avoid overheating sensitive PCBs (printed circuit boards).
-
Page 2: Table Of Contents
+/2146#06" %106'065 5#('6;" Preparation ....5 Detaching +05647%6+105" the Stand ....6 Setting the Temperature ....7 We have taken every precaution in Soldering ....8 designing this soldering station to Replacing the Fuse ..9 ensure that it is as safe as we can Resetting the Soldering make it. - Page 3 • Never cover the ventilating slots when using the station. Place the station on a hard, flame resistant base. • Always observe the manufacturer’s directions concerning soldering paste, solder creams, and fluxes. • Never heat plastic materials or liquids (solvents, water, and so forth).
- Page 4 24'2#4#6+10" ° ° ° ° ° ° ° ° C ↔ ↔ ↔ ↔ 1. Use a small pointed Bottom View object, such as a straightened paper ° ° ° ° ° ° ° ° C ↔ ↔ ↔ ↔ clip, to set at the bottom of the station to Celsius or...
-
Page 5: The Stand
4. Insert the soldering iron into the spring support in the soldering iron stand. 5. Soak the supplied sponge with water and then put it in the tray on the stand. 6. Set at the side of the station –/O before plugging it into an AC outlet. -
Page 6: Temperature
To reattach the stand , simply place the large tab on the side of the stand in the notch on the side of the station and slide the stand down until it clicks into place. ± ± "016'" " 5'66+0)"6*'" •... -
Page 7: Station
4. Press once to change the MODE mode (reading versus setting). 5. The station senses the heating element’s temperature. The soldering tip’s current temperature appears. If the temperature is below 300 ° F ± ± (150 ° C), ED ED ED ED appears. - Page 8 51.&'4+0) When the soldering iron has reached the desired temperature, you can start to solder. 1. Remove the soldering iron from the stand. 2. Clean the tip on the sponge in the iron stand, so impurities and oxides are removed from the soldering tip.
- Page 9 7. Clean and tin the soldering iron. Then put the soldering iron back into the stand. 4'2.#%+0)"6*'" (75' 1. Disconnect the soldering iron from AC power. 2. Use a screwdriver to push and rotate the fuse holder cap on the back of the station counterclockwise.
- Page 10 4'5'66+0)"6*'" 51.&'4+0)" 56#6+10 If the soldering station works improperly or if the display is blank, H and press TEMPERATURE- G at the same time to TEMPERATURE- reset the station. %#4' Keep the soldering station dry; if it gets wet, wipe it dry immediately. Use and store the soldering station only in normal temperature environments.
-
Page 11: Specifications
52'%+(+%#6+105 Operating Voltage ......120V AC/60Hz Power Input ........... 80W max. ° ° Temperature Setting Range ..350 to 840 ° ° (200 to 450 Display ..........3-digit LCD ± Tolerance ............Fuse ........1.6A Slow-blow 250 V ° ° Ambient Temperature ....... - Page 12 Just press onto solder and efficient connections, and connection with a hot iron and protects against tip oxidation. let the braid absorb the solder. 64-2185 RadioShack Corporation 08A02 Fort Worth, Texas 76102 Printed in China...
Need help?
Do you have a question about the 64-2185 and is the answer not in the manual?
Questions and answers