
Related Manuals for Sylvania SRCD875


Summary of Contents for Sylvania SRCD875
- Page 1 USER’S GUIDE SRCD875 CD Radio Turntable with USB PLEASE READ BEFORE USING THIS EQUIPMENT...
-
Page 3: Important Safety Instructions
Important Safety Instructions Read these Instructions. FCC Warnings Keep these Instructions. NOTE: This equipmenthas beentestedand found to comply or has been dropped. Heed all Warnings. with the limits for a Class B digital device, pursuant to Part 15 of the FCC Rules. -
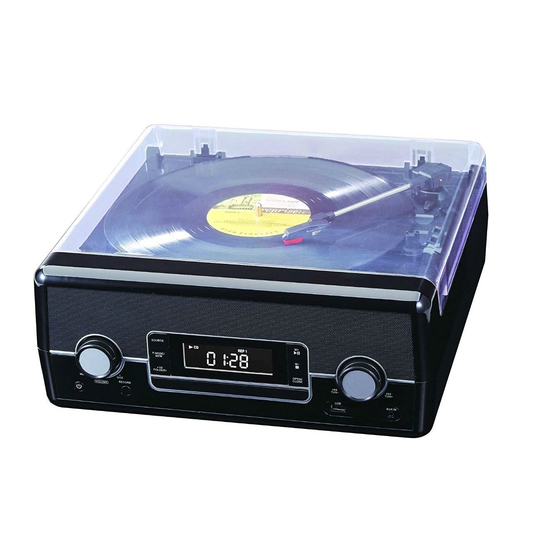
Page 4: Control Location
Control Location Dust Cover Turntable Tone arm 45 RPM Adaptor Tone arm control lever Auto stop control switch Speed selector Hold Down Clip Tone arm rest FRONT SIDE LCD Display SOURCE button M+ / button P-MODE/MEM button M- / button TUN+/- VOLUME Control Controls... -
Page 5: Power Source
Power Source This unit operates using the supplied AC Adapter (Operate at 120V ~ 60Hz) Connecting AC Adaptor NOTE: Only use the supplied adapter. Plug the AC adaptor into normal a power outlet socket. Insert the DC plug of the AC adaptor cord into the DC IN Jack at the back of the unit. Switching On for the first time Plug into AC power by following instructions on the previous Connecting AC adaptor section. - Page 6 Care And Maintenance of Disc WARNING! THIS PRODUCT USES A CLASS 1 LASER. AVOID ANY DIRECT EXPOSURE TO THE LASER BEAM. USE OF CONTROLS, ADJUSTMENTS OR PROCEDURES NOT LISTED IN THIS GUIDE MAY RESULT IN HAZARDOUS EXPOSURE. Handing Compact Discs To remove a CD from its storage case, press down on the center of case and lift the disc out.
-
Page 7: Stop Playback
Stop playback To stop playback, press the M- / button on the unit. The total number of tracks of the CDs / MP3 Disc / USB will be displayed. Skip track During playback, tune the TUN+ / or TUN- / controls to skip to the next or previous tracks. -
Page 8: Radio Operation
4. Repeat steps 2-3 to program up to 20 tracks. 5. Press the M+ / button to play the programmed tracks after programming is completed. The “PROG” icon will be displayed during the programmed playback. 6. Tune the TUN+ / or TUN- / controls repeatedly until you reach the desired programmed tracks number. -
Page 9: Phono Operation
PHONO Operation Gently open the dust cover. 1. Lift the dust cover all the way up until it stop, the cover will now stay open. 2. Remove white protective needle cover by gently pulling towards the front of the unit. 3. -
Page 10: Aux In Operation
RECORDING PHONO During PHONO playback, press RECORD button to record the PHONO audio from start current track in MP3 format. Press RECORD button again to stop recording. The stored file name after recording will be “ REC1.MP3 “ in file “REC”. AUX IN Operation Setting up (AUX IN) connection AUX-IN jack will allow you to connect external music player or external sound source to the... -
Page 11: Specifications
Specifications Power Output....1.5 watt RMS x 2 channels Speakers ..... . 4 Ohms 5 W, x2. -
Page 12: Limited Product Warranty
LIMITED PRODUCT WARRANTY This quality product is warranted to be free from manufacturer’s defects in material and workman-ship, provided that the unit is used under the normal operating conditions intended by the manufacturer. Should you have any problem with this product, please and it is highly recommended to visit our website at www.curtisint.com before you take any other steps as we have additional copies of instruction manuals, operating manuals and trouble shooting tips on our website which gives you the answer on most of the questions you could have in operating the unit.
Need help?
Do you have a question about the SRCD875 and is the answer not in the manual?
Questions and answers