Advertisement
Table of Contents
- 1 Table of Contents
- 2 Introduction
- 3 Safety and Usage Precautions
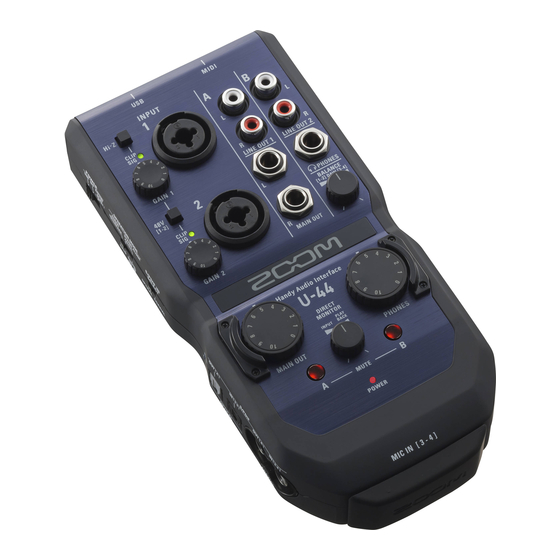
- 4 Part Names
- 5 Connecting with a Computer/Ipad
- 6 Recording
- 7 Playback
- 8 Using Direct Monitoring
- 9 Connecting MIDI Devices
- 10 Using Digital Audio Equipment
- 11 Connecting ZOOM H-Series MIC Capsules
- 12 Using as a Standalone AD/DA Converter and MIC Preamp (Standalone Mode)
- 13 Troubleshooting
- 14 Specifications
- 15 Signal Flow Diagrams
- Download this manual
Advertisement
Table of Contents

Related Manuals for Zoom U-44


Summary of Contents for Zoom U-44
- Page 1 Operation Manual © 2016 ZOOM CORPORATION Copying or reprinting this manual in part or in whole without permission is prohibited.
-
Page 2: Table Of Contents
Contents Introduction ………………………………………… 2 Using Digital Audio Equipment ………………… 19 Safety and Usage Precautions ………………… 3 Connecting ZOOM H-Series Mic Capsules …… 22 Part Names ………………………………………… 4 Using as a Standalone AD/DA Converter and Mic Preamp (Standalone Mode) …………………… 24 Connecting with a Computer/iPad ………………... -
Page 3: Safety And Usage Precautions
Operation using an AC adapter contact ZOOM customer service with the following information: product Never use any AC adapter other than a ZOOM AD-17 . model, serial number, and the specific symptoms of the breakdown or Always hold the AC adapter itself when disconnecting it from an outlet. -
Page 4: Part Names
Part Names MAIN OUT jacks LINE OUT 1 jacks INPUT 1 jack Hi-Z switch LINE OUT 2 jacks Level indicators PHONES jack PHANTOM switch GAIN knobs BALANCE knob INPUT 2 jack MAIN OUT knob PHONES knob DIRECT MONITOR knob MUTE switches Power indicator MIC IN connector TIP: HOT... - Page 5 Part Names (continued) Left side POWER switch OPERATION MODE switch S/PDIF IN SELECT switch SYNC indicator S/PDIF OUT jacks S/PDIF IN jacks Back MIDI OUT jack USB 2.0 port MIDI IN jack DC 5V connector...
- Page 6 Installing the Driver Do not connect the until installation completes. Windows Download the ZOOM U-44 Driver from http://www.zoom.co.jp/downloads/ to your computer. NOTE Launch the installer and install the driver. NOTE Driver installation is not necessary when using a Mac.
- Page 7 Choosing a Power Source Using bus power Use a USB cable to connect the to the computer. <Back> Using batteries Open the battery cover on the bottom. Install the batteries. Replace the battery cover. NOTE batteries. Using an external power supply Connect either the optional AD-17 adapter, a commercially available USB power adapter, or a mobile USB battery to the DC 5V connector.
-
Page 8: Connecting With A Computer/Ipad
Connecting with a Computer Minimize the volume of any output devices that are currently connected to the to AUDIO INTERFACE. Use a USB cable to connect the to the computer. <Back> to USB or BATTERY/DC IN to turn the power on. NOTE can only be used if it is connected to a computer. - Page 9 iPad Connection to an iPad when using either the optional AD-17 power adapter, an external DC power supply, or AA batteries. Minimize the volume of any output devices that are currently connected to the to AUDIO INTERFACE. Install batteries or connect an external power supply. (→ P . 7) Connect the to the iPad using an Apple iPad Camera Connection Kit or Lightning to USB Camera Adapter.
- Page 10 Minimize the volume of any output devices that are currently connected to the Turn off amps, monitor speakers, and any other output equipment that is currently connected to the to OFF .
-
Page 11: Recording
Connecting Instruments Guitar Bass guitar (mono instrument cable) Keyboard (TRS cable) Using the Hi-Z Function and turn on ( 1 and turn off (... - Page 12 Connecting Mics Dynamic mic (XLR cable) Condenser mic (XLR cable) Using Phantom Power When using a condenser mic, turn on (...
- Page 13 Check the status of the input signal. Adjust the input gain. HINT...
-
Page 14: Playback
the volume levels accordingly. Connect headphones or speakers. Speakers Headphones Adjust the headphones/speakers volume. NOTE → P . 17) - Page 15 Muting Outputs muted/unmuted. Press for the channel you want to mute.
-
Page 16: Using Direct Monitoring
Using Direct Monitoring Direct monitoring enables you to listen to input signals before they pass through the without latency. Turn to adjust the balance between the audio input and the computer playback signals. - Page 17 Adjusting the Computer Playback Signal Balance signals during a DJ performance. Live performance DAW software Speakers MAIN OUT [1-2] 30% Click track Headphones [3-4] 70% DJ performance DAW software Speakers MAIN OUT [1-2] 50% Cue audio Headphones [3-4] 50% Turn to adjust the balance between computer playback signals 1-2 and 3-4.
-
Page 18: Connecting Midi Devices
Connecting MIDI Devices <Back> MIDI IN jack MIDI OUT jack Sound module MIDI IN jack MIDI keyboard or MIDI controller MIDI OUT jack NOTE to a DAW using a MIDI port, follow the instructions below to ensure proper connectivity and functionality. <Windows>... -
Page 19: Using Digital Audio Equipment
Set the same sampling rates for the and the connected device. Follow the procedures below to change the sampling rate. <Windows> on the ZOOM Control Panel. <Mac> Open the Utilities folder in the Applications folder, double-click the Audio MIDI Setup application, and then... - Page 20 (continued) Inputting an S/PDIF signal Switch to OPTICAL or COAXIAL to select the input you want to use. Connect the S/PDIF device to the S/PDIF IN jack set in step 1. (input) S/PDIF IN jack S/PDIF IN jack S/PDIF device (output) S/PDIF OUT jack NOTE...
- Page 21 (continued) Outputting a S/PDIF signal Connect the S/PDIF device to the S/PDIF OUT jack. (output) S/PDIF OUT jack S/PDIF OUT jack S/PDIF device (input) S/PDIF IN jack NOTE HINT...
-
Page 22: Connecting Zoom H-Series Mic Capsules
NOTE Turn the power OFF . NOTE be usable. Remove the protective caps from the and the mic capsule or extension cable. - Page 23 NOTE unit. by ordinary stereo files, the stereo width must be adjusted and the data must be converted to an ordinary stereo file after recording by using ZOOM MS Decoder or other plug-in software. HINT Mid-Side Microphone Capsule Shotgun Microphone Capsule...
-
Page 24: Using As A Standalone Ad/Da Converter And Mic Preamp (Standalone Mode)
Using as a Standalone AD/DA Converter and Mic Preamp (Standalone Mode) Minimize the volume of output devices connected to the Supply power. (→ P . 7) to set the sampling rate. (Master) (Slave) Turn the on using the power supplied in step Confirm that the power indicator is lit. -
Page 25: Troubleshooting
C o n f i r m t h a t t h e S o u n d s e tt i n g o f t h e clock source and sampling rate are selected computer that you are using is set to "ZOOM Cannot use in standalone AD/DA mode... -
Page 26: Specifications
24-bit USB2.0 Interface MIDI IN/OUT 5 pin DIN jack Power Source USB bus power (Type B)/ZOOM AD-17 (Micro-B)/DC 5 V power supply (Micro-B)/2 AA batteries (about 4 hours continuous operation with phantom power off) 5 W maximum Power consumption Dimensions 198.8 mm (D) ×... -
Page 27: Signal Flow Diagrams
Signal Flow Diagrams AUDIO INTERFACE mode signal flow diagram DIRECT MONITOR LEVEL INDICATOR INPUT OUTPUT OUTPUT 1 2 3 4 1 2 3 4 1 2 3 4 Hi-Z/ Gain INPUT1 Lo-Z INPUT1 Gain INPUT2 INPUT2 INPUT1 -6dB -6dB COAXIAL IN OPTICAL OUT INPUT3 INPUT2... - Page 28 ZOOM CORPORATION 4-4-3 Kandasurugadai, Chiyoda-ku, Tokyo 101-0062 Japan http://www.zoom.co.jp Z2I-2572-02...
Need help?
Do you have a question about the U-44 and is the answer not in the manual?
Questions and answers