Table of Contents
Advertisement
Quick Links
Advertisement
Table of Contents

Related Manuals for Dynamic DX

Summary of Contents for Dynamic DX
- Page 1 Modular powerchair control system DX SYSTEM MANUAL...
-
Page 2: About This Manual
The term ‘accessory’ used in this manual refers to equipment that is ancillary to the main functioning of the DX system. It does not refer to an accessory of the powerchair. The DX System is a component of the powerchair. -
Page 3: Table Of Contents
Contents 1 Introduction to the DX System .........9 The heart of the DX System ..............9 DX System extensions ................9 DX System connections ................9 One system fits all ..................9 2 A typical DX powerchair setup......10 Installation procedure..............11 2.1.1... - Page 4 4.3.4.6 High Voltage parameters ..........47 4.3.4.7 Temperature Rollback ............ 48 4.3.4.8 Halve Turning Gain............48 5 The DX Master Remote ...........49 Introduction ..................49 5.1.1 The User Control Module (UCM) ......... 50 5.1.2 The physical user interface .......... 50 Available Master Remotes ............
- Page 5 5.3.2 Drive Profiles ..............58 5.3.2.1 The principle..............58 5.3.2.2 Drive Profile 0..............59 5.3.2.3 Speed setting recommendations......... 59 Programming Drive Profiles as a digital Speed Pot..59 Programming Drive Profiles for different environments .................... 60 5.3.2.4 Single Drive Profile mode ..........60 5.3.3 Two or more joysticks: choosing the joystick source 61 5.3.4...
- Page 6 6.1.1 The GPSB/SLIO ............... 97 Secondary Remotes..............98 6.2.1 Available Secondary Remotes ........98 DX Steering/Actuator/Lighting Modules ........99 DX Environmental Control Modules .......... 100 DX Auxiliary Modules ..............100 Programmable parameters ............101 6.6.1 Actuator Settings (CLAM/TAM)......... 103 6.6.1.1 CLAM Enable ..............
- Page 7 Programming accessories ordering information..116 Localised parameter storage ............ 117 Auto Download................118 Programming and testing a DX chair for stability....119 Retain the settings with a Master Remote replacement ..125 7.5.1 Replacement with the same type Master Remote125 7.5.2...
- Page 8 : Issue 1 – October 2007 GBK60348...
-
Page 9: Introduction To The Dx System
Most DX Modules have two DX BUS connector sockets. That way you can connect another DX part easily. DX BUS is an interface (the way the modules "talk" to each other) based on the CAN interface, which is widely used in the automotive industry. CAN is well known for its reliability and its fault detection. -
Page 10: Typical Dx Powerchair Setup
2 A typical DX powerchair setup A standard powerchair installation with the DX System consists of the following electrical parts: The Batteries (section 2.2) The Motors (section 2.3) The Parkbrakes (section 2.4) A DX Power Module (chapter 4) A DX Master Remote (chapter 5) The DX BUS cables (section 3.1) -
Page 11: Installation Procedure
Do not connect any cables before all the parts of the DX System are mounted. • Connect the DX Power Module to the rest of the DX System with the DX BUS cables (see section 2.1.1 for general wiring recommendations). •... -
Page 12: General Wiring Recommendations
DX BUS cable. Warning: 1. Route the cables and fasten all DX components in a position so that the cables, the connectors and the connector sockets do not allow water entry or suffer from physical strain, abuse or damage, like cutting or crushing. -
Page 13: The Batteries
2.2 The batteries The batteries provide the energy for the powerchair to drive. The batteries are connected to the DX Power Module. The DX Power Module sends the energy of the batteries to the motors and to the other modules. - Page 14 1 A (0.05 CA) 20 Ah (100%) Notes: 1. Dynamic Controls recommends to use batteries with a capacity that is at least twice as high as the average discharge current. 2. New batteries often start with only 80% of their rated capacity.
-
Page 15: Battery Charging
2.2.3 Battery charging The battery charging socket of the DX System is a 3-pin XLR type normally located on the DX Master Remote. Signal Battery Battery Positive (B+) charger Battery Negative (B-) Drive Inhibit The Drive Inhibit signal makes sure that the powerchair does not drive when the batteries are being charged. -
Page 16: Battery Protection
2.2.4.2 Battery Saver If the battery Voltage falls below 21V, the DX System reduces the performance of the powerchair. This •... -
Page 17: The Motors
The wheel motors control the powerchair speed and direction. The motors are connected to the DX Power Module. Note: If one of the motors is not connected to the DX Power Module, the DX System detects a Motor Fault (see 9.6) and prevents driving. 2.3.1 Motor types... -
Page 18: Motor Connections
The resistance of different motor types varies typically between 20 and 350 mΩ. The DX Power Module must know what the motor resistance is because the motor resistance determines the internal voltage drop in the motor when the motor is under high load (when the motor needs a lot of current to do a task). -
Page 19: The Parkbrakes
1A – 2A maximum current per parkbrake (dependent on the Power Module used, see the PM manual for the correct specification) 2.4.2 Parkbrake configurations The parkbrake connection pins are located in the motor connectors of the DX Power Modules. 2.4.2.1 Two 24V parkbrakes – Dual, M1 and M2 In the dual configuration each parkbrake is driven from a separate output. -
Page 20: One 24V Parkbrake - Single, M1 Only
Brake Do not connect 24V park- brake like this For this configuration the DX Power Module Park Brake parameter (see section 4.3.3.1) must be set to Single. Warning: Do not connect a second 24V parkbrake in parallel to M1, because an open circuit fault in only one of the two parkbrakes can not be detected. -
Page 21: Two 12V Parkbrakes
Brake 12V parkbrakes configuration 1 12V parkbrakes configuration 2 For both these configurations the DX Power Module Park Brake parameter (see section 4.3.3.1) must be set to Single. Notes: Configuration 1: if the park brakes are connected to M2 instead of M1, a Left Parkbrake Fault (flash code 5) will occur. -
Page 22: Manual Parkbrake Release Switch
2.4.3 Manual parkbrake release switch Manually operated parkbrake release switches must be fitted together with a suitable suppression device across each parkbrake. Fuse Release Battery+ switch Park- brake 2x zener diode 39V, min 2W Surge: min 50W, 2ms Always fit a suppression device Do NOT connect like this The suppression device prevents the generation of high voltage transients causing possible damage to the Power Module or to the parkbrake release switch itself. -
Page 23: Electrical Delay
2.4.5.1 Electrical delay When the powerchair stops, the parkbrakes will be applied. However, the parkbrakes must not be applied too early. The parkbrakes must not engage • if the powerchair stops to change direction (for example forward to reverse) • before the powerchair has come to a halt after high deceleration •... - Page 24 : Issue 1 – October 2007 GBK60348...
-
Page 25: The Dx Bus
This makes the DX BUS a safe and fault tolerant data network. The DX BUS also distributes power to the DX Modules and can safely carry up to 12 Ampere continuously. -
Page 26: The Dx Bus Cable
4' 11" GSM63015 2.0 m 6' 7" GSM63020 2.5 m 8' 2" GSM63025 DX BUS cable with Ferrite bead to improve EMC 2.0 m 6' 7" GSM63020F YY x 100 ± 10 Parameter Value Contact Resistance (per contact) 3 mΩ nom, 7 mΩ max As per IEC 512-2, Positronic Wire resistance @ 20°C... - Page 27 10°C. Avoid extension above 3x compressed length because this can cause a permanent stretching of the coil. 2. Make sure that no spring force is applied to the DX BUS connector; fasten a strain relief or cable tie on or near to the coiled section of...
-
Page 28: Dx Bus Module Connection Layout
Because of the internal resistance of the DX BUS cable, high-current modules can ause a voltage drop on the DX BUS when they are connected far away from the Power Module. For this reason all high-current DX Modules (for example actuators and lights) must be connected as close to the Power Module as possible, preferably in parallel. -
Page 29: The Dx Power Module
4 The DX Power Module The DX Power Module converts the speed and direction signals generated by a DX Remote into high current outputs. These outputs drive the motors and activate the parkbrakes. The Power Module must be connected to: •... -
Page 30: Available Power Modules
* The PMB-S has its two motor and Park Brake channels driven in parallel, for a single motor output with twice the current of each channel of a standard Power Module. The PMB-S is used in DX Systems with only one drive motor, like many servo steered powerchair systems. -
Page 31: Power Module Programmable Parameters
4.3 Power Module programmable parameters Warning: Do not try to program the Power Module before you have read • The programming chapter of this manual • The manual of the specific Power Module 4.3.1 List of parameters Key: Editable at this level (see section 7.1.2.1: Dongle versions) Viewable at this level Parameter Possible Values Default... - Page 32 Parameter Possible Values Default Rev HHP Lite Std Adv Battery Battery Guess Maximum 24.2 – 28.8 V 25 V Battery Guess Minimum 22.3 – 26.2 V 22.7 V Battery Guess Recover 0 – 30 decimal 15 dec Voltmeter Battery Gauge No / Yes Slow Batt Time Scale Driving No / Yes...
-
Page 33: Motors
4.3.2 Motors 4.3.2.1 Current Limit Parameter Possible Values Default Rev HHP Lite Std Adv Current Limit 10 – 80A 40 A The Current Limit is the maximum sustained current that the Power Module is programmed to deliver to the motor. To protect the electronics of the Power Module, the maximum current will be reduced further if the Power Module becomes too hot, dependent on the setting of the Temperature Rollback parameters (see 4.3.4.7). -
Page 34: Load Compensation
4.3.2.3 Load Compensation Parameter Possible Values Default Rev HHP Lite Std Adv Load Compensation 0 – 500 mΩ 0 mΩ Load Compensation automatically compensates for changes in motor speed when the chair drives over loads such as sidewalks, curbs or slopes. Correct Load Compensation is important for all chairs to reach acceptable performance, especially when a chair has switched controls, for example a scanner or Sip and Puff. -
Page 35: Determining The Motor Resistance
Determining the motor resistance There are three ways to determine the motor resistance: 1. Look at the motor data that is provided by the manufacturer of the motor. 2. Measure the motor resistance. 3. Look at the powerchair behaviour. 1. Find the resistance of a motor in the motor data sheets •... - Page 36 2. Measure the resistance of a motor Tools needed • One 12V battery (capacity 20 Ah or more), or a 12V DC power supply that can deliver at least 20A • A resistance of approximately 1 Ohm - 100 Watt, for example: o A high power resistor o Extra motors in series...
- Page 37 6. If the current that you have measured is less than 8A, either use a 24V battery or use half the resistor value and repeat the measurement. For a good measurement the current should be between 8A and 20A. 7. The motor resistance is the voltage divided by the current: Measured Voltage at the motor connector Motor resistance Measured Current...
- Page 38 Step by step 1. Turn the DX System ON 2. Position the powerchair in front of the edge 3. Connect the HHP to the DX Master Remote 4. Enter Technician Mode (see section 7.1.1.1, 'HHP Technician Mode') 5. Press NEXT...
- Page 39 L o a d c o m p e n s a t i o n 8 0 m i l l i o h m s 17. Turn the DX System OFF E X I T N E X T D O W N 18.
-
Page 40: Temp Dependent Load Comp
4.3.2.4 Temp Dependent Load Comp Parameter Possible Values Default Rev HHP Lite Std Adv No / Yes Temp Dependent Load Comp Temperature Dependent Load Compensation calculates the correct Load Compensation values for different temperatures of the Power Module. This will make sure that Load Compensation does not become too high when the Power Module is cold, or too low when the Power Module is hot. -
Page 41: Adjusting Veer Compensation With The Hhp
Adjusting Veer compensation with the HHP 1. Turn the DX System ON 2. Connect the HHP to the DX Master Remote 3. Enter Technician Mode (see section 7.1.1.1: HHP Technician Mode) 4. Press NEXT 5. Press YES T e c h n i c i a n m o d e... -
Page 42: Left/Right Motor Swap
Note: 1. If you invert only one of the two motors, the performance of the DX System will be reduced. This situation is not recommended for long term use. 2. The Left Motor can refer to M1 or M2, dependent on the Left / Right Motor Swap setting. -
Page 43: Motor Stall
If a stall timeout has occurred, the powerchair will not drive and Flash Code 11 (see 9.6) will be displayed on the System Status LED of the DX Master Remote. To reset the system, switch it off and switch it back on again. -
Page 44: Maximum Motor Volts
4.3.2.12 Maximum Motor Volts Parameter Possible Values Default Rev HHP Lite Std Adv Maximum Motor Volts 24 – 30 V 26 V Maximum Motor Volts sets the maximum voltage that the Power Module will apply to the motor. Note: If local regulations require that the powerchair speed is limited to a specific value, use this parameter to set a speed limit for a particular chair type (for specific motors and a specific wheel diameter). -
Page 45: Park Brakes
4.3.3 Park Brakes 4.3.3.1 Park Brake Parameter Possible Values Default Rev HHP Lite Std Adv Park Brake Single / Dual Dual Single – Only parkbrake output M1 is active. Do not use parkbrake output M2. Dual – Parkbrake output M1 and M2 are both active. See section 2.4.2: Parkbrake configurations for more information on how to connect the parkbrakes. -
Page 46: Battery
The Battery Gauge will show 100% battery capacity at this voltage. Battery Guess Minimum is the voltage at which the DX System thinks that the battery is completely empty. The Battery Gauge will show 0% battery capacity at this voltage. -
Page 47: Batt Gauge Ramp Rate
(for example: when the DX system is switched on after charging). This can mislead the battery gauge into thinking that the batteries are full, when in fact, they are not. -
Page 48: Temperature Rollback
4.3.4.7 Temperature Rollback Parameter Possible Values Default Rev HHP Lite Std Adv 40 – 75 °C 50 °C Temperature Rollback Minimum 50 – 85 °C 70 °C Temperature Rollback Maximum To protect the Power Module from overheating, a thermal roll-back algorithm reduces the output current when the Power Module becomes too hot. -
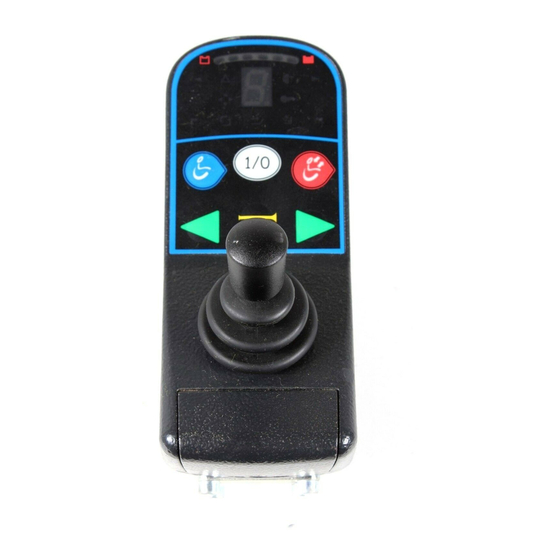
Page 49: The Dx Master Remote
It must be read together with the installation manual of the actual Master Remote that will be installed on the powerchair. 5.1 Introduction The Master Remote is the central building block in a DX System. Every DX System must have one, and only one Master Remote. The DX Master Remote •... -
Page 50: The User Control Module (Ucm)
5.1.1 The User Control Module (UCM) The UCM is the brain, or the main computer, of the DX System. The UCM is built into every Master Remote. The UCM is responsible for • System wake-up and shutdown (the UCM is connected to the system on/off switch) •... -
Page 51: Available Master Remotes
Master Remote Application Advanced driving Advanced seating Highly customisable Switched control available Joystick only menu control available DX-REMG90A Environmental control DX-REMG90T G90A : two sockets to connect external switches G90T : two toggle switches Advanced Driving Seating and lighting All actuators directly accessible from keypad... -
Page 52: Master Remotes Without Joystick
Advanced driving, seating, lighting and environmental control 3-quadrant RIM, switched or proportional Optional joystick control with Secondary Remote Bi-directional actuator control DX-REMG91 Highly customisable DX-REMG91S Accessory Shortcut Key gives access to the last used function G91S provides single switch scanning... -
Page 53: Programmable Parameters
5.3 Programmable parameters 5.3.1 Speed and acceleration principles Speed Limiting Options Power Joystick deflection Speed Demand Module 0-100 % 0 – 100 % 5.3.1.1 Speed Demand When the user deflects the joystick or presses a drive control switch, the UCM (see section 5.1.1) converts the Joystick Deflection value into a Speed Demand value. -
Page 54: Speed Limiting Options
5.3.1.2 Speed limiting options The DX System offers many options that limit the available Speed Demand range to suit safety requirements as well as the preferences of the user. These options can be grouped into five categories: • the Maximum Motor Volts parameter •... - Page 55 The Chair Speed parameter (5.3.9.1) on the HHP (0-10, converted to 0-100%) • The DX BUS Speed Pot parameter (0-100%). Any DX Module can take control of this parameter via the DX BUS. The actual output value of the Speed Pot function will be the lowest of all the parameters above.
-
Page 56: Acceleration And Deceleration
5.3.1.3 Acceleration and deceleration Acceleration is the rate at which the speed increases when the joystick is pushed out of the centre position. Too high Good Too low • Too sensitive • Smooth • Unresponsive • Jerky • Dependent on user •... -
Page 57: Damping Point
Damping Point When the powerchair almost reaches the desired speed, the acceleration / deceleration rate (that initially is given by the applicable acceleration / deceleration parameter of the previous page) is slowly decreased to zero. This prevents a sudden change in acceleration once the desired speed is reached. -
Page 58: Drive Profiles
The DX system can store up to 6 Drive Profiles. Each Drive Profile can be independently customised to provide varying levels of speed and responsiveness. -
Page 59: Drive Profile 0
5.3.2.2 Drive Profile 0 Drive Profile 0 has all parameters set the same as Drive Profile 1, but prevents the powerchair from driving. This is a safety feature required by some regulatory authorities to prevent a sudden change in speed when progressing from Drive Profile 1 (normally the slowest), down to Drive Profile 5 (normally the fastest) when Wrap Profiles is enabled (see section 5.3.8.2). -
Page 60: Programming Drive Profiles For Different Environments
Programming Drive Profiles for different environments • Turning speed can be higher for indoor drive profiles, because fast turning at low speed can be helpful indoors to drive around objects. • Fast turning at high forward speed can be dangerous, so the fast outdoor drive profile should have a lower turning speed. -
Page 61: Two Or More Joysticks: Choosing The Joystick Source
This parameter can be adjusted with the HHP and the Wizard. 5.3.4 Reducing the movement to operate the joystick Normally a DX powerchair will reach full speed only when the joystick is pushed as far as it can mechanically go (for example when it hits the restrictor plate). -
Page 62: List Of Parameters
5.3.6 List of parameters Key: Editable at this level (see section 7.1.2.1: Dongle versions) Viewable at this level Parameter Possible Values Default HHP Lite Std Adv Drive Profiles Forward Speed @ Maximum 10 – 100 % -,A,C Forward Speed @ Minimum 5 –... - Page 63 Parameter Possible Values Default HHP Lite Std Adv Drive Profile Options Maximum Profile Number 1 - 5 -,A,C Wrap Profiles No / Yes Change Profile While Driving No / Yes -,A,C Allow Non-Driving Profile No / Yes -,A,C Sleep Timeout 1 –...
- Page 64 Parameter Possible Values Default HHP Lite Std Adv System Settings -,A,C CLAM Slowdown 0 – 100 % 20 % -,A,C Neutral to PB Delay 20 – 5000 ms 100 ms Chair Speed Enable No / Yes Single Profile Mode No / Yes CANH Power Switch No / Yes CAN Terminator...
-
Page 65: Drive Profiles Parameters
5.3.7 Drive Profiles parameters These parameters have to be set for every Drive Profile: Parameter Possible Values Default HHP Lite Std Adv Forward Speed @ Maximum 10 – 100 % -,A,C Forward Speed @ Minimum 5 – 100 % Forward Acceleration 10 –... -
Page 66: Forward Speed @ Maximum
5.3.7.1 Forward Speed @ Maximum Parameter Possible Values Default HHP Lite Std Adv Forward Speed @ Maximum 10 – 100 % -,A,C Sets the forward speed of the powerchair when the joystick is fully deflected forward and the Speed Pot is in its Maximum position. This parameter must be set for every Drive Profile. -
Page 67: Reverse Speed @ Maximum
5.3.7.5 Reverse Speed @ Maximum Parameter Possible Values Default HHP Lite Std Adv Reverse Speed @ Maximum 10 – 100 % -,A,C Sets the reverse speed of the powerchair when the joystick is fully deflected backward and the Speed Pot is in its Maximum position. This parameter must be set for every Drive Profile. -
Page 68: Turning Speed @ Maximum
5.3.7.9 Turning Speed @ Maximum Parameter Possible Values Default HHP Lite Std Adv Turning Speed @ Maximum 20 – 100 % -,A,C Sets the turning speed of the powerchair when the joystick is fully deflected sideways and the Speed Pot is in its Maximum position. This parameter must be set for every Drive Profile. -
Page 69: Non-Linear Turn
5.3.7.13 Non-Linear Turn Parameter Possible Values Default HHP Lite Std Adv Non-Linear Turn No / Yes Non-Linear Turn decreases the joystick gain (output/input ratio) for low turning speeds. This gives the user finer steering control at low turning speed, because more movement of the joystick is required to generate the same turning output. -
Page 70: Short Throw Travel / Short Throw Shape
100 – 200 % 200 % Normally a DX joystick will output a 100% Joystick Deflection signal (see 5.3.1) only when the joystick is pushed as far as it can mechanically go (for example when it hits the restrictor plate). - Page 71 To keep the chair stable, the Short Throw Shape parameter can shave the corners off the 'square of movement' that a high Short Throw Travel value has created. Short Throw Shape 200% Short Throw Shape 150% Short Throw Shape 100% A good starting point for a user with limited hand movement/strength can be: Parameter Name Value...
-
Page 72: Grip
For each Drive Profile, the dealer or therapist can use the Grip parameter to indicate to the DX System the kind of surface that this Drive Profile will be used in. If the intended surface offers little physical grip, the value of the Grip parameter can be decreased. -
Page 73: Damping Point / Turn Damping / Speed Damping
5.3.7.16 Damping Point / Turn Damping / Speed Damping Parameter Possible Values Default HHP Lite Std Adv Damping Point 10 – 100 % 40 % Turn Damping 10 – 100 % Speed Damping 5 – 100 % 40 % When the powerchair almost reaches its desired speed during acceleration or deceleration, the acceleration/deceleration rate is slowly decreased to zero. -
Page 74: Chair Stability Parameters
5.3.7.18 Chair Stability Parameters Parameter Possible Values Default HHP Lite Std Adv Speed x Turn for Grip 5 – 100 % 100 % Accel Out Of A Turn For Grip 0 – 200 % 100 % Accel Into A Turn For Grip 0 –... - Page 75 Speed X Turn for Grip is the absolute maximum speed/turn product for which the chair is stable on a surface with good grip. The DX System limits the turning speed when the forward speed is too high, and it limits the forward speed when the turning speed is too high.
- Page 76 The increase of forward force demand combined with less traction reduces the stability of the chair. To compensate for the reduced stability, the DX System constantly calculates the traction on each drive wheel and then limits the momentary value of the forward acceleration dependent on the value of Accel out of a Turn for Grip.
- Page 77 See section 7.4: Programming and testing a DX chair for stability. A possible starting point to prevent Front Wheel Drive powerchairs from spinning...
-
Page 78: Steering Stability Parameters
5.3.7.19 Steering stability parameters Parameter Possible Values Default HHP Lite Std Adv Turning @ Full Speed 5 – 100 % 100 % Turning Accel @ Full Speed 100 – 300 % 100 % If the powerchair travels at full speed, the chair can easily "snake". When the powerchair snakes, it slightly changes direction from left to right. - Page 79 The Turning @ Full Speed and Turning Accel @ Full Speed parameters change the values of their own source parameters linearly dependent on the momentary UCM Speed Demand value, (see 5.3.1.1), not on the joystick deflection. Turning Speed @ Maximum: 25% Turning Acceleration: 100% Turning @ Full Speed:...
-
Page 80: Drive Profile Options Parameters
5.3.8 Drive Profile Options parameters Parameter Possible Values Default HHP Lite Std Adv Maximum Profile Number 1 - 5 -,A,C Wrap Profiles No / Yes Change Profile While Driving No / Yes -,A,C Allow Non-Driving Profile No / Yes -,A,C Sleep Timeout 1 –... -
Page 81: Wrap Profiles
If the Allow Non-Driving Profile parameter (5.3.8.4) has the value 'Yes', Drive Profile 0 appears between Profile 5 and 1. The function of Wrap Profiles varies between the different DX Master Remotes and the way they are configured. The Wrap Profiles parameter is ignored in certain configurations. -
Page 82: Allow Non-Driving Profile
-,A,C If sleep mode is enabled with the Sleep Mode Enable parameter (see section 5.3.9.8), Sleep Timeout sets the number of minutes of inactivity after which the DX System goes to sleep. Sleep Timeout can be set separately for each Drive Profile. -
Page 83: Joystick Source
There can not be more than one joystick of the same type simultaneously connected to the DX System. For example: one RJM-type joystick, an ACU and an ARC can be simultaneously connected, but not two RJM-type joysticks. RJM-type joysticks include: all DX-RJM joysticks, switch modules and the Sip and Puff module. -
Page 84: Joystick Swap Forward / Reverse
This parameter reverses the direction of the DX Master Remote's built-in joystick. Parameter Deflection Driving Value direction Forward Forward Reverse Reverse Forward Reverse Reverse Forward Use this parameter if the DX Master Remote is mounted in a reverse orientation. : Issue 1 – October 2007 GBK60348... -
Page 85: General User Options Parameters
Neutral Maximum defines how far the joystick must be moved from the centre position before the powerchair starts to move. If this parameter is increased, the joystick must be deflected more to start driving. This parameter affects all joysticks in the DX System. -
Page 86: Disable Oonapu Faults
4 seconds, the OONAPU fault will become a latching fault. To clear a latching fault, the user must switch the DX System off and then on again. If Disable OONAPU Faults has the value 'Yes', the user has unlimited time to return the joystick to the centre. -
Page 87: Drive Delay After Power-Up
No / Yes -,A,C If Sleep Mode is enabled, the DX System goes to sleep after the number of minutes of inactivity set by the Sleep Timeout parameter (see 5.3.8.5). During the sleep mode the DX System is switched off. To switch the system back on •... -
Page 88: Power-Up Profile Number
Power-up Profile Number 1 - 7 The Power-up Profile Number is the Profile in which the DX System will start when the system is switched on. If Power-up Profile Number has the value '7', the DX System will start up with the same Drive Profile that was active when the DX System was powered down. -
Page 89: System Settings Parameters
5.3.10 System Settings parameters Parameter Possible Values Default HHP Lite Std Adv -,A,C CLAM Slowdown 0 – 100 % 20 % -,A,C Neutral to PB Delay 20 – 5000 ms 100 ms Chair Speed Enable No / Yes Single Profile Mode No / Yes CANH Power Switch No / Yes... -
Page 90: Neutral To Pb Delay
5.3.10.2 Neutral to PB Delay Parameter Possible Values Default HHP Lite Std Adv -,A,C Neutral to PB Delay 20 – 5000 ms 100 ms The Neutral to Parkbrake Delay parameter sets the delay between zero speed demand and the moment that the parkbrakes are de-energised. The correct value of this parameter is dependent on the mechanics of the parkbrake that is used on the chair. -
Page 91: Single Profile Mode
DX BUS lines. Normally the Power Module and the UCM Master Remote provide this termination. If CAN Terminator is set to 'Yes', the UCM will apply a CAN terminator to the DX BUS CANH and CANL signal lines. This is the standard setting. Only set CAN Terminator to... -
Page 92: Ucm Joystick Swap Left/Right
If no ACU is fitted, setting this parameter to 'Yes' will slightly decrease the performance of the chair, because the DX System will regularly search for the presence of an ACU. : Issue 1 – October 2007... -
Page 93: Acu Joystick Swap Left/Right
– The DX System remains in the Attendant Mode until the Momentary Switch is pushed to release the control of the powerchair back to the user. If ACU has Momentary Switch (5.3.10.11) is set to 'No', the value of ACU Momentary... -
Page 94: Rjm Enable
For example: the Heavy Duty joystick or the Sip and Puff Module. If the DX System uses a switched joystick, set RJM has Analog Joystick to 'No'. If this parameter has the value 'No', the UCM ignores small speed signals and small direction signals from this joystick. - Page 95 Unwanted small direction signals can be caused by a small analog offset signal when a switched joystick outputs "zero". These small direction signals can cause the powerchair to veer slightly. Intended direction Veer Actual direction Small direction signals can cause a slight veer With a proportional joystick the user can correct for any veer by moving the joystick slightly sideways.
-
Page 96: Joystick Switch Threshold
Some functions such as actuator operation and lighting control can use the joystick as an input switch. Joystick Switch Threshold sets the value beyond which the DX System assigns the joystick to be in the "on" position. Set this parameter lower than 50% to •... -
Page 97: Dx Modules
6 DX Modules 6.1 Introduction Including the Power Module and the Master Remote, a DX System can contain up to 16 DX compatible modules dependent on the application. Available types of DX Modules are • Remote Joystick Module (RJM), DX-RJM Secondary Remotes Switch modules •... -
Page 98: Secondary Remotes
(the joystick or the switches, dependent on the type of Secondary Remote) to speed and direction signals, and • sends the speed and direction signals as DX BUS messages to the Master Remote via the DX BUS. To use a Secondary Remote, select it as the Joystick Source (see 5.3.8.7) in one of the... -
Page 99: Dx Steering/Actuator/Lighting Modules
• Five actuators • Front lights, Rear lights • Left and right turning indicators, Hazard lights DX-CLAMB All power and control signals provided through the DX BUS Combined Lighting Soft Start feature provides smooth actuator control and Actuator Module Slow/Stop input (for actuator position switches) 24V lighting (DX-LM-Z) 12V regulated outputs for TÜV approved lighting (DX-LM-TUV) -
Page 100: Dx Environmental Control Modules
6.4 DX Environmental Control Modules DX Module Function / Applications Needs the DX-SCR, the G90 or the G91 Remotes to operate Uses the Secondary driving Remote as input control '8 Output mode' controls up to eight separate devices DX-ECU 'Mouse mode' acts as a mouse mover, fifth switch acts as click... -
Page 101: Programmable Parameters
6.6 Programmable parameters Parameter Possible Values Default HHP Lite Std Adv Actuator Settings ( CLAM/TAM CLAM Enable No / Yes -,A,C CLAM is Critical No / Yes -,A,C Actuator While Driving No / Yes -,A,C Actuator 1 Enable No / Yes -,A,C Actuator 2 Enable No / Yes... - Page 102 Parameter Possible Values Default HHP Lite Std Adv Remote Control Settings (ARC/RSM) ARC Enable No / Yes -,A,C ARC Always Drives No / Yes Actuators 1&2 ARC Drives Actuators 1&2 No / Yes ARC Drives Actuator 3 No / Yes ARC Drives Actuator 4 No / Yes ARC Drives Actuator 5...
-
Page 103: Actuator Settings (Clam/Tam)
No / Yes -,A,C Set to 'Yes' for CLAM or TAM operation. If this parameter has the value 'No', the DX System does not detect a CLAM or a TAM (even if one is present and connected) and all CLAM-related parameters are ignored. -
Page 104: Actuator 1 - 5 Enable
Setting the value of these parameters to 'Yes' enables the corresponding actuator. If an actuator is not enabled, its actuator select buttons are ignored and the actuator will not be present in the actuator menu (if the used DX Master Remote has an actuator menu). -
Page 105: Actuator Timeout
– The switches on the Master Remote or the ARC operate the actuator If the ARC is present in the DX System, this parameter is normally set to 'No'. Note: Some Master Remotes can select the actuator with joystick left/right movement and operate the actuator with joystick forward/backward movement. -
Page 106: Actuator Buttons Are Bi-Directional
One actuator button or 'joystick forward' performs up/extend, a second actuator button or 'joystick reverse' performs down/retract If the ARC is present in the DX System, this parameter is normally set to 'No'. Note: In UCM software Rev C this parameter has moved to the 'Remote Specific Options' section. -
Page 107: Clam Lighting Enable
Possible Values Default HHP Lite Std Adv CLAM Lighting Enable No / Yes If a DX-CLAMB is fitted and it controls the powerchair lights, set CLAM Lighting Enable to 'Yes'. Set to 'No' in all other cases. 6.6.2.2 Lighting Module Enable Parameter... -
Page 108: Side Lights Enable
Remember Hazard State No / Yes Yes – If the hazard lights were on when the DX System was turned off, they will be switched on again when the DX System is turned on. – The hazard lights are always off after the DX System is turned on. -
Page 109: Remote Control Settings (Arc/Rsm)
ARC Enable No / Yes -,A,C Yes – The user can use the ARC when it is present in the DX System. – The ARC is not operational, even when it is present in the DX System. Note: For version '–' and 'A': If ARC Enable is set to 'Yes', set Joystick Actuators (6.6.1.8) to 'No'. -
Page 110: Arc Drives Actuator 3, 4, 5
No / Yes ARC Drives Actuator 5 No / Yes Yes – The chosen actuator channel on the DX-ARC or the DX-ARC-SWB drives the actuator. – The chosen actuator channel on the DX-ARC or the DX-ARC-SWB has another function, see drawing. -
Page 111: Environment Control Settings (Ecu1/Ecu2)
ECU 2 Enable No / Yes The DX System supports a maximum of two DX-ECU modules. Each of these modules has eight channels that can be controlled. It has become customary to use ECU1 as a mouse mover module and ECU2 as an environment control module. - Page 112 : Issue 1 – October 2007 GBK60348...
-
Page 113: Dx Programming
With inappropriate programming settings, certain features and options may not be accessible or perform as expected. DX is a fully programmable system that can be optimised for particular chair types and to suit the driving environment and preferences of individual users. -
Page 114: Programming Tools
Drive Program parameters. Warning: The DX-HHP is for use only by powerchair manufacturers and their authorised dealers. It is not for use by the powerchair user. Dealers may only program parameters as instructed by the powerchair manufacturer. -
Page 115: The Pc-Based Wizard Program
7.1.2 The PC-based Wizard program The Wizard is a PC-based tool suited to programming production runs of identical powerchairs or modules, or one-off highly customised powerchairs. 7.1.2.1 Dongle versions The Wizard requires a hardware security key (dongle) to write parameters to a controller. Without dongle the Wizard can still display parameter values and diagnostic messages, but nothing can be edited or written to a controller. -
Page 116: Programming Accessories Ordering Information
7.1.3 Programming accessories ordering information Dynamic DX Programming Accessories Part Description DC Part # Qty/Unit Wizard Kit – Programming Kit Contains DWIZ-KIT software, cables and adapter (no dongle) Wizard – Software Only (CD) DWIZ-SW Wizard Dongles – Parallel port OEM/Advanced version... -
Page 117: Localised Parameter Storage
7.2 Localised parameter storage The parameters of the DX System are stored in several locations: • The Master Remote (these parameters are also called UCM parameters) • The Power Module • Each intelligent DX Module stores its own parameters The Master Remote stores all parameters that relate to speed, direction and user preferences, for example: •... -
Page 118: Auto Download
The DX Master Remote stores a backup copy of the parameters of all other DX Modules that are present in the DX System. After a DX Module is replaced, the DX Master Remote detects that the parameters of the new module do not have the same values as the parameters of the old module. -
Page 119: Programming And Testing A Dx Chair For Stability
7.4 Programming and testing a DX chair for stability The best results when programming a DX chair will be obtained when the person who programs the chair physically tests the settings on the chair in question, and adjusts the settings based on the observed physical chair behaviour. The following procedure... - Page 120 2. Speed programming and testing a. Program the static speeds (the Speed @ Maximum parameters) of the Drive Profiles (5.3.2). Before programming these speeds, consider the intended use of the drive profiles (as digital speed pot or as environmental profile), because this will change your options later in the process.
- Page 121 4. Steering control programming and testing Drive the chair to a flat open space with good grip. Sit in the chair and select the fastest Drive Profile. Set Grip (5.3.7.15) and Speed x Turn for Grip (5.3.7.18) to 100%. Slowly a.
- Page 122 Stop the chair and set Grip to 80%*. g. Repeat steps 5a to 5e. With a Grip setting of 80%* the chair should turn comfortably over the full range of joystick positions. • If the chair does not turn comfortably, decrease Speed x Turn fo r Grip further until the chair does turn comfortably.
- Page 123 DX System can not make it stable. Include in the user manual that the chair can not be driven on this type of surface.
- Page 124 p. CAREFULLY repeat steps 5a to 5e and 5h to 5m. Check that the chair does not lose contro • If the chair loses control, decrease the value of the Grip parameter until the chair d oes not lose control. •...
-
Page 125: Retain The Settings With A Master Remote Replacement
The DX Master Remote stores a backup of all the programmable DX parameter values. If the DX Master Remote is replaced, all the original parameter values are lost because the new DX Master Remote will overwrite the original parameter values with its own "backup"... - Page 126 Switch off the old Master Remote b) Disconnect the old Master Remote from the PC c) Disconnect the old Master Remote from the DX BUS d) Connect the new Master Remote to the DX BUS e) Connect the new Master Remote to the PC...
- Page 127 If you have doubts about the suitability of a program that is already loaded into a chair, contact the manufacturer of the chair. Complete DX System programs can be easily sent by email. This makes the process of sending and downloading settings efficient and straightforward.
-
Page 128: Replacement With Another Type Master Remote
7.5.2 Replacement with another type Master Remote If the Master Remote is replaced by another type Master Remote with different features (for example: a REMG80 is replaced by a REMG91), the parameter set that is backed up by the Wizard must be converted to the new Remote version and type before it can be written back. - Page 129 In this example the conversion is from a Master Remote with a joystick (REMG80) to a Master Remote without a joystick (REMG91). REMG80 REMG91 Wizard detects that the new Master Remote does not have a joystick and sets the Joystick Source parameter (5.3.8.7) for every Drive Profile to the external joystick (Remote Joystick Module, RJM).
-
Page 130: Testing
8.2 The testing procedure 1. Turn on the DX System with the power switch. Check that the System Status LED on the Master Remote is on and does not flash. - Page 131 4. If the Master Remote has a horn, press the horn button. Check that the horn operates correctly. 5. Turn the DX System ON and OFF several times and listen. Check that the parkbrakes do not click. Leave the DX System ON.
- Page 132 Manuals of all other DX Modules that are installed on the powerchair. 29. Repeat testing and programming of the DX System until the performance of the powerchair is as expected. 30. Park the powerchair in a safe location and turn off the DX System. : Issue 1 – October 2007 GBK60348...
-
Page 133: Diagnostics
Programmer or the Wizard. 9.1 Limp Mode If the DX System detects a fault that does not demand the powerchair to be stopped completely, it will go to 'Limp Mode'. This is a reduced speed mode that recognises problems, but allows the powerchair user to drive slowly towards a safe environment where the problem can be investigated. -
Page 134: Out Of Neutral At Power Up (Oonapu)
OONAPU condition disappears and the powerchair can drive normally. If the joystick is not returned to the centre within 4 seconds, the OONAPU condition will become a latching fault. To clear a latching fault, the user must switch the DX System off and then on again. -
Page 135: Battery Warning Conditions
9.5 Battery warning conditions The Battery Gauge (if the used Master Remote has one) flashes its LEDs to indicate a battery warning. The number of LEDs that flash indicate the type of the warning. Flashing Description Warning condition / Cause / Action LEDS Warning condition: The battery voltage has exceeded 28V. -
Page 136: Flash Codes
• Replace the critical module A DX Module with a Slow/Stop input (for example a CLAMB) is set to slow or stop. This may not be a fault, it is probably caused by the seat position being extended. Flash Code 2 is shown to indicate that the chair may go slower than expected. - Page 137 Flash Fault source Meaning Code The motor is not connected to the Power Module, or Motor 1 / L there is a short-circuit in the motor connection. • Check that the motor cables are not loose or damaged • Disconnect the motor plug from the Power Module and Check with a multi meter that there is no connection between the motor pins and the parkbrake pins.
- Page 138 If the Hazard Lights were already switched on when the DX System was turned on, sometimes Flash Code 10 occurs. • Turn off the Hazard Lights, turn off the DX System then turn the DX System on again. The motor current has been at, or close to, current limit for longer than the Stall Timeout parameter value.
-
Page 139: Appendices
Device Classification Europe The DX System is a component of a Class I medical device as detailed in the Council Directive 93/42/EEC concerning Medical Devices. The DX System is a component of a Class II medical device (Powered Wheelchair) as detailed in 21 CFR §... -
Page 140: Maintenance
2. All switchable functions on the Dynamic electronics system must be regularly tested to make sure that they function correctly. 3. All Dynamic electronic components must be kept free of dust, dirt and liquids. If necessary, wipe with a cloth dampened with warm water. Do not use solvents or abrasive cleaners. -
Page 141: Safety And Misuse Warnings
10.4 Safety and Misuse warnings Warnings to be included in the User Manual The following warnings are applicable to the installer and must be passed on to the end- user before use of the product. • Do not install, maintain, or operate this equipment before you have read and understood all the instructions and all the manuals for this product and all the other products that you use or install together with this product. - Page 142 Dynamic Controls has made every effort to make sure that RFI does not change the behaviour of the controller, but very strong signals can still cause a problem.
-
Page 143: Electromagnetic Compatibility (Emc)
10.5 Electromagnetic Compatibility (EMC) Dynamic Electronic Controllers have been tested on typical vehicles to confirm compliance with the following appropriate EMC standards: USA: ANSI/RESNA WC/Vol:2 - 1998 Sec 21 Europe: EN12184: 1999 Sec 9.8.1-3 National and international directives require confirmation of compliance on particular vehicles. -
Page 144: Contact Details
Contact Details Dynamic has a global network of sales and service centres. Please contact your nearest Dynamic representative for Sales and/or Service advice, or visit our web site: www.dynamiccontrols.com New Zealand – Head Office Australia – Service Agent Dynamic Controls...
Need help?
Do you have a question about the DX and is the answer not in the manual?
Questions and answers