Table of Contents
Advertisement
Advertisement
Table of Contents

Subscribe to Our Youtube Channel
Related Manuals for MFB DOMINION 1


Summary of Contents for MFB DOMINION 1
- Page 1 Operating Manual...
- Page 2 IMPRINT MFB – Ingenieurbüro Manfred Fricke (Engineering office) Neue Str. 13 14163 Berlin - Germany www.mfberlin.de...
- Page 3 DISCLAIMER MFB will not assume any responsibility for errors which may occur in this manual. The content of these instructions is subject to change without prior notice. When this manual was created, good care was taken to exclude any mistakes and contradictions. MFB will not accept any guarantees for this manual except those provided by commercial law.
- Page 4 Nevertheless, this product is special waste and must not be disposed in ordinary household waste. For disposal, please contact your local dealer, MFB's local distributor or www.mfberlin.de.
-
Page 5: Table Of Contents
Table of Contents General Setup OSCILLATORS VCO - Modulation VCO - Synchronization VCO - Frequency Modulation (FM) MIXER FILTER VCF - Modulation ENVELOPES LFOs MODULATION / LFO3 PITCH Key Functions - Aftertouch Single-/Multi-Trigger Glide VELOCITY/PROGRAMMING VELOCITY - Routing SYSTEM SETTINGS Preset Selection Saving Presets Program Changes... -
Page 6: General
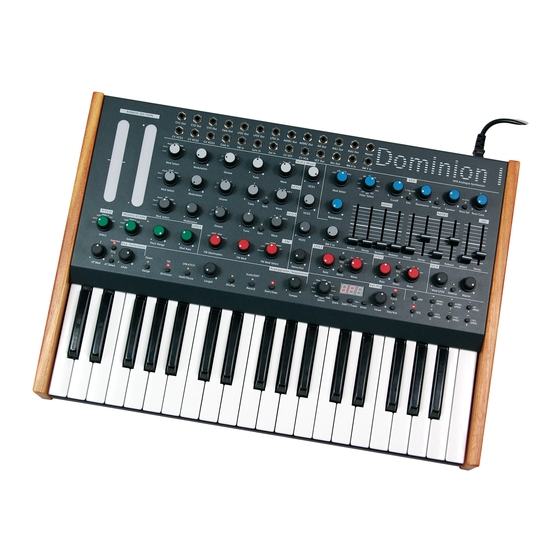
General Dominion I is a monophonic analogue synthesizer. Among its most important characteristics are a threefold oscillator section that can be played paraphonically with up to three voices, a new designed multimode filter with twelve operational modes, 128 memory locations, step sequencer arpeggiator, versatile... -
Page 7: Oscillators
OSCILLATORS Dominion I utilizes three voltage controlled oscillators (VCO) with almost equal functions. Differences are to be found for the Tune controls and ring modulation. All described functions are valid likewise for VCO1, VCO2 and VCO3. Use the four-stage selector Wave to choose the waveform. -
Page 8: Vco - Modulation
tones, allowing detuning by a little more than a full additional octave. Use the four-stage selector Octave to adjust the octave range for each oscillator. Select between 32’, 16’, 8’, 4’, 2’ and 1’. VCO – Modulation Each individually modulated. Modulation control adjusts the respective modulation intensity whereas the modulation target depends on the setting of the Mod Select selector. -
Page 9: Vco - Synchronization
Note: When switching Mod Select, the new function will be activated after having moved the Modulation control. Note: Although this function has been labeled PW resp. PWM, meaning pulse width (modulation), the parameter modifies the symmetry of all VCO waveforms. Using the Modulation control, the curves change as follows when turned from left to right: Wave Triangle –... -
Page 10: Vco - Frequency Modulation (Fm)
VCO – Frequency Modulation (FM) Use the frequency modulation section to modulate VCO1 and VCO2 in pitch by VCO3. Depending on the settings and intervals, this leads to metallic and atonal sounds. Use the four-stage selector FM Source to set the modulation target: OFF –... -
Page 11: Mixer
MIXER Controls VCO1, VCO2 and VCO3 oscillators' output level, prior entering filter stage. With controls set to full level, the filter input will be slightly overdriven. Noise/Ext adjusts the level of the internal noise generator (white noise). With the input labeled Ext In being used, noise... -
Page 12: Filter
FILTER The filter section has been greatly expanded compared to the MFB Dominion X. It now offers twelve different filter modes based upon the SED circuit (Single Ended & Discrete). Use Filter Select to choose between the filter modes: LP1 – 24 dB low pass LP2 –... -
Page 13: Vcf - Modulation
Pressing Key will activate the key-follow-function where the cutoff frequency will follow the played notes' pitch: LED off – key-follow amount 0% LED lit slightly– key-follow set to 50% LED fully lit– key-follow amount 100% Press Inverse to apply negative envelope modulation. The LED is lit is in this mode (see note on page 14). -
Page 14: Envelopes
ENVELOPES Dominion I offers two ADSR envelopes and one AD envelope. ADSR1 is permanently connected to control the filter's cutoff frequency with its modulation intensity being controlled by the Contour knob. In addition, this envelope can also be used to modulate oscillators 1 and 2 by setting the VCO >... -
Page 15: Lfos
LFOs LFO1 LFO2 offer equal functions. The Rate control sets the speed within a range of approx. 0.1 Hz to 100 Hz. Note: Just as for the envelopes, the LFOs can be switched to a slower mode (see page 25). Here, the speed approx. -
Page 16: Modulation / Lfo3
Note: At 100% key follow, the LFO speed doubles with each octave. Hence, the maximum speed increases to approx. 1.2 kHz. MODULATION / LFO3 The third LFO in Dominion I utilizes a triangle waveform and works in dependence of the ribbon MODULATION control respectively MIDI controller CC#1 (of an external MIDI source). -
Page 17: Pitch
The Mod Rate control sets the LFO speed which is visualized by a rhythmic blinking LED. When set fully left, no LFO modulation is applied. However, the ribbon can still be used to manually control the targeted parameter. The LED is lit red in this case. Note: The settings for MODULATION / LFO3 are not being saved with the presets. -
Page 18: Key Functions - Aftertouch
Key Functions - Aftertouch The keyboard's channel- aftertouch function can be used to add punctual control different parameters. The bipolar AT Mod control sets the amount of modulation. When turned right from its center position, the modulation is positive. When turned left from center, the modulation is inverted. -
Page 19: Single-/Multi-Trigger
CUt – modulation of the filter's cutoff frequency C C C C U U U U A A A A – amount of Modulation for the parameter selected by the filter's Mod Select Exit this menu without any changes applied by pressing the AT Select button. -
Page 20: Velocity/Programming
VELOCITY/PROGRAMMING The Vel/Prg section fulfills several tasks. Here, system settings as well as the routing of the keyboard's velocity towards one or several parameters can be set. The procedure is as follows: Select a modulation target resp. a system function using the Select selector. Choose between possible sub functions by pressing Enter. - Page 21 VCA – affects the output volume (- - - - 63 63 to 63 VCF – affects the filter frequency (- - - - 63 63 to 63 The sub menu (Enter) allows for a filter calibration: Key Follow (middle LED dot) and Resonance (right LED dot) may be calibrated for increased tonality.
-
Page 22: System Settings
SYSTEM SETTINGS The selector switch's positions Voice to Midi are dedicated to Dominion I's system settings. Voice – toggles between a monophonic (1 1 1 1 ) and a paraphonic mode with three voices (3 3 3 3 ) For paraphonic mode, the sub menu (middle LED dot) selects whether the filter's key follow function uses the lowest note (LO LO) or highest note (HI... - Page 23 Curve – settings for the velocity curve and pitch ribbon Sub menu 1 (left LED dot) selects the velocity curve (0 0 0 0 to 3 3 3 3 ). Selecting 0 0 0 0 disables velocity. In this case, the modulation routings for the velocity (see page 20) are noneffective.
-
Page 24: Preset Selection
Selecting Presets Dominion I offers 128 memory locations being organized in 16 banks of eight sounds each. To call up a preset, Patch mode needs to be active which is visualized by a corresponding LED. Use the Value control to select a preset bank 01n 01n to 16n 16n from the display. - Page 25 Function buttons 1 to 8 In combination with the SHIFT button, the preset selector switches 1 to 8 serve to activate different functions. Press and hold the SHIFT button to display which function is currently activated. Buttons 1 ARP and 5 SEQ If Dominion I's mode has been changed using the Seq/Arp button,...
-
Page 26: Arpeggiator
ARPEGGIATOR By pressing the Seq/Arp button, Dominion I changes into a mode where either the arpeggiator or the sequencer can be started. Use SHIFT + button 1 ARP to select the arpeggiator. Start/Stop - pressing this button enables the arpeggiator. Note and chords being played will now be arpeggiated. - Page 27 The same arpeggio directions are available for three additional modes. With the left LED dot lit (e.g. U.P U.P), every note is repeated twice. With the left and middle LED lit, every note is repeated three times (e.g. d.O. d.O.). With all LED d.O.
-
Page 28: Sequencer
SEQUENCER By pressing the Seq/Arp button, Dominion I changes into a mode where either the arpeggiator or the sequencer can be started. Use SHIFT + button 5 SEQ to select the sequencer. Playing Sequences Press Start/Stop to manually start the sequence. Use the Tempo control to adjust the speed in BPM (30 30 to 280 280). -
Page 29: Editing Sequences
Note: With Voice being set to three voices (see page 22), the sequencer may also record two or three notes per step. You may press a chord or alternatively hold the first note and add another one or two notes. Upon release of the first note, the step is being saved. -
Page 30: Patch Panel Connections
(CV) and gate signals. Suitable products to control Dominion I are MFB's step sequencer URZWERG PRO or the functional expansion MEGAZWERG. In addition, Dominion I is compatible to all common Eurorack compatible module synthesizer systems. - Page 31 Gate Out – this jack outputs a gate signal being generated Dominion keyboard arpeggiator/sequencer. It may be used to trigger an external envelope. FM In – an external signal applied to this input will replace VCO3 as the source of frequency modulation for oscillators 1 and 2 (see page 10).
- Page 32 RM X In / RM Y In – these two input jacks allow one or two external signals to be fed into the analogue ring modulator. A signal being fed to RM X In replaces the signal of VCO1, while a signal being fed to RM Y In replaces the signal of VCO2.
-
Page 33: Rear Panel Connections
REAR PANEL CONNECTIONS Power – attach the supplied power chord to this connector. Use the adjacent switch to switch Dominion I on and off. Midi IN / Midi OUT / Midi THRU – these three connectors allow integration of Dominion I into a MIDI setup. Sustain FSW –... -
Page 34: Midi Implementation
MIDI IMPLEMENTATION Model: MFB Dominion I, Version: 1.0, Date: 6/26/2014 Function Value/Remark Basic Channel T/R: 1-16, stored, TX = RX Mode* Default T/R: 4 Messages T/R: x Altered T: ***, R: x Note Number T/R: 36-127 * True Voice T: ***, R: 36-127 *... - Page 35 1. Important: Do not modify this unit! This product, when installed as indicated in this manual, meets FCC requirements. Modifications not expressly approved by MFB may void your authority, granted by the FCC, to use this product. 2. Important: When connecting this product to accessories and/or another products use shielded cables.
Need help?
Do you have a question about the DOMINION 1 and is the answer not in the manual?
Questions and answers