Table of Contents
Advertisement
Quick Links
Advertisement
Table of Contents

Related Manuals for leema-acoustics Pyxis


Summary of Contents for leema-acoustics Pyxis
- Page 1 HANDBOOK Leema Acoustics Pyxis Reference Standard Pre-amplifier...
-
Page 2: Table Of Contents
Pyxis Overview ........ - Page 3 PYXIS Front Panel Controls ...............15 Standby Button .
- Page 4 Leema Acoustics software. Leema Acoustics manufacturers importers or dealers shall not be liable for any incidental damages including personal injury or any other damages caused by improper use or operation of the hardware or software.
-
Page 5: Introduction
In a system with the Leema Antila CD player and Altair power amplifiers, Pyxis offers a totally balanced signal path from and including the digital domain all the way through to the power amplifiers. -
Page 6: Very Important
VERY IMPORTANT VERY IMPORTANT Before connecting your new Leema Pyxis to the rest of your system, please ensure that all other devices are powered OFF. All required sources, destinations and LIPS cables should also be connected BEFORE inserting the mains power lead and powering for the first time. -
Page 7: Design Philosophy
System Pyxis cannot be used in isolation. It must be used in a system which includes a source or sources and a power amplifier or amplifiers and loudspeakers. Significant control and compatibility advantages apply if the entire system is designed using Leema units. -
Page 8: Connecting Lips
The audio units, Antila, Pyxis, Corvus and so on, are connected in a daisy chain fashion using simple 3.5mm jack cables. When the Pyxis is powered on, the other units in the chain receive instructions as to which input has been selected, which units also need to switch themselves on and what the current volume setting is etc. -
Page 9: Bi-Amping And Lips
Hydras for the surround left/right pair, a Corvus and an additional Hydra for the centre channel. In a system such as this, the units must be plugged together in the correct order. The Pyxis must be plugged to the first, Left Hydra. -
Page 10: Analogue Connections
PYXIS Analogue Connections Analogue Connections Input connections Phono> The Phono pre-amplifier stage is optional. When this option is not fitted the sockets are replaced by a blanking plate. Both MM (Moving Magnet) and MC (Moving Coil) phono (RCA Cinch) sockets are provided. After determining the cartridge type these inputs should be connected directly to the analogue outputs (usually marked left/right and colour coded white/red) of the turntable. -
Page 11: Cd Mode
CD player. DO NOT connect any available digital outputs from the CD player to any the Pyxis analogue input terminals since damage to loudspeakers is likely to occur. The two BALANCED XLR-3 sockets are provided to cater for CD players with balanced outputs. These should be connected directly to the balanced analogue outputs of the CD player (usually marked left/right). -
Page 12: Tape In
When Pyxis is used in conjunction with these power amplifiers, although the user interface is the same, I.e. turning the gain knob on Pyxis varies the level, the signal sent from the pre-amplifier is always at optimum (full) level. In this case the actual gain control takes place in the power amplifier(s). -
Page 13: Preamp Outputs
Note : Record level is optimised by using Pyxis gain trim or by setting Agena cartridge gain for best results. Note : Do NOT send a surround stream to the Pyxis USB input. E.g. Dolby AC3 or DTS. This may result in high level digital noise being output. -
Page 14: S/Pdif
By default there is no equivalent mute on the USB record and replay connec- tion. If you wish the USB to behave in the same way as the analogue tape loop your Leema Acoustics dealer can carry out a modification. -
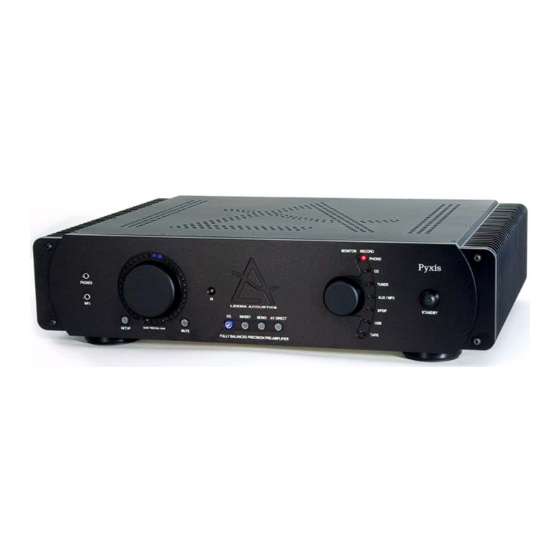
Page 15: Front Panel Controls
Power button on the remote control will power the unit on. The blue LED ring around the Volume control will flash for a few seconds while the Pyxis initialises. If mains power has not been removed from the unit or the rear panel mains switch has not been turned off then the last input previously selected is re-selected and the volume setting is slowly raised to a low level. -
Page 16: Source Selection Switch
PYXIS Front Panel Controls Source Selection Switch Two source modes are available. when one of the blue LEDs in the left-hand arc is lit turning the input source selection switch cycles sequentially through the pre-amplifier’s LISTEN output sources. Pressing the knob changes mode and the current RECORD output selection is indicated by a red LED in the right-hand arc. -
Page 17: Volume Control
Setup The key to Pyxis simplicity is that settings are made and stored on an input associative basis. In other words all the settings made, BASS, TREBLE, BALANCE and GAIN are stored separately for each input and recalled when the input is selected. -
Page 18: Centre Buttons
When lit EQ is active. Pressing the button toggles between EQ bypass and EQ active. INVERT When lit the absolute phase of the Pyxis output is inverted. I.e. both left and right channels are phase reversed. Pressing the button toggles INVERT on and off. -
Page 19: Remote Control
PYXIS Remote Control Remote Control... -
Page 20: Button Functions
PYXIS Remote Control Button Functions Stand-by Brings Pyxis into and out of Stand-by mode AV DIRECT Engages and disengages AV DIRECT mode < VOLUME DOWN > VOLUME UP SETUP First press enters setup mode with BASS selected. Subsequent presses cycle through TREBLE, BALANCE and GAIN then back to BASS. -
Page 21: Audio Specifications Under Construction
PYXIS Audio Specifications Under Audio Specifications Under construction...
Need help?
Do you have a question about the Pyxis and is the answer not in the manual?
Questions and answers