Table of Contents
Advertisement
TRX-200 Wide Band Receiver
TRX-200 W
TRX-200 W
ide Band Receiver
ide Band Receiver
ide Band Receiver
TRX-200 W
TRX-200 W
ide Band Receiver
Operation manual
Operation manual
Operation manual
Operation manual
Operation manual
I.D.A. Inc. Tokyo, Japan
I.D.A. Inc. Tokyo, Japan
I.D.A. Inc. Tokyo, Japan
I.D.A. Inc. Tokyo, Japan
I.D.A. Inc. Tokyo, Japan
1
I.D.A.
I.D.A.
I.D.A.
I.D.A.
I.D.A.
Advertisement
Table of Contents

Summary of Contents for IDA TRX-200
- Page 1 I.D.A. I.D.A. I.D.A. I.D.A. I.D.A. TRX-200 W TRX-200 W TRX-200 Wide Band Receiver ide Band Receiver ide Band Receiver ide Band Receiver TRX-200 W TRX-200 W ide Band Receiver Operation manual Operation manual Operation manual Operation manual Operation manual I.D.A. Inc. Tokyo, Japan I.D.A.
-
Page 2: Table Of Contents
I.D.A. I.D.A. I.D.A. INDEX TURN ON TRX-200 ..........4 FRONT PANEL ............6 SIDE VIEW OF TRX-200 ..........7 TOP PANEL ............8 BACK PANEL ............9 OPERATIONS ............10 ADJUSTMENT OF SQUELCH LEVEL ........11 MONITORING FUNCTION ..........11 CONFIGURATION ........... - Page 3 Please read this operating manual carefully to avoid miss operation of the receiver. The TRX-200 is carefully designed but like all receivers the radio can suffer from a degree of self-oscillation known as ‘birdies’. These are from the nature of super heterodyne circuit and do not represent a fault.
-
Page 4: Turn On Trx-200
9 to 14VDC, 300mA or by using the provided DC connect- ing lead. The DC input socket is 1.3mm centre positive. CAUTION: Do not attempt to connect the TRX-200 directly to the main CAUTION: Do not attempt to connect the TRX-200 directly to the main... - Page 5 Always remove dry batteries when they have run down. Do not leave batteries in the battery compartment when the TRX-200 is not being used for a long period of time, remove the batteries to avoid leakage.
-
Page 6: Front Panel
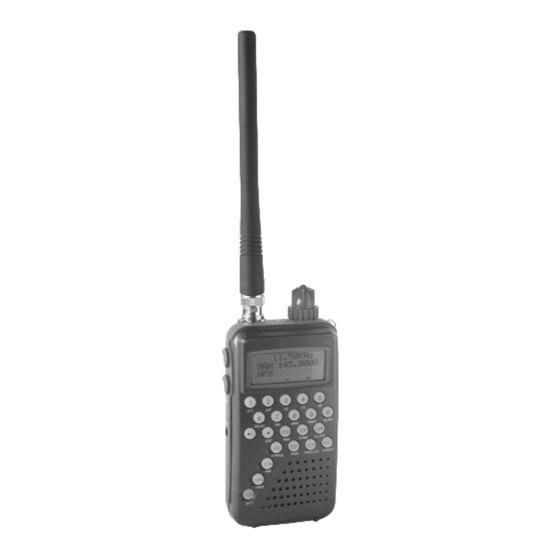
I.D.A. I.D.A. I.D.A. I.D.A. I.D.A. CONTROLS, CONNECTORS CONTROLS, CONNECTORS CONTROLS, CONNECTORS AND FUNCTIONS AND FUNCTIONS AND FUNCTIONS AND FUNCTIONS CONTROLS, CONNECTORS CONTROLS, CONNECTORS AND FUNCTIONS FRONT P FRONT P FRONT P FRONT P FRONT PANEL ANEL ANEL ANEL ANEL Strap hanger: Strap hanger: Strap hanger: Strap hanger:... -
Page 7: Side View Of Trx-200
Function [FUNC] key: Function [FUNC] key: various keys. When this key is pressed, TRX-200 goes into function mode and [F F F F F ] is displayed on LCD and you are ready to press a 2nd function key while this [F F F F F ] is displayed. -
Page 8: Top Panel
When the earphone socket is used, the internal speaker will automatically be muted. This can also be used as RS232C serial data port, making the TRX-200 capable of being connected to the RS232C serial port of a personal computer. -
Page 9: Back Panel
ANEL ANEL ANEL Reset Switch: Reset Switch: Reset Switch: Reset Switch: Reset Switch: To restore the TRX-200 to initial factory set status, press the switch using a needle or similar pointed object as illustrated Battery compartment: Battery compartment: Battery compartment:... -
Page 10: Operations
OPERA OPERATIONS TIONS TIONS TIONS TIONS TURNING ON THE TRX-200: TURNING ON THE TRX-200: TURNING ON THE TRX-200: Keep TURNING ON THE TRX-200: TURNING ON THE TRX-200: [PWR] [PWR] pressing the [PWR] [PWR] [PWR] key for more than 2 second. The LCD displays opening message when you turn the radio on. -
Page 11: Adjustment Of Squelch Level
TRX-200 and then press [SQL MONI] [SQL MONI] [SQL MONI] key just beneath the function key to put the TRX-200 in squelch adjustment mode and rotate the dial clockwise until back- ground noise just disappears (threshold point), this is the most sensitive setting of the control. - Page 12 I.D.A. I.D.A. I.D.A. I.D.A. I.D.A. In monitoring mode, the squelch level is virtually 0 0 0 0 0 and therefore the weak- est signal can be monitored. If there is no signal coming in, white noise can be heard. 2. Press [SQL MONI] [SQL MONI] [SQL MONI] [SQL MONI] key again to disable monitoring...
-
Page 13: Configuration
I.D.A. I.D.A. I.D.A. I.D.A. I.D.A. CONFIGURATION In configuration mode, various parameters can be selected by pressing [UP][DOWN] key or by rotating multifunction dial. An arrow mark on LCD indicates your current selection Your choices on currently selected parameter can be displayed by pressing [ENT] key. Select your preference by pressing [UP][DOWN] key or by rotating multifunction dial and press [ENT] key to confirm your selection. - Page 14 9600bps. To connect PC, Select +RECEIVE and display RECEIVE menu. Select +Version: To display firmware version. Select Version and press [ENT] key to display firmware version. You are only able to clone 2 TRX-200 when both radios are same firmware version.
- Page 15 TT] key: Keep pressing the key more than 1 second to turn on TRX-200. To turn off the radio, keep pressing the key more than 1 second. Last status is to be save and the radio is to resume it when the radio is turned on again.
-
Page 16: Search Function
I.D.A. Second function: Program frequency with name tag to scan memory channel 000 to 999. When the keys are pressed TRX-200 initially displays youngest bank and channel number combination which is not yet used. You can enter bank and channel number directly from numeric keys... - Page 17 I.D.A. I.D.A. I.D.A. I.D.A. I.D.A. [DOWN] [DOWN] [UP] [UP] [DOWN] [DOWN] key can be used to confirm the selection. [UP] [DOWN] [UP] [UP] key can be used to step back to prior letters. Press [ENT] [ENT] [ENT] [ENT] [ENT] key to confirm the input. 5.
-
Page 18: Specifications
I.D.A. [ENT/CONFIG] [ENT/CONFIG] 7. [ENT/CONFIG] [ENT/CONFIG] [ENT/CONFIG]: To confirm key entry. Second function: To setup initial parameters of TRX-200. See page 13 for the detailed explanation. [UP/.] [UP/.] 8. [UP/.] [UP/.] [UP/.]: To make selection over the displayed menu or to change scanning or searching direction to upward. - Page 19 [ENT] [ENT] [ENT] key to confirm the selection. When you select AUTO, TRX-200 auto- matically makes mode selection according to the current frequency range. Or select AM, NFM, WFM, USB, LSB or CW at your preference. Second function: To start Programmable Memory Scan. You can select certain programmed channels and group such to Programmable Memory Scan list where you can sort 20 programmed channel per bank.
- Page 20 [ENT] key and program appropriate step frequency from numeric keys and press [ENT] key to confirm the increment. Second function: TRX-200 has 10 banks for memory channels and 100 channels can be programmed per bank for total 1,000 memory channels.
- Page 21 I.D.A. I.D.A. I.D.A. I.D.A. I.D.A. Select one of these PG PG channel by rotating multifunction dial or pressing [UP][DOWN] [UP][DOWN] [ENT] [ENT] [UP][DOWN] [UP][DOWN] [UP][DOWN] keys press [ENT] [ENT] [ENT] key to display memory channels where you can select a channel to the selected PG PG channel.
- Page 22 [FUNC]+[2/LP]. LP is to be displayed on LCD. To turn off the filter, press same key combination again. [2/SS] [2/SS] 16. [2/SS] [2/SS] [2/SS]: TRX-200 has built in Scramble decoding System. To use the feature press [FUNC]+[2/SS] [FUNC]+[2/SS] [FUNC]+[2/SS] [FUNC]+[2/SS] [FUNC]+[2/SS] and SS on or off menu is to be displayed.
- Page 23 SINGLE SINGLE is to sweep channels or frequencies until radio detects active signal. Once TRX-200 detects active signal, the squelch is opened and the signal level is to be displayed at the center of band scope with a maker associated with 19 below and 19 above of, channels in scan mode or frequencies in search and manual mode.
- Page 24 INTERV V V V V AL AL is to sweep channels or frequencies until radio detects active signal. Once TRX-200 detects active signal, the squelch is opened and the signal level is to be displayed at the center of band scope with a maker associated with 19 below and 19 above of, channels in scan mode or frequencies in search and manual mode.
- Page 25 I.D.A. I.D.A. I.D.A. I.D.A. I.D.A. [FUNC] + [5/dB] [FUNC] + [5/dB] 18. [FUNC] + [5/dB] [FUNC] + [5/dB] [FUNC] + [5/dB]: The key sequence can toggle signal strength display between signal strength bar and dBuV reading of incoming signal strength. 19.
- Page 26 [FUNC]+[7/PRI] [FUNC]+[7/PRI] [FUNC]+[7/PRI] [FUNC]+[7/PRI]: One priority channel can be programmed. When the priority channel is turned on, TRX-200 keeps overriding to the priority channel in any receiving modes except ESY mode except ESY mode except ESY mode except ESY mode every certain except ESY mode duration period selected by priority timer.
- Page 27 I.D.A. I.D.A. I.D.A. I.D.A. I.D.A. [FUNC] + [7/PRI] [FUNC] + [7/PRI] To display priority menu, press [FUNC] + [7/PRI] [FUNC] + [7/PRI] [FUNC] + [7/PRI] . Program all parameters and at last toggle ON or OFF followed by [ENT] [ENT] [ENT] [ENT] [ENT]...
- Page 28 I.D.A. I.D.A. I.D.A. I.D.A. I.D.A. To select monitoring pattern when TRX-200 receives active signal at + PRI MODE + PRI MODE programmed priority frequency, select + PRI MODE + PRI MODE + PRI MODE by rotary dial and [ENT] [ENT]...
- Page 29 22. [FUNC] + [9/TIMER] [FUNC] + [9/TIMER] [FUNC] + [9/TIMER] [FUNC] + [9/TIMER] [FUNC] + [9/TIMER]: TRX-200 has 2 timer function such as ON timer and OFF timer. Menu structure is as follows. + ON Timer 12:00 + OFF Timer...
- Page 30 [ENT] [ENT] to exit the menu. [ENT] 23. [FUNC] [0/B LINK] [FUNC] [0/B LINK] [FUNC] [0/B LINK]: To link banks is very easy on TRX-200. Select [FUNC] [0/B LINK] [FUNC] [0/B LINK] [FUNC] [FUNC] Search or scan mode by pressing designated key and press [FUNC]...
Need help?
Do you have a question about the TRX-200 and is the answer not in the manual?
Questions and answers