
Summary of Contents for Universal U-15
- Page 1 U-10 / U-15 R-20 / R-25 E-40 / E-45 Manual en Español Latino Americano: ASSEMBLY MANUAL / OWNER’S MANUAL http://www.UniversalHomeFitness.com...
-
Page 2: Table Of Contents
Changing Unit Measures (English Imperial/Metric) Maintenance Troubleshooting Warranty To validate warranty support, keep the original proof of purchase and record the following information: Serial Number __________________________ Date of Purchase ____________________ To register your product warranty , go to: www.UniversalHomeFitness.com/register Or call 1 (800) 605–3369. If you have questions or problems with your product, please call 1 (800) NAUTILUS (628–8458) Or go to: www.UniversalHomeFitness.com Nautilus, Inc., (800) NAUTILUS / (800) 628-8458, www.NautilusInc.com - Customer Service: North America (800) 605-3369, csnls@nautilus.com | outside U.S. technics@nautilus.com | Printed in China | © 2015 Nautilus, Inc. | ® indicates trademarks registered in the United States. These marks may be registered in other nations or otherwise protected by common law. Universal, Bowflex, Schwinn, and Nautilus are trademarks owned by or licensed to Nautilus, Inc. -
Page 3: Important Safety Instructions
IMPORTANT SAFETY INSTRUCTIONS When using an electrical appliance, basic precautions should always be followed, including the following: This icon means a potentially hazardous situation which, if not avoided, could result in death or serious injury. Obey the following warnings: Read and understand all warnings on this machine. Carefully read and understand the Assembly instructions. - Page 4 Before using this equipment, obey the following warnings: Read and understand the complete Manual. Keep the Manual for future reference. Read and understand all warnings on this machine. If at any time the Warning labels become loose, unreadable or dislodged, contact Nautilus Customer Service for replacement labels. To reduce the risk of electrical shock or unsupervised usage of the equipment, always unplug the power cord from the wall outlet and the machine and wait 5 minutes before cleaning, maintaining or repairing the machine.
-
Page 5: Safety Warning Labels / Serial Number
SAFETY WARNING LABELS AND SERIAL NUMBER • • • • • • • • • • • • Serial number Product specification FCC Compliance Changes or modifications to this unit not expressly approved by the party responsible for compliance could void the user’s authority to operate the equipment. The power supply complies with part 15 of the FCC rules. Operation is subject to the following two conditions: (1) This device may not cause harmful interference, and (2) this device must accept any interference received, including interference that may cause undesired operation. Note: This power supply has been tested and found to comply with the limits for a Class B digital device, pursuant to Part 15 of the FCC Rules. -
Page 6: Specifications
SPECIFICATIONS Maximum User Weight: 275 lbs. (125 kg) Power Requirements: 4 D Batteries (LR20) – not included Operational Voltage: 6VDC Regulatory Approvals: O ptional AC Power Adapter: UL listed, CSA certified (or equivalent), Rated 120V 60Hz Input, 9VDC, 500mA Output. Class 2 or LPS. This product, its packaging, and components contain 50” (126cm) chemicals known to the State of California to cause cancer, birth defects, or reproductive harm. This Notice is provided in accordance with California’s Proposition 65. If you would like additional information, please refer to our website at www.nautilus.com/prop65. -
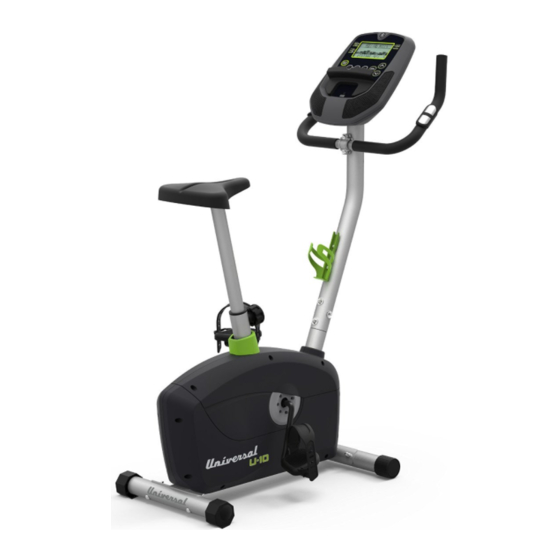
Page 7: Parts
PARTS 11 (R) 10 (L) Item Description Item Description Main Frame Console Front Stabilizer Handlebars Rear Stabilizer Left Pedal (L) Seat Post Right Pedal (R) Adjustment Knob (pre-installed) Water Bottle Holder Seat Media Tray Console Mast (with pre-installed Handlebar Bracket) Note: Media Cable is attached to the Console. -
Page 8: Hardware
HARDWARE / TOOLS Item Description Carriage Bolt M8 x 65 Arc Washer M8 Acorn Nut M8 Hex Screw M8 x 15 Note: Select pieces of Hardware have been provided as spares on the Hardware Card. Be aware that there may be remaining Hardware after the proper assembly of your machine. Tools Included Not Included... -
Page 9: Assembly
ASSEMBLY 1. Attach Stabilizers to Main Frame Note: Make sure the Universal decal on the Rear Stabilizer faces outward from the machine. 2. Install Pedals Note: The Left Pedal is reverse-threaded. Be sure to attach Pedals on the proper side of the Bike. Orienta- tion is based from a seated position on the bike. - Page 10 3. Attach Seat to Seat Post and Frame Note: H ardware is pre-installed on Seat and not on Hardware Card. NOTICE: The Adjustment Knob is pre-installed on the Main Frame. Make sure the Adjustment Knob engages the Seat Post. Do not set the Seat Post position higher than the stop mark (MAX) on the tube. 4. Install Console Mast on Main Assembly NOTICE: Align the clips on the cable connectors and make sure the connectors lock.
- Page 11 5. Install Handlebars on Console Mast Note: Hardware is pre-installed on Console Mast and not on Hardware Card. NOTICE: Make sure the Handlebar Bracket (7a) has an equal distance between the two ends of the bracket and the bracket mount on the Console Mast. Do not crimp the cables.
- Page 12 6. Attach Media Tray to Console and Install Console on Console Mast Note: Before you attach the Media Tray, remove the protective plastic film from the front of the console. Be sure the tabs on the Media Tray snap into the Console. Remove the pre-installed screws from the back of the Console before you connect the cables.
-
Page 13: Final Inspection
8. Install Batteries in Console Note: T he console uses D size batteries (LR20). Make sure that the batteries point in the direc- tion of the +/– indicators in the battery bay. If you use rechargeable batteries, the optional power adapter will not recharge the batteries. Do not mix old and new batteries. Do not mix alkaline, standard (carbon-zinc), or – rechargeable (Ni-Cd, Ni-MH, etc) batteries. Optional Power Adapter The console for your machine can operate on battery power or AC power. For AC power, it is necessary to order the optional Power Adapter. -
Page 14: Leveling The Bike
BEFORE YOU START Leveling Your Bike The levelers are the polygonal end caps on the Rear Stabilizer. Turn the end cap to adjust the level. Make sure the bike is level and stable before you exercise. Moving Your Bike To move the upright bike, carefully tilt the Handlebars toward you while pushing the front of the bike downward. Push the bike to the desired location. -
Page 15: Features
FEATURES FUN RIDES CHALLENGES ROLLING HILLS UPHILL FINISH RIDE IN THE PARK CROSS-TRAINING MOUNTAINS PIKES PEAK PYRAMIDS QUICK START ENTER FUN RIDES MOUNTAINS CHALLENGES START STOP Console Water Bottle Holder Handlebars, Upright Contact Heart Rate (CHR) Sensors Adjustable Seat Power Connector Adjustment Knob Battery Bay Fully Shrouded Flywheel... -
Page 16: Console Features
Console Features The Console provides important information about your workout and lets you control the resistance levels while you exercise. The Console has a grid display with touch control buttons to navigate you through the exercise programs. Keypad Functions QUICK START Begins a Quick Start workout START/STOP Starts a Program workout, pauses an active workout. And if pushed and held down for 3 seconds during FUN RIDES CHALLENGES... -
Page 17: Contact Heart Rate (Chr)
Speed / Distance The SPEED/DISTANCE display field shows the machine speed in kilometers per hour (km/h) or miles per hour (mph) for 6 seconds, then the Distance for 6 seconds. The Distance display shows the distance count (miles or km) in the workout. Note: To change the measurement units to English Imperial or metric, refer to the “Changing Unit Measures” sec- tion in this manual. RPM / KCAL (Calories) The RPM/KCAL display field shows the machine revolutions per minute (RPM) for 6 seconds, then the KCAL display shows the estimated calories that you have burned during the exercise for 6 seconds. Level / HR (Heart Rate) The LEVEL/HR display field shows the current resistance level (1–8) for 6 seconds, then your Heart Rate for 6 sec- onds. - Page 18 The Heart Rate table is an estimate of what Heart Rate Zone (HRZ) is effective to burn fat and better your cardiovascular system. Physical conditions vary, therefore, your individual HRZ could be several beats higher or lower than what is shown. The most efficient procedure to burn fat during exercise is to start at a slow pace and gradually increase your intensity until your heart rate reaches between 60 – 85% of your maximum heart rate. Continue at that pace, keeping your heart rate in that target zone for over 20 minutes. The longer you maintain your target heart rate, the more fat your...
-
Page 19: Operations
OPERATIONS What to Wear Wear rubber-soled athletic shoes. You will need the appropriate clothes for exercise that allow you to move freely. How Often Should You Exercise Consult a physician before you start an exercise program. Stop exercising if you feel pain or tightness in your chest, become short of breath, or feel faint. Contact your doctor before you use the machine again. Use the values calculated or measured by the machine’s computer for reference purposes only. •... -
Page 20: Profile Programs
Changing Resistance Levels Push the Increase() or Decrease() buttons to change the resistance level at any time in a workout program. Profile Programs These programs automate different resistances and workout levels. Fun Rides Rolling Hills Ride in the Park Mountains Pike’s Peak Pyramids Challenges... -
Page 21: Changing Unit Measures (English Imperial/Metric)
Changing Unit Measures (English Imperial/Metric) To change the measurement units (for distance and speed) to English Imperial or metric: 1. Push the Fun Rides button. 2. The display shows the Rolling Hills program. Push the ENTER button. 3. The display shows the time of the workout. Push the ENTER button. 4. The display shows the Level value. Push the ENTER button. 5. The display shows a workout summary for the Rolling Hills program. Push and hold the ENTER button, and then also push and hold the START / STOP button. -
Page 22: Maintenance
MAINTENANCE Read all maintenance instructions fully before you start any repair work. In some conditions, an assistant is necessary to do the necessary tasks. Equipment must be regularly examined for damage and repairs. The owner is responsible to make sure that regular maintenance is done. Worn, damaged or loose components must be repaired or replaced immediately. Only manu- WA R N I N G facturer supplied components can be used to maintain and repair the equipment. - Page 23 Console Handlebars Levelers Console Mast HR Cables Flywheel Pedals CHR Sensors Brake Assembly Crank Arms Seat RPM Sensor Battery Bay Seat Post Speed Sensor Magnet AC Power Adjustment Knob Servo Motor Connector Machine Type Shrouds Drive Belt Switch Data Cable Center Plates Drive Pulley...
-
Page 24: Replacing The Console Batteries
Replacing the Console Batteries If the Battery Indicator comes on, replace the batteries in the back of the console with fresh batteries. Make sure the batteries point in the +/– direction shown in the battery bay. Note: T he console uses D size batteries (LR20). If you use rechargeable batteries, the optional power adapter will not recharge the batteries. Do not mix old and new batteries. Do not mix alkaline, standard (carbon-zinc), or rechargeable (Ni-Cd, Ni-MH, etc) batteries. – Machine Type Switch The Machine Type switch (N) on the Console is preset at the factory to B (bike) or E (elliptical). -
Page 25: Troubleshooting
TROUBLESHOOTING Condition/Problem Things to Check Solution No display/partial display/ If bike has AC adapter, Make sure unit is plugged into a functioning wall outlet. unit will not turn on check electrical (wall) outlet If bike has AC adapter, Connection should be secure and undamaged. Replace check connection at unit adapter or connection at unit if either are damaged. - Page 26 Console shuts off (enters Check data cable integrity All wires in the cable should be intact. If any are cut or sleep mode) while in use crimped, replace cable. Check data cable Be sure cable is connected securely and oriented prop- connections/orientation erly.
-
Page 27: Warranty
WARRANTY Who Is Covered This warranty is valid only to the original purchaser and is not transferable or applicable to any other person(s). What Is Covered Nautilus, Inc. warrants that this product is free from defects in materials and workmanship, when used for the purpose intended, under normal conditions, and provided it receives proper care and maintenance as described in the Product’s Assembly and Owner’s manual. - Page 28 Nautilus Bowflex Schwinn Fitness Universal ® ® ® ® 8008533.070115.C...
Need help?
Do you have a question about the U-15 and is the answer not in the manual?
Questions and answers