
Related Manuals for Solmeta GMAX


Summary of Contents for Solmeta GMAX
- Page 1 INSTRUCTION MANUAL Version 1.0 Camera Geotagger For Nikon or Canon GPS plus Beidou Barometric altimeter Position Tracing Logger Shutter Release Remoter LCD display Bluetooth technology...
-
Page 3: Table Of Contents
Contents Introduction Highlights Features Packinglist Nomenclature Charging Turning the Receiver On Geotagging Image as you shoot GPS/BDS logger The main menu display Custom setting Access the custom setting How to do the custom setting? Other applications Specifications Warranty... -
Page 4: Introduction
Introduction Thank you for your purchase of a Solmeta GPS receiver GMAX. The GMAX Receiver can geotag your shots and record the routes of your travel. Easy to use! Be sure to read this manual thoroughly before use. -
Page 5: Highlights
GPS/BDS signal. Or Indoor location can be disabled In Auto working mode the GMAX is on or off following the connected camera’s on or off. Detachable connecting cable allows different cable to use with different Nikon camera models. -
Page 6: Features
You can set the shooting start time, shooting end time and the interval via the custom setting Wireless remoter While a Solmeta “ GMAX-Remoter ” APP installed in your mobile phone, the GMAX and your mobile phone can be used together as a wireless remoter (See page 34) -
Page 7: Packinglist
Packinglist Confirm that the package contains the following items Storage bag GMAX & cable for charging Manual downloading logging data D ata cables Connecting cables Cable-GD for Ten pin remote terminal Cable GE for Nikon D90 Cable GF for Accessory terminal Note There is only one data cable in the standard package. -
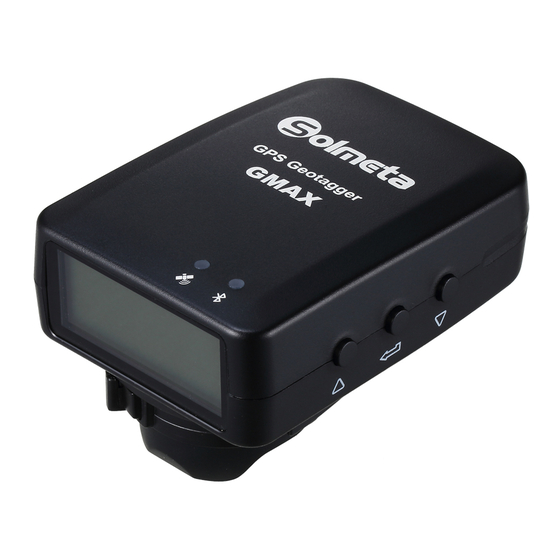
Page 8: Nomenclature
Nomenclature Down Key Enter Key Up Key Bluetooth/Log indicator GPS/BDS acquisition indicator Power/Home Key Data/USB Terminal Mounting foot locking lever Release button Contacts Mounting foot locking pin... -
Page 9: Charging
Charging The receiver is equipped a high-capacity lithium rechargeable battery, a full charge supports more than 18 hours of continuous work. The receiver can be charged by using any USB port that provides standard 5 volts. Note 3-4 hours for a full charge. The battery icon in the LCD shows the battery level. -
Page 10: Turning The Receiver On
Turning the Receiver On To turn on the receiver, press for more than 3 seconds until the LCD shows The firmware version will be displayed first, and then the latitude and longitude will be displayed in the LCD. Turning the receiver off 1 Short press the LCD shows a flashing 2 Short press... -
Page 11: Geotagging Image As You Shoot
5.Take photo and images is automatically geotagged. LATITUDE : 22 31.0786' LONGITUDE : 113 55.1056' ALTITUDE :79m :2015/10/06 TIME(UTC) :08:30:25 HEADING :260.10 The GPS/BDS data and heading viewed on the camera The GMAX is connected to the Ten-pin terminal camera... - Page 12 Geotagging Image as you shoot The GMAX is connected to the Accessory termainal camera Note Since each camera’s GPS application is different, the user must refer to the camera’s manual to know the detail of how to use the GPS unit.
- Page 13 Geotagging Image as you shoot Auto working mode You can choose Auto working mode in your photography day. When choosing Auto working mode, the receiver is on or off following the connected camera’s on or off. This ensures the receiver drains the power less and acquires the GPS signal quickly.
-
Page 14: Gps/Bds Logger
GPS/BDS logger The GMAX can be used as a data logger. When the GMAX is GPS/BDS signal fixed, location information can be automatically recorded on the receiver itself along the route traveled. (There is no need to connect the receiver to the camera. -
Page 15: The Main Menu Display
The main menu display When the receiver is GPS/BDS signal fixed, you can check the GPS/BDS information, compass data and other information in the LCD. Press , the following 6 different displays will be shown in the LCD, one by one. Description The char in the up indicate the latitude. -
Page 16: Custom Setting
Custom setting You can customize the following features to suit your preference. 1 Which positioning system to be used GPS Beidou or GPS+Beidou. The default is GPS+Beidou double positioning. 2 The display format of latitude and longitude 3 Enable the Indoor fixing” or disable it. Indoor fixing means when “... - Page 17 Custom setting 19.Check the available memory for logging. Set the logging interval, or turn off logging. The interval can be set as 1s, 5s, 10s, 15s, 30s, 1min 2min 5min 10min 20min or 30min. 10 seconds is the default. 20 Turn on the bluetooth or turn it off. 21 Timer release setting.
-
Page 18: Access The Custom Setting
Access the custom setting 1.When the receiver is on, press until the LCD shows 2. To access the custom setting, press and the first setting of choosing the positioning system will be activated simultaneously 3.To access other setting, press . To exit the custom setting and back to the main menu display, press Custom setting introduction Option Item... - Page 19 Access the custom setting The LCD backlight is on, off or delay off. ON means the backlight is always on. OFF means the backlight is always off. Delay means the backlight will be automatically off a few minutes later. When choosing on, 3 kind of different brightness can be selected, low light, middle light or high light.
- Page 20 Access the custom setting Level calibration The speed unit. Mile, Kilometer or Knots. The altitude unit, meter or feet. Which altitude data to be shown, the data from GPS/BDS or atmospheric pressure. The altitude data can be calibrated when choosing the atmospheric pressure data.
- Page 21 Access the custom setting GPS/BDS working frequency and the working time of each time in Auto mode. FRE is the frequency. 10min, 15min, 30min, 60min, or 90min can be selected. CON is the working time. 1min, 3min, or 5min can be selected. GPS/BDS working frequency and the working time of each time in Clock mode.
- Page 22 Access the custom setting Turn on the Bluetooth connection or turn it off. CH GMAX ** means the name of the device. The name can be set as 00, 01, 02, 03, 04, 05, 06, 07, 08, 09, 10, 11, 12, 13, 14, and 15.
-
Page 23: How To Do The Custom Setting
How to do the custom setting? When the receiver is custom setting accessed, press is to access next setting or change the option. Press is to activate current setting or complete the setting. Note To exit the current setting and return to the main menu display, press Set the positioning system 1.While the LCD shows... - Page 24 How to do the custom setting? Enable the “Indoor fixing” or disable it 1.While the LCD shows press and the option menu will flash. 2.Press to change the option 3.While your preferred option appears, press to confirm your selection. Set the LCD backlight on, off or delay off 1.While the LCD shows press and the option menu...
- Page 25 How to do the custom setting? 3.3 If you prefer OFF, press while a flashing displayed and the backlight will be always off. Set the indicators of the GPS signal acquisition, logging and the Bluetooth are on or off 1.While the LCD shows press and the option menu will flash.
- Page 26 How to do the custom setting? 2.Press to change the option 3.While your preferred option appears, press to confirm your selection. Doing the compass calibration Why calibrate? The compass in the receiver is sensitive to nearby magnetic objects that could cause measuring error. To compensate for this error, it is sometime necessary to perform a calibration.
- Page 27 How to do the custom setting? 2.Perform the follow operation Around X-axis Around Y-axis Around Z-axis Hold the receiver, and rotate it slowly around the X-axis, Y-axis, and Z-axis, each axis done twice. Please do try to keep a constant speed of rotation, and each rotation takes almost 10 seconds.
- Page 28 How to do the custom setting? To do the calibration, press while pointing the receiver to the magnetic north. ( You should find the magnetic north in your location with help of other accurate compass. ) 3.2 If you prefer press while the LCD shows a flashing and the LCD will show...
- Page 29 How to do the custom setting? 1.While the LCD shows press and the option menu will flash. 2.Press to change the option 3.While your preferred unit appears, press to confirm your selection and the secondary option will flash. The secondary option is to select which altitude to be shown.
- Page 30 How to do the custom setting? 4.2.2 If you prefer using the sea level pressure as the reference to do the calibration, while the LCD shows press the value on the bottom will flash. Press to adjust the value.While the value is adjusted to the sea-level pressure issued by the local observatory, press and the LCD will show press...
- Page 31 How to do the custom setting? displayed, and the secondary setting option on the bottom will flash The secondary setting is to set the local time. Press to add or reduce the time zone and the time will be changed accordingly. While the local time is adjusted to the current local time, press again to complete the setting and the LCD will show the local time.
- Page 32 How to do the custom setting? Set the air pressure unit 1.While the LCD shows press and the option menu will flash. 2.Press to change the option 3.1 If you prefer the unit as PSI, press while a blinking displayed and the flashing char will be stable. 3.2 If you prefer the unit as bar, press while a flashing displayed and the flashing char will be stable.
- Page 33 How to do the custom setting? Press again and the option will flash 2.Press to change the option, the option is the GPS working frequency.10min, 15min, 30min, 60min, or 90min can be selected. 3.While your preferred frequency appears, press and the LCD will show as 4.Press again and the option will flash...
- Page 34 How to do the custom setting? 5.Press again and the option will flash 6.Press to change the option, the option is the GPS working time of each time. 1min, 3min, or 5min can be selected. 7.While your preferred working time appears, press to confirm your selection.
- Page 35 How to do the custom setting? 3.1 To turn on the Bluetooth, press while the LCD shows and the LCD will show it is to set the device name. Press to choose your wanted name, the name can be set as 00, 01, 02, 03, 04, 05, 06, 07, 08, 09, 10, 11, 12, 13, 14, and 15.
-
Page 36: Other Applications
Other applications Timer release The receiver can be used as an external timer release device when it is connected to the camera. You can specify the shooting start time, shooting end time and the interval according to your wanted via the custom setting. - Page 37 Other applications Wireless remoter To use the GMAX as a camera wireless remoter, a “ GMAX-Remoter ” APP should be installed in your mobile phone in advance. The APP is a wireless remoter software. It can communicate with the GMAX receiver via the Bluetooth, and then to realize the focus and shutter release on the camera.
- Page 38 Other applications An accuracy clock The receiver can be used as an accuracy clock. The time can be adjusted by GPS/BDS. You can set the GPS working frequency in custom setting. See page 30 How to run the clock mode? 1.While the receiver is on, press and the LCD shows a flashing 2.Press...
-
Page 39: Specifications
Specifications Compatible cameras Nikon DSLR cameras *Cameras equipped Ten-pin remote terminal or Accessory terminal for GPS unit. * Cameras doesn’t support GPS unit < LOG> mode available Geotagging Images Latitude, longitude, elevation, direction, time (UTC) Internal memory 4 GB Reception frequency L1, 1575.42 MHz B1, 1561.098MHz Data format... -
Page 40: Warranty
Solmeta Technology Co., Limited guarantees its product from manufacturing defects and workmanship for a period of two-year from the date of original purchase. During the two-year warranty, Solmeta Technology will repair or replace the product free of charge. Please keep your original invoice as proof of purchase. - Page 41 A note on electronic devices: In extremely rare instances, a strong external static charge may cause the device to stop functioning. Turn the camera off and disconnect and reconnect the GMAX In the event of continued malfunction, contact your retailer or Solmeta-authorized service representative.
- Page 44 Shenzhen Solmeta Technology Company Add: Room 327, Building 5, Zhong Xing Industrial Town, Chuang Ye Road, Nan Shan district, Shenzhen,518054,China Tel: +86-755-26969187 Fax: +86-755-26969187 PRINTED IN CHINA E-Mail: service@solmeta.com Web: www.solmeta.com...
Need help?
Do you have a question about the GMAX and is the answer not in the manual?
Questions and answers